Showing posts with label crafts. Show all posts

Thursday, April 23, 2015

The Perfect Project Organizer

It makes such a difference when you have just the right storage situation for your needs. My craft room is a room that houses many ongoing projects. I couldn't quite figure out how to keep it need and tidy, but still have the projects readily accessible. I knew that if I put them away, out of sight, that they would get forgotten and perhaps end up on the back burner forever. I have one wall of my craft room that my bookshelf fit on, and I just kept cramming more and more projects onto it. I didn't like the messiness of it, though.


I knew Ikea would have a solution. They always seem to have so many organizing and storage options. I wandered around until I found the perfect shelf. It's made of metal, so it's strong, and the paint doesn't chip off, either. I also spent some time in the basket and box organizers for shelves, and found the perfect match for my shelves. They weren't really meant to go together, but the basket/boxes fit perfectly on the shelves.


Hard to believe that's a photo of the very same spot, housing much of the same stuff.

I added felt to the bottom of the baskets, to ease in gliding and to protect the surface of the shelves. The drawers in the center of the shelving unit house smaller projects. I have shallow baskets in the drawers to keep them all organized and in their places.


I have a tag on the baskets that hold projects, so I know where everything is without having to pull all the baskets out. Can I tell you how happy this shelf makes me? It's crazy that something that simple can matter so much, but somehow it does. It makes me smile, and it also keeps my head a little more clear. Which is a big plus.

Thursday, March 12, 2015

Primary Birthday Gifts

This year for the birthday gifts to the Primary children, we are giving a necklace to the girls, and a carabiner to the boys. 


It's pretty hard to come up with an idea that is inexpensive, but that the kids will enjoy and actually use. We have a fairly large Primary, so we had to keep the cost down.


That's where my husband comes in with his amazing metal laser machine. Our oldest son runs the metal shop part of our business, so he designed and produced the actual pendants that went on the necklaces. After his part, a jewel or pearl were added, and there you have it...


... a darling little necklace, that I'll be wearing, along with the kiddos.

As far as the boys' carabiners are concerned, I don't have a picture of that, but they were imprinted with the same words (the Primary theme for 2015), and packaged the same way. And what boy doesn't love a carabiner?

Saturday, February 14, 2015

Grow Old Along With Me - sign

I saw a recent episode of Fixer Upper (which, by the way, is my favorite show on HGTV these days). Joanna had this sign made for a client who had always loved this saying.

I, too, have always loved it, so when I saw it, and that it was made out of metal, I thought it might be the perfect thing for Bob to use his big machine for. I made mention of it, and thought maybe when he wasn't busy (in 30 years or so) he would have a minute to think about it. But the very next morning, he asked me dimensions, etc, and voila! This is what came home with him at the end of the day.


It's huge, which I love. It measures 24 x 24, and is probably a good 10 pounds. Robbie and Bob collaborated on it, which makes it even more special. We've found the perfect home for it right on the mantel in our bedroom. Love it, love it! It opens the door to many possibilities of what we can do with those big metal shop machines we acquired recently. I know, I know. They weren't purchased for my home decorator ideas (scooch on over, aviation world), but, oh the possibilities....

Friday, February 6, 2015

Two More Jelly Roll Quilts Delivered

I've delivered the first of our grand baby quilts for the year. It was so much fun to do the quilts for the twins. They're very similar, but have a few subtle differences. 


The backs are slightly different, along with one of the border fabrics.


Gotta love those jelly roll quilts. (To read more about how to make jelly roll quilts, click here) It was a good way for me to go so that all of my grandkids have the same basic quilt design, but very different with the use of different fabrics. And there are such cute jelly roll fabrics out there. I've got several rolls on my shelf just waiting to be made. The first ones to be finished though, will be the three for our other three new grandbabies. 

For those who are wondering what the count is to date, we have 5 here, with one due any day and another due in a couple of months. We are beyond thrilled to have so many new ones so close together (five in three months time!). Our family is growing so quickly. Bob and I spent most of January visiting or babysitting grand kids. And I've gotta say, we couldn't think of anything that would bring us any more pure joy. It has been like a slice of heaven around here.

Monday, December 22, 2014

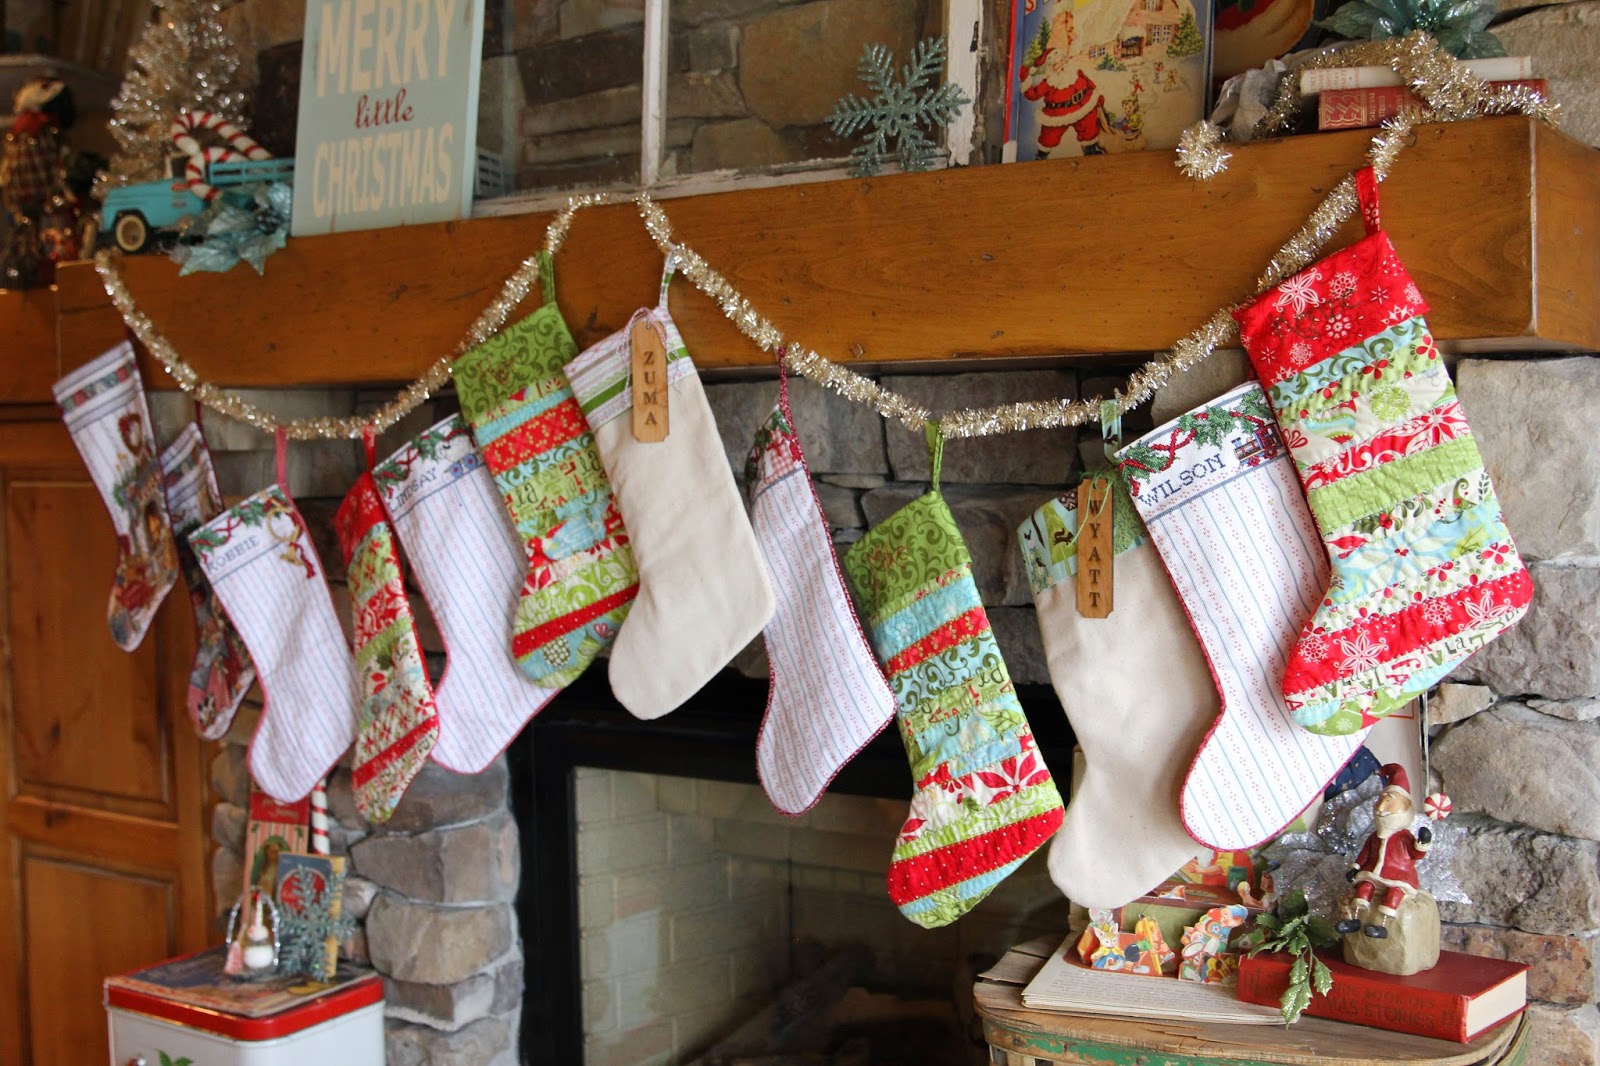
Grandchild Version of Our Christmas Stocking


Last year I posted the directions for making scrappy Christmas stockings. I made all of our in-law kids stockings like the ones below. And this year, I needed to come up with a simple grand kids version. Simple because I know that I'll need to make several in the coming years, and I wanted it to be a do-able thing. You'd hate to have any of them have to wait three years for their matching stocking! I know there are darling stockings that crop up every year, but I'm too nostalgic to oust the old for the new. I made our original two stockings just after we were married (30 years ago), and I'm sure they'll be hanging on the mantel for the next 30 years. And these grandkids' stockings will be fun, because they're basic enough that they'll never go out of style, and I can use fun, different fabrics for the cuffs.


For the instructions on how to make my scrappy patchwork stockings, click here. My grandkids' version is basically the same stocking, but skipping the patchwork part. 

To make these Christmas stockings, I followed a pattern from Moda Bakeshop. The pattern is "His and Her Scrappy Christmas Stockings" by Nicole Willmore. Click here to see the original free pattern.

So, to do the grand kids stockings, the directions are as follows:

I wanted the stockings to be the exact same shape as the others that I already have, so I used my others as a template to draw up my own pattern. Years ago, I made six stockings for my family. As my kids have married, I knew that I wasn't going to go back and cross-stitch stockings for their spouses, so I wanted to come up with something else, and these scrappy stockings fit the bill. I like the idea of having the stockings being a little mix-and-match, so the fact that they are different designs from the originals doesn't bother me a bit. In fact I sort of like it... it seems to represent the phases our family has gone through (first our little family of six, then the four marriages of our kids, and finally, the additions of grand babies to the family).

You may notice the sad shape that my cutting board is in. It has some battle scars from previous projects (which may or may not have involved kids with markers). I have a newer one, but I love this little one that fits in the corner of my counter so well. So, ignore the scars and the marks. 

The Moda pattern is great to follow along with. I'll just add a few of my own photos here and some of the changes or adjustments I made. The original pattern makes two stockings. My stockings each measure about 16" long and 9-1/2" wide at the foot of the stocking.

On the Moda ingredient list, you'll notice that it uses a jelly roll. You won't need a jelly roll for my more basic version of the stocking. You will need about 1/2 yard (depending on the size and shape of your stockings) of whatever fabric you'd like the stocking to be made out of. I want all of my grand kids stockings to match, as far as the stocking part. And then, they'll each have a different fabric for the cuff. I chose a nice mid-weight cotton muslin for my stockings.

You will also need a piece of warm and natural that you will cut to just one piece that is exactly the size and shape of your stockings.

Cut four stockings out of the muslin, and one stocking out of the warm and natural batting.


And with any patterned fabric that you choose, cut the following:

-7 x 13-1/2 (cuff)
-2-1/2 x 6 (hanging loop)

The larger of the two, the cuff piece, may change depending on the size of your stocking. I changed mine from the original pattern.

Stack three of the stocking shapes as follows: 
1-warm and natural piece
2-stocking front (one of the four stocking shapes already cut out), with the right side away from the warm and natural
3-stocking back (right side facing the right side of the stocking front)

Pin these three together and sew them together, right sides facing each other.


Sew the other two stocking pieces together (they'll end up being the lining). Be sure to leave about a 2" opening on the long, straight edge of the stocking for turning later. Trim and clip the curves so that the stocking will turn easily, being really careful not to clip the seams.


To make the loop, I used the 2-1/2" x 6" piece of fabric. I folded it in half length-wise, and pressed. Then I unfolded it and folded the outside edges into the middle, and pressed again. I sewed along the entire long edge, using about 1/8" seam allowance.


Then, I took the large cuff piece and folded it in half and sewed the 7" edge, right sides together.


I turned half of it so that I had a cuff folded in half... like the picture below.

this cuff is for a different stocking, but you get the idea...

I placed the raw edge along the raw edge of the stocking at the top.


Then, I pinned it with the seam in the back, or along the seam of the stocking. To add the loop, I folded the loop fabric in half, centered it over the side seam, and then pinned.

Then, I placed the quilted stocking inside of the lining stocking and pinned all along the top, being careful to pin the loop exactly where it should be.


I sewed carefully along the top, and then pulled the quilted stocking through the opening of the lining stocking.

Sew along the lining opening to close the hole.

Push the lining stocking down into the quilted stocking, and iron flat.


And my sweet husband engraved the name tags that I attached to the stockings. You could also embroider the names, or whatever suits your fancy. Again, I wanted to do something that wouldn't take me too long, or I knew it might not get done very quickly. And remember, next Christmas I'll have five more grand baby stockings to do.


Thursday, December 18, 2014

Projects Crowding Me Out of My Kitchen

Yesterday, I walked into the kitchen and was struck by the little projects I had going on just about every possible surface. Mind you, I have a craft room, but that is currently being inhabited by another throng of little projects. 

I've got vintage key ornaments on-going. We've made over a hundred, and there are still about 40 to go... 


I'm also working on Ollie blocks for my two grand babies. Soooooo cute! 


When they're all done, I'll post about them. 


I've also put together 30 little jars of chocolate almonds for visits my husband will be making in the neighborhood in the next day or two...


And another 15 little Christmas bowls with chocolate almonds. Also for visits he'll be making. (That adds up to lots of visits for him and the other men!)


A little less pretty to look at are the stacks of lesson binders I'm working on to get ready for the new year in Primary.


And of course, quilts to bind.


It's fun to work on these projects and also fun to see them go out the door! The two boxes of chocolate almond treats went out the door last night, and I have reclaimed many, many square feet of counter space. My goal is to keep that bit of real estate empty.

Only one week left til Christmas! Can you believe it?! It's been a wonderful December so far. So full of things that have helped to remind me of the true meaning of Christmas. I love the Christmas plays, programs, ward party, music, books, conversations, etc, that help to keep my thoughts and feelings centered on the birth of Jesus Christ. What a beautiful, simple event that made so much possible for each of us. How blessed we are!

Thursday, December 11, 2014

Christmas Tags From Vintage Cards

Boy, oh boy. Do you know that feeling when you find a treasure at an antique or thrift store, and you can't believe your luck? My sister and I scored some very vintage scrapbooks a few months back. We've seen empty ones before, but these were full to the brim of vintage cards -- for all seasons and holidays!

I bought two of them and set them aside, just waiting til I had some time to actually do something with them. And I found the perfect reason to pull them out last week. I needed some Christmas gift tags, but not just anything would do. I had made some decorated bottle brush trees, and I wanted a tag that would "fit" the style.

Enter Scrapbook #1:


Just look at these pages.


They're chalk-full of vintage Christmas cards. And since they aren't to or from anyone I know, I don't feel too bad re-purposing them for gift tags.


I imagine whoever took the time to put all the cards in the book, would get a kick out of knowing that 70 years later, they are being put to use yet again.


They could not be any cuter!


I had a hard time choosing which card I wanted to use, but I finally found one I thought would work. I cut the card away from the book, leaving only the glued-on back page of the card.


And this is what the card looked like.


I suppose you could just cut a shape out of the card, and use it without any other backing, but I wanted it to be a bit stouter, so I simply used a glue stick to glue a plain tag to the back of the card, being careful to hold it up to the light so that I could see through it and know I was gluing it right where I wanted it.


Then, I cut around the little tag, and punched a hole where the tag's hole was originally.


I got three tags out of one card! Can't beat that. And there are literally hundreds more waiting to be made, when the time comes. So next time you see vintage Christmas cards, or better yet... an old scrapbook, don't pass it by!

Thursday, December 4, 2014

Bottle-Brush Trees: Failure and Success


The Christmas season is in full-swing, and I love it! I think this may be our busiest one yet, but I'm bound and determined to love every single minute of it, and so far, so good! I put a lot of thought into how I wanted December to be. I knew we had things scheduled every single night for the first two weeks, and many of the others beyond that. I knew that we had not been able to get much done before December hit, so we'd be scurrying around, playing "catch up" almost the whole time. I knew that my husband would be exhausted from his many, many hours spent in his church calling at this time of the year. And I knew that the first of our five grand babies that are currently expected, would be making her appearance the week after Christmas. Lots to do, and truly not enough time to get it all done. I came up with a plan:

1. Plan ahead, and be organized.
2. Don't be afraid to say no.
3. Live in the moment. Enjoy it all!
4. Play Christmas music around the house all the live-long day.
5. Be aware of those around me. Serve even in the smallest of ways.
6. Spend a few minutes every day pondering The Living Christ: The Testimony of the Apostles of The Church of Jesus Christ of Latter-day Saints (Click on the title to read it. It's beautiful, poignant, and speaks to my heart) and read from good Christmas books.
7. Cross things off the "to-do" list that are just fluff, and don't need to be done.
8. When I'm busily running around, remind myself what that trip to Costco, or the grocery run, or the stop in at the mall has to do with Christmas. Most of those errands have everything to do with buying/making gifts or preparing food and our home for family gatherings, and thinking about that just helps me keep my head in the right place. It's all good.

At this time of year, especially, it takes real effort to stay focused on the true meaning of Christmas. So many things to do, events to be at, gifts to buy, things to make. But what a gift it is to know and feel that at the heart of all of our celebrating and hustle and bustle, is our love for family, friends, and Jesus Christ. It is truly the most wonderful time of the year!

Moving on to one of the crafts I had planned to make for Christmas. I found these donut cutters at a antique shop in Logan, Utah. 


I love the look of them, and as soon as I saw them, I knew they would make a perfect base for the bottle brush trees I had wanted to try. I had seen a few different pins about bleaching and dying bottle brush trees, so I thought I'd give it a whirl. Oh boy.


I soaked the trees in a bleach/water mixture, and when that didn't do anything, I went for straight bleach. I left the trees soaking for 48 hours, and all they did was change to a dingy color of green. I had thrown 2 smaller trees, that were made of a different material, and to my surprise, they actually bleached beautifully. BUT, when they were drying, and I gently fluffed the little piney spikes back out, they all fell out. Bleh. At that point, I threw the whole kit-and-caboodle out in the trash can, and went to WalMart and bought some while bottle brush trees with very little decor on them. They were cheap and already white. I knew I could work with those.


I got to work taking the bows off, and many of the little peg-shaped ornaments. They weren't glued in well, and most of them were cockeyed so that you could see the peg. Not the look I was going for.


Then, I took the bases of of each of the trees. Easy. Just unscrew and gently pull as you do so, and the bases come off. I then ran a bead of hot glue around the top inside of the donut cutter, and held the trees in place until they dried.


The decorating was so much fun. I don't have any pics of the process, because my hands were covered in white snow fluff and hot glue. I had bought a box of odds and ends from vintage glass garlands, so I used those pieces on the trees. I pretty much used up all that I had, but I would have kept on going if I had had more tiny ornaments to work with. As it was, I was making them for my mom and sisters for an event the next day, so I didn't have time to find more ornaments online.


Notice the "snow" all over the table. These trees did shed a bit of their snow, but it was easy to clean up, so it's all good. I tied a tiny card with a teeny tiny candy cane around each one with baker's twine, and Done! A fun and really quick project.

I had enough of the white trees for my sisters and mom, but I ran out of the white, and made a green tree for myself. 


Which is actually okay, because I have a lot of white/off-white bottle brush trees.


And there is my newest addition. Sitting as proud as a peacock in a donut cutter. Love it!