Since the Week-By-Week Food Storage Plan is based on four weeks each month, there are a few times a year where you'll get a break. This week happens to be the fifth Tuesday of the month, so that means that you will have a week off. This is a great time to back-track a bit and catch up on anything you still have on your list that you need to get (from previous weeks). Its also a nice time to straighten your food storage shelves and continue to make room for new items. Spend a few minutes getting things organized, and then call it "good" til next week!
If you would like the full info on the Week-By-Week Food Storage Plan, just click on the tab at the top of the page. It also has the information as to how you can get a copy of the weekly schedule as well as the complete inventory sheets.

Tuesday, July 30, 2013
Friday, July 26, 2013
BBQ Dinner Recipes and Kerplunk Game
We had us some real fun on Pioneer Day! We had a BBQ feast, which included such things as grilled teriyaki chicken, grilled pineapple skewers, grilled zucchini, grilled corn on the cob (lots of grilled things for Bob to keep track of), fruit salad, crab pasta salad, and I believe that's about all we could hold on our plates. I think in all, I tried four new Pinterest recipes, and all four were keepers. Yay! So, I'll share my version of those here. I have no photos of any of the food because it was scarfed to fast. We sat down and literally devoured it all. Which is a good thing. I hate to have a fridge full of leftovers!
First...
5-Star Grilled Teriyaki Chicken (from Six Sisters' Stuff)
1 lb. skinless, boneless chicken breasts
1 cup teriyaki sauce
1/4 c. lemon juice
sprinkle of garlic powder
2 t. sesame oil
Place chicken in bowl, mix the teriyaki sauce, lemon juice, garlic powder and sesame oil in a separate bowl, and then pour over chicken. Make sure all the chicken is coated, cover bowl, and refrigerate for 8-12 hours. Be sure to toss the chicken every couple of hours so that the chicken continues to be coated.
Turn grill to high heat. Place chicken on grill, and discard marinating sauce. Grill chicken for 6-8 minutes on each side, or until juices run clear when chicken is pierced with a fork.
Fruit Salad (from Lilluna.com)
1 medium seedless watermelon, cubed
2 pints of strawberries, sliced
3 c. grapes
1/3 c. dry vanilla pudding mix
Put all of the fruit together in a bowl. Sprinkle pudding mix over the top of everything, and gently stir to coat all pieces. Refrigerate for at least an hour.
The pudding mix works with the juices to make a nice little glaze, and it helps to sweeten the strawberries.
Grilled Corn on the Cob
corn cobs
olive oil
1 cup feta cheese
1/4 c. fresh chopped cilantro
sea salt, to taste
pepper, to taste
Huck and clean corn. Brush olive oil lightly onto the cobs. Mix 1 cup feta cheese, fresh chopped cilantro, sea salt and pepper together and spread on a plate. Place corn on a medium high grill, and grill til the corn seems tender and cooked. When done, roll the cobs in the feta and cilantro mix on the plate, and serve. It was also good to cut the grilled corn off the cobs, then take a scoopful of the feta mixture and mix in with the corn. Yum.
Grilled Caramelized Pineapple (from Six Sisters' Stuff)
fresh pineapple chunks (cut from one pineapple)
1/4 c. brown sugar
1/4 c. butter, melted
1/2 t. cinnamon
1/2 t. vanilla extract
1 T. honey
wooden or metal skewers
Place four pineapple chunks onto each skewer. Mix together brown sugar, butter, cinnamon, vanilla, and honey. Place skewered pineapple on a large pan. Using a brush, glaze each piece of pineapple with the brown sugar mixture.
Place skewers on a medium-high grill. Cook for 5-10 minutes on each side, or just until the sugar-glaze starts to caramelize. Serve warm.
Crab Pasta Salad (from Sugar n' Spicegals)
12 oz. medium shell pasta, cooked
1 pound crab, imitation (shredded with a fork)
1 c. chopped celery
8 eggs (hard-boiled and diced)
1 c. mayonnaise
1 c. sour cream
sprinkle of onion powder
2 t. sugar
salt and pepper to taste
Mix the mayo, sour cream, onion powder, sugar, salt and pepper together till creamy. Set aside. In a large bowl, gently stir the pasta, crab, celery and eggs. Add the mayo and sour cream mixture. Taste to see if it has enough salt and pepper. Refrigerate until you serve.
Giant Kerplunk Game
After we ate, we all retired to play our new giant Kerplunk game that Bob and I built. There are some great instructions on thisoldhouse.com. If you are making one, you'll want to use that as a reference for sure. We changed it up a bit and did things our own way, but it turned out pretty much the same.
.JPG)
Of course we had to test it out before everyone came over, with a first-ever game. It was actually really fun!
We started with our circles (which Bob cut with his laser machine, but the original instructions show you how to do it with a jigsaw). I glued and clamped the wood circles together.
.JPG)
And then it was time to paint them. A couple days after this photo, I got around to spray-painting the legs blue, too. The blue is the bottom ring, and the red is the top.
.JPG)
We bought the coated chicken wire from Home Depot. I wish we could have bought our small chunk that we needed, but we had to buy a whole roll. So, if you are making one of these, come on by for a chunk of chicken wire.

And here are some of my darlings playing the game. We all got into the action, and had a few great rounds.

We got the dowels from Home Depot, also, and just cut them exactly in half. We have gobs of dowels, but it makes it kind of fun to have so many. I got the balls years ago from Target, but picked up some more from Home Depot, so we have tons more than what shows in the photo here.

We're going to take this up to our family reunion, and have some fun with it there, and then I'm sure we'll be using it for Activity Days, Young Women, Scouts, and more family things! This was a great, cheap project!
Once again, Thanks Love, for helping me with yet another project. Now, on to the next one....
Wednesday, July 24, 2013
Oh Pioneers!
Around these parts, we celebrate the faith and diligence of the early Latter-day Saints who crossed the plains and entered the Great Salt Lake Valley on July 24, 1847. My husband closes down the shop and we get to enjoy the day together and relax. A couple of years ago, we were asked to head up making a parade float for the Pioneer Day Parade in Salt Lake City. What a huge undertaking! It made for a not-so-restful holiday that year, that's for sure! This year we plan on tinkering around the house, getting a few little projects done, and then having our family over this evening for a barbecue and games and fireworks (if the weather permits!).

Here's a little more background (from LDS.org) into the migration of the Mormon settlers...
Pioneer Trek
-The 19th-century Mormon migration beginning in 1846 in Illinois, then through Iowa and Nebraska and eventually to a place of refuge in the Rocky Mountains, was one of the most remarkable episodes in the history of the United States' great western migration. Unlike the thousands of pioneers streaming west to California and Oregon looking for a better life, the Mormon pioneers migrated involuntary -- the result of expulsion from Illinois and Missouri by hostile neighbors. Later, the Mormon pioneer trail would be filled with converts coming from Europe.
-With the assassination of Joseph Smith in 1844 and increasing pressure on the Mormons to abandon their city of Nauvoo on the banks of the Mississippi, it soon became obvious to Church leaders that they would need to move yet again. At first they established a refuge in what was called Winter Quarters, near present-day Omaha, Nebraska. Then in 1847, under the leadership of Brigham Young, the first wagon train headed west for the Rocky Mountains, its precise destination unknown.
-As the first group of Mormon pioneers reached the Salt Lake Valley in the summer of 1847, Brigham Young looked out over what was then a barren, dry desert and declared, "This is the right place."
-In 1849, President Young established the Perpetual Emigration Fund to assist poor Latter-day Saint immigrants. The fund helped some 30,000 immigrants from the British Isles, Scandinavia, Switzerland, Germany and the Netherlands reach America -- more than one-third of the total Latter-day Saint immigrants from Europe during that period.
-To cut down on expensive wagons and oxen, some 3,000 of the pioneers subsequently used low-cost wooden handcarts that were light enough to be pulled across the Great Plains. One family or five individuals were assigned to a handcart, with 18 to 20 people sharing a tent. A cart hauled no more than 200 pounds -- about 17 pounds of baggage per person. Each highly organized company was led by an experienced guide and was accompanied by at least four oxen-drawn supply wagons.
-The first party of handcarts set out from Iowa City, Iowa, on 9 June 1856 with a company of 266 people from England, followed two days later by a second company of just over 200. These early handcart brigades successfully arrived in the Salt Lake Valley, but the trips were not easy. Pioneer journals record harsh weather, the threat of hostile Indians, the death of fellow travelers and the ongoing hardships of hunger and fatigue.
-Tragedy struck in the fall of 1856 after the Willie and Martin handcart companies left late in the season with 1,000 people between them. Both companies were plagued by a lack of supplies and hardships, including an early snowstorm that turned into one of the worst storms of the century. The exhausted companies set up camp in deep snow on the Wyoming plains, where more than 200 people died from starvation and cold. A massive rescue effort was launched immediately when word of their plight reached Salt Lake City. In all, whether they came by wagon or handcart, thousands of Mormon pioneers died on the trail. Loved ones including children were often buried in shallow graves that would never be visited again.
-Under Brigham Young's direction, an estimated 70,000 Latter-day Saints made the difficult journey to Utah from 1847 until the transcontinental railroad was completed in 1869. The collective experience of the pioneers has cut deep into Mormon self-identity. Pioneer ancestors who made the trek are honored and often spoken of not only in family gatherings of descendants but also in meetings of Church members, who see the pioneers' example of courage and sacrifice as inspirational.
(Information taken from lds.org)
 |
| Bob and I, on the Pioneer Trek several years ago |
Tuesday, July 23, 2013
July Week 4: Canned Goods
This week's food storage items are:
July Week 4: Canned goods: chili, beans, etc.
This week sortof captures all of the canned goods that aren't already included on another week in the Week-By-Week Food Storage Plan. For my family's needs, it boils down to basically canned beans, like black beans, kidney beans, chili, refried beans, white beans and baked beans.
I keep all of my food storage canned goods in my basement food storage room on Shelf Reliance shelves.

Once a month or so, I go down to my basement and I "shop" for more canned goods and bring some up to my pantry in my kitchen. That leaves some empty spaces in my can racks, which I'll refill once every quarter or so... just to keep up on my canned goods.
My ingenious, sweetie-pie husband came up with a shopping list for each of the canned good items in our Shelf Reliance shelves.

It has them listed in the order that they are on the shelves, so I can quickly go down the shelves and mark how many cans I need of each item. Then I tuck that list into my purse, and when I'm at the grocery, I pull that out and pick up the needed items. For canned goods, I love shopping the case lots sales. I'll pick up a case of each of the canned goods that we really use. Then I keep the case down at the end of my Shelf Reliance shelves, and I can refill from my own case of canned goods.
If you don't quite have a "system" yet, just do a simple version of the above. Decide which canned goods you eat regularly and would benefit from keeping a good supply of them on hand. Figure out how many of each of the items you might need in a year's time, and subtract whatever you already have on hand. Then, use that number, and write it down on a grocery list of the items. If you have loads of canned goods you want to have in storage, break it down to acquiring one different type each week for several weeks. That way you won't "break the bank" by getting them all at once.
If you would like the full info on the Week-By-Week Food Storage Plan, just click on the tab at the top of the page. It also has the information as to how you can get a copy of the weekly schedule as well as the complete inventory sheets.
Saturday, July 20, 2013
Magnificent Bull Moose
We went to the cabin last Friday and Saturday, and on our end of the day ride, we bumped into this magnificent bull moose. He was gigantic, and unafraid of us. We turned the engine off and just sat and watched as he ate, rubbed his antlers on the trees, and ambled across the road in front of us.


At one point, he decided to run up the hill, and it looked like he was just barely jogging, but his strides were huge, and he was up and across the hill with almost no effort at all. One of my favorite things about going up to the cabin is the animal watching... and being with my family... and relaxing... and eating... and hiking... and laying around... and breathing deep, long, clean breaths... and going on rides... and being with Bob... (all in no particular order)
Thursday, July 18, 2013
Chalkboard Circle Garland
Okay, I love to find ideas in magazines that I can easily make for my own home. Garnet Hill had this in their recent catalog.

I immediately thought of my uber-talented husband, and showed him the photo. He asked about how large I would want the circles to be, and a few days later, I had a stack of chalkboard circles on the kitchen table. Voila!
He used his laser-cutting machine (it works miracles, I tell ya!), and cut the circles out, with two small circles at the top of each one. If you didn't have a laser machine, then you could also do this with a jig-saw and a drill. The chalkboard material can be found at Home Depot.

Of course, you season the chalkboard first, by rubbing the chalk all over it. Use a good quality chalk that won't scratch the surface of the chalkboard.
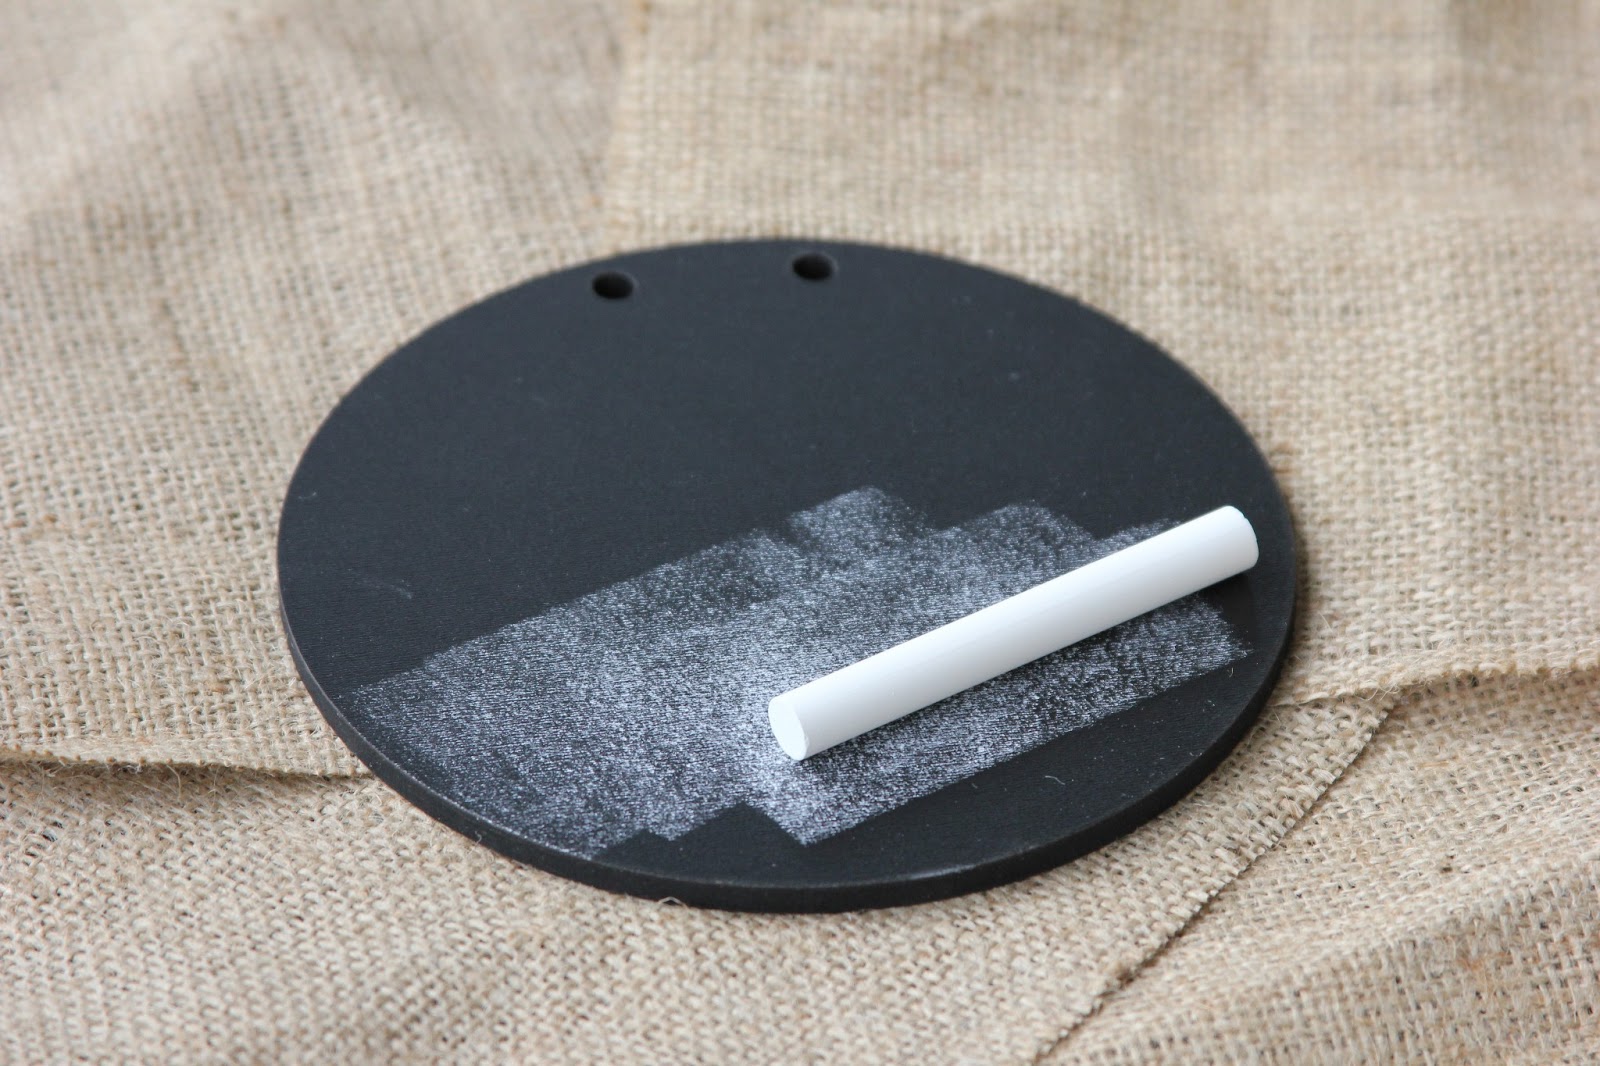
After rubbing the chalk over the surface, wipe it off with a soft, clean cloth or chalkboard eraser.

The last step is the easiest... string the circles onto ribbon or string of your choice.

And write something fun on them...

I can see this being darling for Christmas and other holidays. You could easily change out the ribbon, and write something festive on the circles. Oh, the possibilities! How cute to write the name someone who is having a birthday, so that they're celebrated all day or all week long! Or think of it in a baby's room with their name on it, or some darling word.... like "darling". Love it! My daughter is going to be carrying these in her Etsy shop, so they will be available soon!

Thanks, sweetie-pie. On to the next project!
Tuesday, July 16, 2013
July Week 3: Vinegar
This week's food storage item is:
July Week 3: Vinegar - white distilled, apple cider, rice, etc.

This is a pretty simple, straight-forward week. Decide how much vinegar you might use in the coming year. If you use rice vinegar or apple cider vinegar or any other vinegar in your cooking, then be sure to take those into account. Also, remember the uses for vinegar as a cleanser. The Reader's Digest has 150+ Household Uses for Vinegar. I've included just the first part of the list here....
Vinegar is very inexpensive, so it doesn't hurt to have an extra jug or two on the shelves. If there was a long-term emergency, this would be the perfect thing to have around as a cleanser and a "do-all". (Sortof like the Windex in "My Big Fat Greek Wedding") After you have decided how much you need, add the items to your shopping list, and in the next day or two, purchase them. Then, get them on your shelves, update your Inventory Sheets, and sit back and enjoy the rest of your week!
One important thing to do as we go through the weeks is to check the inventory you already have for expiration dates. There is nothing worse than needing to use your apple cider vinegar for a recipe, and realizing it expired months ago. Check your pantry for the vinegar items you use daily, and be sure they don't need replacing.
If you would like the full info on the Week-By-Week Food Storage Plan, just click on the tab at the top of the page. It also has the information as to how you can get a copy of the weekly schedule as well as the complete inventory sheets.
July Week 3: Vinegar - white distilled, apple cider, rice, etc.

This is a pretty simple, straight-forward week. Decide how much vinegar you might use in the coming year. If you use rice vinegar or apple cider vinegar or any other vinegar in your cooking, then be sure to take those into account. Also, remember the uses for vinegar as a cleanser. The Reader's Digest has 150+ Household Uses for Vinegar. I've included just the first part of the list here....
150+
Household Uses for Vinegar
With so
many different uses around the house, this super item deserves a reserved space
in your cabinet.
-Clear
dirt off PCs and peripherals
-Clean
your computer mouse
-Clean
your window blinds
-Unclog
and deodorize drains
-Get
rid of smoke odor
-Wipe
away mildew
-Clean
chrome and stainless steel
-Shine
your silver
-Polish
brass and copper items
-Unglue
stickers, decals, and price tags
-Burnish
your scissors
-Clean
your piano keys
-Deodorize
lunch boxes, footlockers, and car trunks
-Freshen
a musty closet
-Brighten
up brickwork
-Revitalize
wood paneling
-Restore
your rugs
-Remove
carpet stains
-Remove
candle wax
-Give
grease stains the slip
-Conceal
scratches in wood furniture
-Get
rid of water rings on furniture
-Wipe
off wax or polish buildup
-Revitalize
leather furniture
Read how to do each item on the list, and also get the rest of the list by clicking on: The Reader's Digest
Read how to do each item on the list, and also get the rest of the list by clicking on: The Reader's Digest
Vinegar is very inexpensive, so it doesn't hurt to have an extra jug or two on the shelves. If there was a long-term emergency, this would be the perfect thing to have around as a cleanser and a "do-all". (Sortof like the Windex in "My Big Fat Greek Wedding") After you have decided how much you need, add the items to your shopping list, and in the next day or two, purchase them. Then, get them on your shelves, update your Inventory Sheets, and sit back and enjoy the rest of your week!
One important thing to do as we go through the weeks is to check the inventory you already have for expiration dates. There is nothing worse than needing to use your apple cider vinegar for a recipe, and realizing it expired months ago. Check your pantry for the vinegar items you use daily, and be sure they don't need replacing.
If you would like the full info on the Week-By-Week Food Storage Plan, just click on the tab at the top of the page. It also has the information as to how you can get a copy of the weekly schedule as well as the complete inventory sheets.
Friday, July 12, 2013
Repainting the Kitchen Bench
Since I've slowly been getting rid of the reds in my home decor, I thought it high-time to paint the bench that goes with my kitchen dining table. At one time this red was just the thing for that room, but now it stands out like a big, red, sore thumb.

As always, I cleaned it all off, and then spray painted it with Kilz as a primer coat. When you do this, just be sure to cover everything. It doesn't have to look pretty, since it will be covered with whatever color you choose for the final color.

This is the bench with the first coat of the color I chose for the spray paint. It took three good coats, but took the paint really well. The paint should last a good, long time.

And here it is in its final resting place. It actually goes along the back of the table, but you wouldn't be able to see it way back there, so for photographing purposes, I set it in front.

Another really, really easy project. I can easily change the color whenever I get a whim to do so (and we know that will happen sooner or later).
Tuesday, July 9, 2013
July Week 2: Water: fill jugs or buy bottled water, water filter, solar shower, filter
This week's food storage item is:
July Week 2: Water: fill jugs or buy bottled water, water filter, solar shower, filter
Water is oh, so important to have in your storage!

We keep large water barrels that we'll be using for hygiene (bathing, cleaning, washing clothes and dishes).

Notice the pump that I keep right with the barrels. If we need to use the water from the barrels, we just screw that pump into the hole, and then we can pump the water out, as needed. If we didn't have that, we would have to figure out how to siphen it out with some sort of food-safe hose.
In smaller containers, we keep the drinking water.

At one point I thought it would be such a smart idea to just buy a gallon or two of water each week when I did my grocery shopping. I began to get a great supply of water on my shelves. Then, one by one, the jugs that the water was in (basically like a milk jug), started leaking on my shelves. At first I thought it was just a random jug that must have had a flaw. So, I cleaned up the water that had leaked out, and forgot about it for a couple of weeks. Soon I had leaks in several of them. Apparently those jugs aren't made to hold liquids for long periods of time. I ended up emptying the jugs into my flower beds, and then replaced them with good, solid, larger water containers. These will last longer than I'll be around, so I should be good!

We have a solar shower, which would come in handy in an emergency. We would just use water from our big blue barrels, then put it in the jug of the solar shower, and could have a little shower if needed (and I'm sure it would be needed!)

We also have a little filter. The water that I have stored for drinking water shouldn't need a filter, but if we need additional water, and have to use a source that may not be entirely clean, we would use our filter for that.
As far as amounts to store, the rule of thumb is to store one gallon per person per day, for at least three days. Even better is to have enough for 10 days, and the best scenario is to have enough for 30 days. So, for the three members of my family who are living in our home at this time, I would need a total of 90 gallons for a 30 day supply.
There is some good, pertinent information on lds.org about storing water. To read more on that, click here. It goes over containers, water pre-treatment, storage, and purification. Good information to have as you think about your water storage.
If you would like the full info on the Week-By-Week Food Storage Plan, just click on the tab at the top of the page. It also has the information as to how you can get a copy of the weekly schedule as well as the complete inventory sheets.
July Week 2: Water: fill jugs or buy bottled water, water filter, solar shower, filter
Water is oh, so important to have in your storage!


Notice the pump that I keep right with the barrels. If we need to use the water from the barrels, we just screw that pump into the hole, and then we can pump the water out, as needed. If we didn't have that, we would have to figure out how to siphen it out with some sort of food-safe hose.
In smaller containers, we keep the drinking water.

At one point I thought it would be such a smart idea to just buy a gallon or two of water each week when I did my grocery shopping. I began to get a great supply of water on my shelves. Then, one by one, the jugs that the water was in (basically like a milk jug), started leaking on my shelves. At first I thought it was just a random jug that must have had a flaw. So, I cleaned up the water that had leaked out, and forgot about it for a couple of weeks. Soon I had leaks in several of them. Apparently those jugs aren't made to hold liquids for long periods of time. I ended up emptying the jugs into my flower beds, and then replaced them with good, solid, larger water containers. These will last longer than I'll be around, so I should be good!

We have a solar shower, which would come in handy in an emergency. We would just use water from our big blue barrels, then put it in the jug of the solar shower, and could have a little shower if needed (and I'm sure it would be needed!)

We also have a little filter. The water that I have stored for drinking water shouldn't need a filter, but if we need additional water, and have to use a source that may not be entirely clean, we would use our filter for that.
As far as amounts to store, the rule of thumb is to store one gallon per person per day, for at least three days. Even better is to have enough for 10 days, and the best scenario is to have enough for 30 days. So, for the three members of my family who are living in our home at this time, I would need a total of 90 gallons for a 30 day supply.
There is some good, pertinent information on lds.org about storing water. To read more on that, click here. It goes over containers, water pre-treatment, storage, and purification. Good information to have as you think about your water storage.
If you would like the full info on the Week-By-Week Food Storage Plan, just click on the tab at the top of the page. It also has the information as to how you can get a copy of the weekly schedule as well as the complete inventory sheets.
Friday, July 5, 2013
Old Screens Define an Outdoor Space
I like to add unexpected elements to my outdoor design. I don't really go crazy, but there are a few things I love, and that seem to speak to me. Several years ago, I came upon these two old screens at an antique store. They were outside in a pile of old doors and windows, and were covered with dirt and dust. As soon as I saw them, I knew exactly where I wanted them.

They fit perfectly at the side of our covered patio. It "encloses" it without really closing it off. It makes it seem a bit like a room. We bring them in during the winter, to save them from the windy snow storms. For each window, we have two eye hooks screwed directly into the beam above. Then, on each window, we screwed in two smaller eye hooks and have small chains attached to those. So, every spring, we just have to slip the chains onto the eye hooks in the beams, and voila! So easy!

I even love how the backs of the screens are a bit rusted from the weather. It adds dimension to them, and makes them a bit less "see through" from the outside in.

Thursday, July 4, 2013

Tuesday, July 2, 2013
July Week 1: Jams and Jellies, or Supplies for Making Your Own
This week's items are:
July Week 1: Jams and Jellies, or Supplies for Making Your Own

This week should be a no-brainer. Either you make your own jams and jellies, or you don't. If you don't, then buy the jams and/or jellies that you will use in a year's time. Be sure to think about any that you use in recipes.
If you like to make your own (whether bottled or freezer jam), then buy the supplies you will need, and make your own. Or at least buy everything but the fruit, and when the fruit is in, then all you'll have to do is buy the fruit.
If you and your family don't ever eat jam, then you have a week off! I use these "off weeks" to straighten and organize my food storage room. There is always some organizing to be done in there!
If you would like the full info on the Week-By-Week Food Storage Plan, just click on the tab at the top of the page. It also has the information as to how you can get a copy of the weekly schedule as well as the complete inventory sheets.
Subscribe to:
Posts (Atom)