Showing posts with label tutorial. Show all posts

Thursday, October 30, 2014

Quick and Snuggly Baby Blanket

We make a lot of baby blankets around here. We love to visit the new mommies in the neighborhood and give them a little blanket for their newborn. It's a wonderful way to get to visit with people, and best of all... we get to see and hold the new wee ones!

I've gone through a few different versions of baby blankets, and I think I've found the one that we'll stick with. It's cozy, soft and simple. And it's warm, but still easy to fit into a diaper bag. Sometimes those big puffy quilts are just a little hard to pack around with you.


Basically, to make these baby blankets, you will start with a yard and a half of a cute printed cotton fabric. And also a yard and a half of a coordinating minky fabric. Wash and dry both pieces of fabric first. Very important to pre-shrink so that you don't have any of that happening afterwards. The two pieces of fabric will likely shrink at different rates, so that would make for a mess of a blanket if you didn't pre-shrink. After the fabric has been washed and dried, square up the cotton fabric so that the edges are all nice and straight and square. Lay the cotton fabric on a large flat surface, with the right side (print-side) facing down. Take your piece of minky, and lay it on top of the cotton fabric, right side up. Try to get one of the straight, factory edges of the minky lined up with at least one of the edges of the cotton fabric. Because of the usual width of the minky fabrics, you will have a good amount of excess. Smooth the wrinkles in the minky, so it's all nice and smooth. Then, cut the minky 1-1/2" smaller than the cotton fabric, on all sides.


After you've trimmed your minky to size, you will fold all of your cotton edges over the minky.


I fold it once, about 3/4 of the way to the minky, and then fold it once more, over the edge and onto the minky. And then pin. And I mean pin. Pin often, like every 2 inches. I know this sounds like overkill, but minky moves and slips a lot. If you don't pin often, you may have some slippage, and your blanket could be a bit skeewampus (if I can borrow that technical term from my dad).


When it comes to the corners, fold up the corner edge into a little triangle, and then fold up the rest of the edging, just as you've been doing, and continue on down the side of the quilt. Hard to explain, but look at the photo below for an idea of what I'm talking about. And don't forget to pin the corner down well.


And now for the sewing. Use a straight stitch and sew all the way around the fabric, fairly close to the edge of the pinned fabric. Take your time, and keep an eye on your presser foot so that your edge is about the same all the way around.


And voila! You are done. Easy as pie. In fact, I like to make several at a time, assembly-line fashion. It doesn't take that much longer to make more than one.


The possibilities are endless. I always find my pieces of cotton fabric first, and then find a minky to match. There are so many darling fabrics out there... makes it hard to choose!


I like to keep a stack of boys and girls quilts at the ready, so that whenever we have a minute to make a visit, I've got a blanket to take.

Thursday, December 12, 2013

"Merry Christmas" tree garland

Did you see the Christmas Pottery Barn catalog this year? They had some great holiday decor, as usual. One of the things that caught my eye was this "Merry Christmas" garland for the tree. 


My tree is (and always will be) full to the brim with ornaments from years past... from the earliest years of our marriage (when I made the ornaments because we didn't have extra money to spend on ornaments), to the "store bought" years (when I was busy with four kids within five years), to the present years (when I buy some, and make some, depending on the year). Every year, we've added a new ornament to the mix, including one for each of the kids. Somewhere on the ornament, I've written the year, so that we know which year the ornaments were added to the collection. And when the kids have gotten married, I give them their box of ornaments -- one for each year -- with their names and dates on them. And one day they may be able to use them on their trees. It makes decorating the tree very nostalgic and fun! 

I always do some sort of garland tucked around the ornaments, but I was getting ready for a change from the one I've been using for the past few years. The Pottery Barn garland was exactly what I was looking for!  I saw it in the magazine, took a day or two to think about it, and then by the time I went back to it, it was sold out. Soooo, I looked again and realized it would be pretty simple to make on my own.

I bought a package of chipboard from Joann Fabric. The chipboard I bought was plain and uncut, but I know you can buy chipboard letters that are already cut out, so that would be an option, too. In my case, I had Bob use his magic laser-cutting machine, and he cut my block letters out to be about 4-1/2" tall.


I punched out all of the letters.


I was worried about what to punch the holes with. I didn't know if the chipboard would be too thick to use a regular hole-puncher, but I was able to do it easily with my old hand hole-puncher. I punched holes in the top of each letter so I could string the baker's twine through it later on.


Now, for the glittering. I have glittered more than my share of items before (think back on the parade float). I know that glitter gets everywhere. When we did the parade float, we used Elmer's Glue, painted it on the item, and then doused the thing in glitter. And the finished product was glittery and beautiful. But, I had a lot of letters to be done, and I didn't want it to take all day.

So, I decided to use glitter spray instead. Krylon Glitter Blast, to be exact.


It is so much cleaner and easier to use than gluing glitter. I coated all the letters with just two coats, and they turned out perfect! And there wasn't much of a mess left, either. Soooooo much easier!


After the paint dried (pretty quickly, for a cold day out in the garage), I used some gray and white baker's twine and strung the letters onto the string. Because of the weight and texture of the chipboard, I didn't have to knot the string at each letter. They just sit nicely on the string wherever I position them.


I know this kind of a tree isn't for everyone. But I love how I can walk by and see an ornament made from a paint stick that my son made when he was six years old, or the little fabric ornaments from a pattern my mom's good friend gave me when she was going through her craft supply -- years and years ago. I also have beautiful ornaments that friends and family have given me through the years, and I love all of them hanging together -- the humble little hand-made ones from 29 years ago hanging proudly right next to lovely collectibles.


Yes, its a tree full of memories. Oh, and I'm sure to put the ones that won't get broken near the bottom. If you look closely at the photo below, on the little light blue present, you'll see a little red wooden block ornament that my little grand-baby was inspecting the other day. I left it right where he left it for future inspections. ;)

Thursday, December 5, 2013

Quilted Christmas Stockings


To make these Christmas stockings, I followed a pattern from Moda Bakeshop. The pattern is "His and Her Scrappy Christmas Stockings" by Nicole Willmore. Click here to see the original free pattern.

I used her pattern, and adjusted it a bit. I wanted the stockings to be the exact same shape as the others that I already have, so I used my others as a template to draw up my own pattern, and used that for my four scrappy stockings. Years ago, I made six stockings for my family. As my kids have married, I knew that I wasn't going to go back and cross-stitch stockings for their spouses, so I wanted to come up with something else, and these scrappy stockings fit the bill. I like the idea of having the stockings being a little mix-and-match, so the fact that they are different designs from the originals doesn't bother me a bit. In fact I sortof like it... it seems to represent the phases our family has gone through.


You may notice the sad shape that my cutting board is in. It has some battle scars from previous projects (which may or may not have involved kids with markers). I have a newer one, but I love this little one that fits in the corner of my counter so well. So, ignore the scars and the marks. 

The Moda pattern is great to follow along with. I'll just add a few of my own photos here and some of the changes or adjustments I made. The original pattern makes two stockings. My stockings each measure about 16" long and 9-1/2" wide at the foot of the stocking.

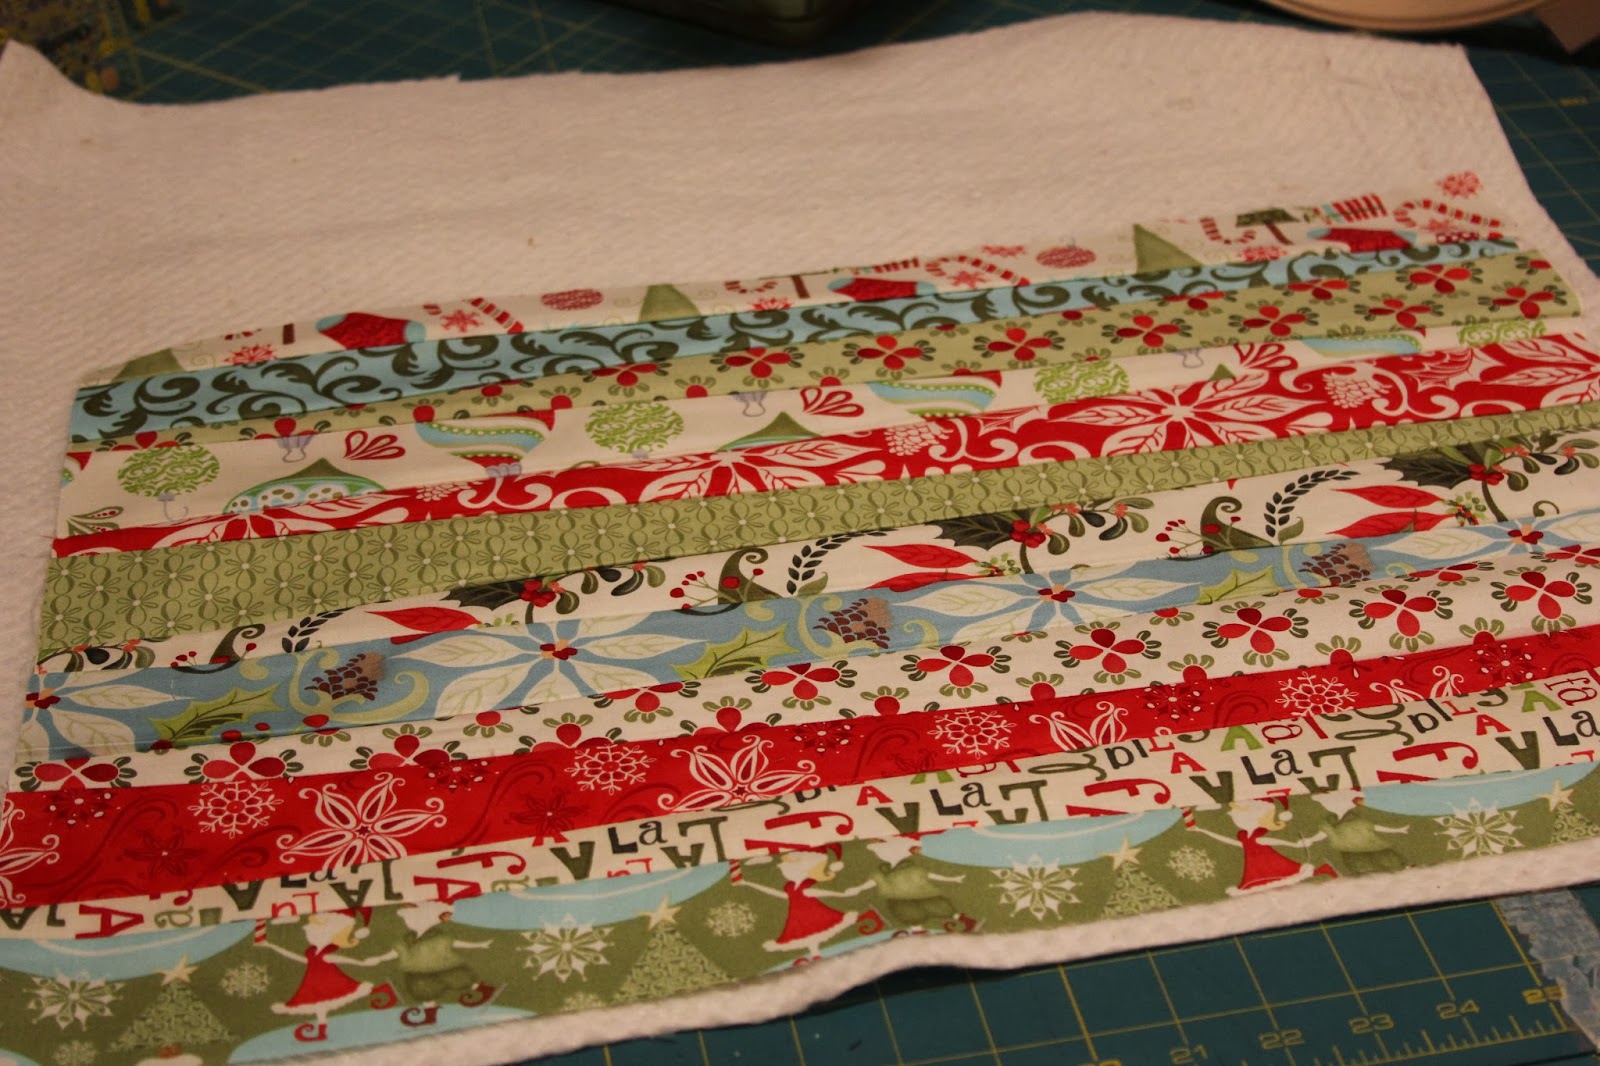
On the Moda ingredient list, you'll notice that it uses a jelly roll. I found a fun Christmas-y one at our local quilt shop, and you can find others online at the Fat Quarter Shop. My jelly roll had enough fabric to make four stockings, plus I have scads left over that I can make a cute Christmas throw with. I went through all my fabric strips and laid out 12 (not 10, like the Moda pattern says) of my favorites, in the order that I wanted them on the stockings.


Once I had them in the right order, I cut each of the 44" strips in half so that they each measured 22". You'll only use 1/2 of each strip, so you can put away the others halves for another project.


Then, I took each 22" strip and cut a long diagonal along the long edge. I kept one end at 2-1/2 inches, and wedged it down to 1" on the other end.


Then, I sewed each of the strips together -- a wide end next to a narrow end, etc. This is where it becomes really scrappy. Don't worry about ends fitting perfectly, or if it looks a bit skeewompus. It will look fine when you continue on.


I ironed all of the seams flat and laid it on my piece of Warm and Natural (see original Moda pattern ingredient list).


To attach it to the Warm and Natural batting, start with the bottom strip, and where there are seams, sew along them with any decorative stitch.


I then measured the quilted fabric and cut it in half, for the two stockings, making sure my stocking pattern would fit nicely on each side.


Now for the coordinating pieces of fabric (check the Moda pattern ingredient list). The layout is a little tricky to follow, but this is how I did it. First, I doubled over the end of the piece of fabric so that I could cut my two stocking lining pieces out.


After cutting out the lining pieces, I laid one more pattern out for the back of the stocking.


With the remainder of the fabric, I cut three more pieces: 7 x 13-1/2, 9 x 3-1/4, and 2-1/2 x 6. The larger of the three, the cuff piece, may change depending on the size of your stocking. I changed mine from the original pattern.


I took the medium-sized piece (9 x 3-1/4) and sewed that along the top of my quilted strips, right sides together. It won't match exactly with the rest of the strips, because of the scrappiness of the edges, but it will all work out in the end.


I ironed that top piece down and then laid out my stocking pattern, pinned it, and cut it out.


Then, I placed the stocking back on the stocking front (strippy piece), pinned them, and sewed them together, right sides facing each other.


I also sewed the stocking lining pieces together, right sides together, leaving about a 2" opening along the long straight edge of the stocking, for turning later. I trimmed and clipped the curves so that the stocking would turn easily, being really careful not to clip the seams.

To make the loop, I used the 2-1/2" x 6" piece of fabric. I folded it in half length-wise, and pressed. Then I unfolded it and folded the outside edges into the middle, and pressed again. I sewed along the entire long edge, using about 1/8" seam allowance.


Then, I took the large cuff piece and folded it in half and sewed the 7" edge, right sides together.


I turned half of it so that I had a cuff folded in half... like the picture below.


I placed the raw edge along the raw edge of the stocking at the top.


Then, I pinned it with the seam in the back, or along the seam of the stocking. To add the loop, I folded the loop fabric in half, centered it over the side seam, and then pinned.


Then, I placed the quilted stocking inside of the lining stocking and pinned all along the top, being careful to pin the loop exactly where it should be.


I sewed carefully along the top, and then pulled the quilted stocking through the opening of the lining stocking.


And end to end, this is what the stocking looks like. Sew along the lining opening to close the hole.


Push the lining stocking down into the quilted stocking, and iron flat.


And I embroidered the names on the cuff. The green ones below show my son-in-law's names embroidered on them, and the red ones had yet to be done in this photo.


And now, I need to come up with the grandchild version, which will be a little simpler (because I'm hoping for loads and loads of grandbabies, and I want to make sure I keep it easy enough to keep up with them! :)
Saturday, January 26, 2013

Baby Blanket Tutorial

Wow. What a week! I'm still floating around a bit... unable (and unwilling) to stop thinking about the birth of our grandson. He is a beautiful baby and he is blessed to have been born in such a sweet, loving little family. And we are so excited to be his grandparents!

I'm slowly but surely getting back to reality and recognizing that there are things to do around here. Contrary to what you may think, my "nesting" only covered so much... I've got oodles of things on my list to clean, to make, to do, to create. And I love it!

I have got to think about getting some Valentines decorations up. I'm pretty sure last year it came and went without me putting up a single Valentine item. I've got to get things in gear this year... we have a pretty major event happening in our home around Valentines Day. I'll get more into that in a later post.

You may be surprised to know that I have all four of my baby blankets finished to the point of binding, and one of them completely bound and finished. Now that is progress!

Since these are pretty quick baby blankets to work up, I thought I'd do a tutorial. I've made ten or so of them -- Bob and I give them to the ladies in the ward and neighborhood who have just had babies.

You will start with two pieces of coordinating fabric -- one in cotton and one in cotton flannel. In this photo, the little birds are the flannel piece. You can make your blanket any size you want, but I generally make mine about 1-1/4 yards by the natural width of the fabric (about 44").


I also don't use batting. This is a light type of a baby blanket that can be folded small and stowed easily in a diaper bag.

Next, square the top piece of your blanket (which is the regular cotton piece, NOT the flannel piece) so that all sides are square and the edges are straight.

The next step is where your fabric stash will come in handy...


Find two or three pieces of coordinating fabric (be sure it coordinates with both the front and back of your blanket pieces) that you can cut some small decorative circles from to add to the top piece of the blanket.

To make the fabric circles, make 3 circle templates out of card stock that are 6", 4-3/4" and 3-3/4". Trace the circles onto the wrong side of the coordinating fabrics, and cut out with pinking shears. Cut one large, two medium, and one small circle.


Next, pin each of the circles in place on the top piece of your blanket. I usually place the largest one in a corner (keeping it about 4" from the sides), and then place the others in close proximity, wherever it "looks right".


Sew the pieces in place, removing the pins as you go. Do a straight stitch about 3/8" from the edge of the circle.

Now lay the flannel piece down (right side down), and the top piece of the quilt on top of it (right side up).  Flatten it out nicely so that there are no creases in the fabric. (Iron the pieces if you need to.) Match the sides the best that you can, then pin along all four sides. Using the squared top as your template, trim away any excess fabric from the back piece. Both pieces should be the exact same size at this point.

Sew around the edge of the blanket about 1/2" in from the edge, removing pins as you go. These stitches will not show -- they are there to hold the blanket together as you are binding it.

These are my four blankets all at the point of needing to be bound.


The next step is cutting the binding strips. I cut my binding on the bias so that it doesn't fray and get all stringy when it is washed. The ruler shows the angle I should use when cutting -- a 45 degree angle. Cut the strips 2-1/2" wide, and cut enough to make about 200" of binding. When you cut the binding, use a rotary cutter with a pinking edge to give the binding a decorative edge.


You can use any coordinating fabric for your binding. I like the looks of mixing and matching binding, and having the strips being a variety of lengths.

After cutting the strips, cut off the ends so that they are a straight edge (instead of an angle edge) and sew together strips.


Press seams open along the strip of binding.


Next, fold binding in half, and press.


Start sewing binding around edge of quilt, starting down about four inches from the beginning edge of the binding so that you leave a "tail" of binding that isn't sewn to the quilt.


Sew about 3/8" from the edge of the binding.


When you come to the corner, sew down to the bottom edge of the quilt, and then stop.


Fold the binding over the next edge of the quilt so that the quilt edge is lined up with the center fold of the binding. Fold binding up and pin to keep in place. Continue sewing binding starting from the corner of the binding where the two corners meet.


When you come back around to the place where you started the binding, check your lengths and cut the end edge of the binding (not the tail that you left at the beginning) so that it is about an inch away from where you originally started attaching the binding. It will be overlapped by the "tail" that you left as you started sewing the binding. 


Finish sewing the binding down. Take the tail that you left at the beginning and fold the end under about an inch. Pin it in place and then sew down the binding down so that it is completely attached all the way around.

At this point, sew one more time around the whole blanket between the original line of stitching and the edge of the binding.

And this is the finished product. Scrappy and cute!


Now to finish the other three.... I'll get to them in a while. For now, I'm off to hold my grandbaby for the afternoon!