
Simple Christmas Stockings
click here for tutorial

Quick and Snuggly Baby Blankets
click here for tutorial

Jelly Roll Jam Baby Quilts
click here for tutorial

Joy Christmas sign
click here for tutorial

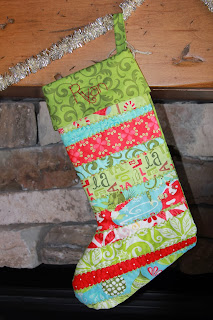
Quilted Christmas Stockings
Click here for tutorial

Dehydrated Apple-Pear Rings
click here for tutorial
click here for tutorial
Quick and Snuggly Baby Blankets
click here for tutorial
Jelly Roll Jam Baby Quilts
click here for tutorial
Joy Christmas sign
click here for tutorial

Quilted Christmas Stockings
Click here for tutorial


Dehydrated Apple-Pear Rings
click here for tutorial

-----------------------------
Taped Candy Treat Ball

It was really easy to make, and such a fun activity for the girls.
To make the candy/treat ball:
You will need small pieces of wrapped candy and clear plastic packing tape. For the candy, I found that it was better to have candy that was wrapped in plastic packaging as opposed to paper packaging, since the paper sometimes sticks to the tape and tears open during the game. You can use other small toys or favors in addition to candy. You can get creative and stick in all kinds of things that have to do with a theme of a party, for instance. The possibilities are limitless.
Start with one piece of candy and wrap a piece of tape around it, leaving a tail about 4" long. Stick another piece of candy under the tape and wrap the tape over it. This will be the center of what will become the candy ball. Cut another piece of tape about 18" long. Start by wrapping it around the "candy ball" you have started. Add a piece of candy, then tape down, and so on. Continue on using strips abut 18" long and taping down candies sporadically as you wrap the tape around the"ball". As you wind it around, and place candies, the ball will start becoming more round. Make the ball as large as you want. It does start to get a bit heavy as it grows.
The reason you use strips of tape instead of one long piece of tape, is that when the kids start unwrapping the ball, you don't want one person to be able to unwind the whole thing that easily. Having smaller pieces makes it harder to get the strips up and unwound within the allotted time.
To play the game:
Have everyone sit in a circle. You will need a pair of dice. One person starts by rolling the dice, while the person to his or her left attempts to find an end of tape and start unwrapping it to reveal the candy. If the person rolling the dice rolls doubles, the person who is unwrapping the ball has to stop and hand the ball to the next person (who is the dice-roller from the last round). The dice-roller hands the dice off to the person on their left, and the whole round starts again. Whatever candy the person is able to unwrap, they are able to keep. It ends up that everyone seems to get something as they unwrap the ball.
It really is a fun way to get everyone laughing and having fun together. And you can make the tape candy ball very inexpensively, too!
------------------------------------------
Boxwood Topiaries
Have you noticed the topiaries that have been in catalogues and magazines in recent months? I have always loved topiaries, but to buy them from some of the catalog stores can be extremely expensive. These two little photos show real ivy topiaries from Pottery Barn that are beautiful, but expensive (not to mention the fact that they have to be kept alive to continue looking good!). The prices range from $189 to $229.


On my last trip to Taipan, I came across topiary balls and candlesticks of various sizes, and decided this would be an easy and quick project. Each topiary ended up costing from $13 to $17. Not bad, comparatively. I have to stop right here and say that at Taipan, they had different examples of topiaries using these balls sitting around. They were just perched on the candlesticks, without being glued down. So, I bought several sets and packaged one up as part of a birthday gift for my sister. After I had already given my sister her gift, I got the others out of the shopping bag and started playing around with them, I realized that they weren't going to stay perched on the candlestick without some way of gluing or holding them down. So, if you're reading this, Sheri, I need that present back so I can secure it well. I hate to think of you having that somewhere in your home, and that blasted topiary ball always toppling off when you least expect it!
Now that I have that off my chest, let's get on with the instructions for making a nicely secured topiary. I started with a candlestick or decorative clay pot. This example will show a glazed candlestick.

I took the topiary ball and found one of the two ends and plucked away the leaves from about a three inch diameter area. I used scissors to snip away any little bits of plastic that protruded from the base.

I checked to make sure the spot I had cleared away would fit nicely on top of the candlestick, and then carefully applied hot glue liberally to the top of the candlestick. I quickly set the topiary with the cleared spot right onto the hot glue and held it firmly until it dried. And there you have it... a darling little topiary that fits nicely into just about any room or decor. I am using mine in my living room.

Baby Blanket Tutorial
You will start with two pieces of coordinating fabric -- one in cotton and one in cotton flannel. In this photo, the little birds are the flannel piece. You can make your blanket any size you want, but I generally make mine about 1-1/4 yards by the natural width of the fabric (about 44").
I also don't use batting. This is a light type of a baby blanket that can be folded small and stowed easily in a diaper bag.
Next, square the top piece of your blanket (which is the regular cotton piece, NOT the flannel piece) so that all sides are square and the edges are straight.
The next step is where your fabric stash will come in handy...
Find two or three pieces of coordinating fabric (be sure it coordinates with both the front and back of your blanket pieces) that you can cut some small decorative circles from to add to the top piece of the blanket.
To make the fabric circles, make 3 circle templates out of card stock that are 6", 4-3/4" and 3-3/4". Trace the circles onto the wrong side of the coordinating fabrics, and cut out with pinking shears. Cut one large, two medium, and one small circle.
Next, pin each of the circles in place on the top piece of your blanket. I usually place the largest one in a corner (keeping it about 4" from the sides), and then place the others in close proximity, wherever it "looks right".
Sew the pieces in place, removing the pins as you go. Do a straight stitch about 3/8" from the edge of the circle.
Now lay the flannel piece down (right side down), and the top piece of the quilt on top of it (right side up). Flatten it out nicely so that there are no creases in the fabric. (Iron the pieces if you need to.) Match the sides the best that you can, then pin along all four sides. Using the squared top as your template, trim away any excess fabric from the back piece. Both pieces should be the exact same size at this point.
Sew around the edge of the blanket about 1/2" in from the edge, removing pins as you go. These stitches will not show -- they are there to hold the blanket together as you are binding it.
These are my four blankets all at the point of needing to be bound.
The next step is cutting the binding strips. I cut my binding on the bias so that it doesn't fray and get all stringy when it is washed. The ruler shows the angle I should use when cutting -- a 45 degree angle. Cut the strips 2-1/2" wide, and cut enough to make about 200" of binding. When you cut the binding, use a rotary cutter with a pinking edge to give the binding a decorative edge.
You can use any coordinating fabric for your binding. I like the looks of mixing and matching binding, and having the strips being a variety of lengths.
After cutting the strips, cut off the ends so that they are a straight edge (instead of an angle edge) and sew together strips.
Press seams open along the strip of binding.
Next, fold binding in half, and press.
Start sewing binding around edge of quilt, starting down about four inches from the beginning edge of the binding so that you leave a "tail" of binding that isn't sewn to the quilt.
Sew about 3/8" from the edge of the binding.
When you come to the corner, sew down to the bottom edge of the quilt, and then stop.
Fold the binding over the next edge of the quilt so that the quilt edge is lined up with the center fold of the binding. Fold binding up and pin to keep in place. Continue sewing binding starting from the corner of the binding where the two corners meet.
When you come back around to the place where you started the binding, check your lengths and cut the end edge of the binding (not the tail that you left at the beginning) so that it is about an inch away from where you originally started attaching the binding. It will be overlapped by the "tail" that you left as you started sewing the binding.
Finish sewing the binding down. Take the tail that you left at the beginning and fold the end under about an inch. Pin it in place and then sew down the binding down so that it is completely attached all the way around.
At this point, sew one more time around the whole blanket between the original line of stitching and the edge of the binding.
And this is the finished product. Scrappy and cute!
Wood Christmas Signs:
As usual, I began with a 1x12 pine board, graciously cut to size by Bob. I like them about 18" long. I paint them with a really watered down brown craft paint that acts as a quick-drying stain.

After the brown dries, I cover it with whatever color I wanted the sign to be. These below are minty green and light blue. Hard to see in the photos, I know. I give them a few coats until the sign is solidly covered.

Then, I design a stencil using my Silhouette vinyl cutter. This time, I did two different designs. I made one of the designs based on a sign I actually purchased last year, and the other design is my version of a printable I saw online recently.
After designing the vinyl stencils, I cut them out on the machine, and applied them to the painted boards. I then pulled out the lettering, and painted over the openings in the colors I wanted the finished lettering to be in. It takes several coats, since you want to paint with a really dry brush (to avoid bleeding under the vinyl stencil).

The best part of the project is peeling off the vinyl. I can usually count on Bob to help me with that, as we watch something on TV together! :)
The color on this top one doesn't show that well, but its the same green as the bottom photo.


And the finishing touch is the back of the sign. Usually, with the layers of paint, the back gets kind of cruddy (a descriptive word borrowed from Bob). I like to cover that with layers of Christmas-y card stock. Sometimes I make copies of old Christmas book pages. I glue them all on, hodge-podge style, and then put a picture hanger on, and voila. Done.

Small hand-made Christmas wreaths:
We started with pine garland from Taipan.
I started by cutting each garland in half. Then, I took brown wire hangers, and straightened them. I tried wire, but the silver-ish color of wire just showed up too much when the wreath was done, so I turned to hangers. The brown color of the hangers blended right in with the garland.

After straightening the hangers, I took one of my half-garlands and wound it around the hanger. It was helpful to take a piece of very thin craft wire and tack down the garland here and there along the hanger wire so that it stayed where I wanted it to. I left a little hanger wire empty on each end.

I then made a simple loop out of each end and hooked them together at the top of the wreath.

To attach the wreaths to my stairway, I just used a small piece of Christmas ribbon and made a simple knot. E.A.S.Y.

Faux Chenille Baby Blanket:
I decided to try a different type of blanket to give out to the new babies in our ward. I had seen faux chenille blankets around for a couple of years, and then my daughter, Whitney, made one, so I thought it might be fun to try one myself. I started by getting 4 different pieces of fabric -- all 1-1/4 yards long.

I layered them with the bottom piece, right side facing down on the table. The next piece, I placed on top of the bottom piece with the right side facing up. The last two pieces were both placed on the pile with right sides facing up. So, to restate: the bottom piece is right side facing down, and then the other three pieces of fabric are right sides facing up. As confusing as that is, it ends up not really making too much of a difference how some of those fabrics are placed. I would say that the top and bottom pieces of fabric are the ones that need to be right sides facing out for sure. Now that I have probably thoroughly confused you, we'll move on...
After all of the layers were placed in the stack, I pinned them all together with several pins -- probably about every 5 inches all ways, so it is held together pretty well. I marked a line with disappearing ink going from one corner to the opposite diagonal corner in a straight line. I then stitched on that line. From that stitched line, I sewed the next line about 1/2 " away, and so on, and so on, until I had one half (diagonally) of the quilt done. Then, do the same thing for the other half.
You can see the lines of stitching in the photo below...

When I was done with all of the diagonal lines, I trimmed the edges down so that they were fairly square (I'm not a perfectionist on projects like this!) and even.

With the quilt stitched, it was time to cut through the fabric. The important thing to remember is that you are cutting through three layers only, leaving the bottom layer intact (or else you will have lots and lots of tiny strips of fabric instead of a quilt). Originally I had wanted my brown side to be the bottom of my quilt, but I decided the stitching showed up a little too well, and showed my imperfections more than I wanted, so I flipped it over, and made the blue side the bottom. The middle two fabrics were going to show about the same either way, so I knew that wouldn't be a factor.
To cut the quilt, use a chenille scissors. It is made for this very type of project, and makes it easier to cut through the layers. I cut lines between every stitched line, as shown in the photo above. Remember, cut through only three layers, leaving the bottom layer intact.
You'll notice it doesn't look much like chenille yet. That will all happen in the laundering process.
The next step is to sew the binding on. I like to cut strips at a 45 degree angle, so that they are cut on the bias. That way, they don't get stringy and fray too much in the wash. I also cut my binding with a rotary cutter that has an edge like pinking shears. After cutting the strips, sew them together and iron the finished, long strip so that it is folded down the middle for the entire length.
I wanted the binding to be scrappy, so I left the raw edge on it instead of turning it under.

After the binding was sewn on, I threw it in the wash to get it all soft and cozy and looking more "chenille-ish".
What a cute baby blanket! I love the way you put this together. Our Simply Create Link party is going on right now. I would love to have you link up, as I'm sure my followers would like to see what you created too. Hope to see you soon!
ReplyDeleteMelissa
redflycreations.com