Showing posts with label cleaning. Show all posts

Thursday, January 8, 2015

Grout cleaning, Christmas organizing, and 72-hour kits

First of all, a big reminder that we'll be working on the next task for our 72-hour kits next week. Click the 72-hour kit tab above, and get caught up, and on the 15th, we'll move on.

Second of all, last night I achieved something great. All of the Christmas decor is gone from our main floor, and that same main floor is vacuumed and dusted. Ahhhhhh. I mentioned how it makes me feel like I can breathe deeply, and indeed I now can. That isn't to say that the basement makes me feel like I can breathe deeply. All of the decor that was on the main floor is sitting in piles, waiting to be gone through, and then awaiting it's new place in my cleaned-out spacious holiday closet. Since my holiday closet isn't spaciously cleaned out yet, I can't put everything back in it, so it sits and waits. This has been the weirdest year as far as getting things back into place. I'm VERY motivated to get it done the right way: to purge the old decor that I don't use, and donate it (either to my kids or to the thrift store). My "grandmother nesting" is in full swing, which helps the cause. BUT, more important things seem to keep coming up. Things like holding our new baby granddaugther, playing "McDonalds" with her sweet two-year-old brother, visiting our twin grandbabies in NICU as often as we possible can (because they are changing before our very eyes), catching up with a friend who has been serving with her husband in Florida but is home for her father's funeral (how do you say, "Darn. Don't have time to talk. I've got old Christmas decor to purge.") Christmas decor can wait. As luck would have it, we don't have a function that we need our basement for until Easter. ;)

And thirdly, I have made a miraculous, astounding, spring-in-my-step discovery. It began before Christmas as I was readying guest rooms and bathrooms for our kids to come and stay. In the bathroom that used to be our girls' bathroom as they were growing up, I was going for the vintage look and wanted white tiles with white grout.  Really? What in the world was I thinking? What happened to my rule of always using the grout that was already the color of dirt so that it would never look dingy? I think I thought that in this one little space, I'd be able to maintain control. But sadly that wasn't the case.

Sorry for the yellow-ish photos. That bathroom has no natural light, so photos are rough. But, yellow-ish or not, the ugly groutlines still show up loud and clear.


Ick.


And recently I have tried every single grout bleaching and brightening technique known to the Pinterest world. And every single time, it ended up looking the very same. How can bleach be so selective as to ruin articles of clothing, but won't make a dent in tiny dirty grout lines. Go figure.

One day as I was wandering through Home Depot, I thought I'd check once again for some sort of product that I hadn't already tried. And voila. I happened upon the answer.


The Miracle Grout Pen. I figured it couldn't hurt. I bought two pens (so that I for sure wouldn't run out), and took them home and went to town.


Can I tell you how much I love this product? Even if I have to do it once a year, I will love it til the day I die. It transformed an embarrassing countertop into one where the grout is the last thing you notice. I love it, I tell ya.

I used about a pen and a half on a two-sink countertop and back splash. I love the results and I'll let you know if it starts fading with cleaning. So far, so good.

Thursday, March 27, 2014

Cleaning Up a L'il Mold

We have been working on the plans for our play room. I'm pretty sure we're having just as much fun planning it as the grand babies will have playing in it. Part of the plans include a play house in a second, small closet in the room. The closet was originally included as we were building the house, when we saw a huge section of unused space under the roof line next to the room. We finished off the room and added a short door to it, and used it as storage space for the boys' old toys, etc. I need to put a big emphasis on the ETC. in that closet. I emptied it the other day, and half of it was stacked with boxes of old clothes. Not really keepers, per se, but just old clothes that come from days long past. After I got all of the boxes out of the space, I noticed that the floor was damp in a corner. I mean really damp. Like if you knelt on the carpet there, your jeans would get wet.

So, that started a completely different ball rolling. We called our neighbor who is a roofer, and he had his crew work on the roof to find the leak. And after a couple of visits, he got to the bottom of the problem and everything is tight and sealed.

Now that the closet was bone dry, I needed to address my mold problem. Ick.


We pulled out all of the carpet in the closet, and threw it away. And most of the closet was just fine, but we had a bad corner that needed some help. None of the dry wall was affected, so we were able to concentrate on just the floor.

I talked to the experts at Home Depot, and they led me in the direction of this product.


I sprayed it on quite heavily, and began scrubbing away. I scrubbed until all it looked clean, and then I scrubbed some more. After wiping it all away, and letting the area dry, I applied bleach all over the whole area.


Then, after the bleach had a chance to do its magic and then dry, I applied more of the mold control product and let that dry for a day or two.


After that, I applied Kilz over the entire thing. (Comes in a spray or paint on form)


I vacuumed before, during, and after the process, just to keep any of the dust and mold spores at bay.

It smells wonderful and fresh, and it is totally dry and a blank slate for our new project. I'll throw in some photos as we move along on the "closet playhouse".

I found some additional helpful information on blackmold.awardspace.com:

Mold on Drywall
If you find mold growing on unpainted drywall in your home you will have to remove the drywall and replace it. Unfortunately there is no way to completely remove mold from unpainted drywall since it is a porous material.

How to Remove Moldy Drywall
Use a utility knife to cut out any section of drywall with mold on it. You should make sure to cut out an area that covers at least two of the wooden beams behind the drywall. This is so you'll be able to properly attach the replacement section of drywall onto the two beams.

Next you'll need to cut out a section of new drywall to replace the drywall you just removed. Use a tape measure to measure out the length and width of the new section of drywall that you'll need so that it will fit properly. Then use the utility knife to cut out the section of new drywall.

Make sure that the new drywall fits snugly in place and then use drywall screws to attach it to the wooden beams. After this you should apply joint compound (also called drywall compound or mud) and then leave it to dry. Once you've left it for 24 hours you can then sand the joint compound down to smooth it out. You can also then paint the drywall if you like.

It's a good idea to 
HEPA vacuum the room as well to remove any mold stirred up during the process.

Mold on Painted Drywall
If you find mold on drywall that is painted or primed then the good news is you shouldn't have to remove the drywall. This is because the mold should be just on the surface and shouldn't have penetrated into the drywall itself.

Wipe or scrub the mold away using a cleaning product or mold killing solution. You can find some mold killing solutions and directions on how to use them at the 
Killing Mold page.

Mold on Wood
It's usually safe to keep using moldy wood once you've cleaned it up. Although there might be some small amount of mold left below the surface of the wood, it shouldn't regrow and cause problems provided you keep the moisture in your home to a minimum. If the wood is painted then it's even better news since the mold probably wouldn't have penetrated into the surface of the wood.

How to Remove Mold from Wood
To clean moldy wood wipe or scrub the mold from the surface using a sponge, cloth or scrubbing brush, along with some water and detergent, or any other household cleaner. See the Killing Mold page for some effective solutions to remove mold.

You can use a mold killer if you want, such as bleach, although it isn't necessary as the main goal is just to remove mold from the surface. There are always going to be small amounts of mold and spores in your home anyway, so trying to kill all the mold spores isn't the aim. Plus dead mold spores are still allergenic.

The same general process for removing mold from wood applies whether the mold is on wooden furniture, wooden walls, wooden beams or any other wood.

Removing Mold Stains from Wood
Once you've cleaned mold growth off wood there might still be a mold stain left behind. Don't worry, this is just a cosmetic problem and the mold shouldn't regrow as long as your house doesn't have any big moisture problems. And if you do get moisture problems then mold will grow in your home whether or not there's a mold stain left behind anyway.

If you don't like the look of the stain you can sand the wood if you want. This should usually remove the stain, although sometimes the mold stain might run deep into the wood so that it can't be completely sanded away.

Another way to get rid of left over mold stains is to use a small amount of bleach to fade it away. This could discolor the wood though so it's a good idea to do a spot test.

Removing Moldy Wood
Another option of course is to remove and replace wood with mold on it. Usually this is not worth the cost and trouble compared to cleaning, but if it's a situation where the wood is cheap and easy to replace you might decide it's the best option.

After Remediating Mold on Wood

You'll need to HEPA vacuum the surrounding area once you've removed the mold from the wood. During mold removal it's inevitable that some mold spores are stirred up and so you need to remove as many as possible by HEPA vacuuming.

After you've finished cleaning up the mold problem you might want to coat the wood with a fungicidal sealant or paint so that you know it's completely safe. This way any mold left in the wood certainly won't affect you and no new mold should begin to grow on the wood either.

Saturday, March 1, 2014

Nesting All Over Again...

Talk about nesting. Whew. I'm in full-throttle mode. We've been focusing on babies for a while now, and it isn't stopping any time soon, which is a good thing. My nephew and his cute wife and family just adopted sweet little twin babies. Because they live out of state, they needed a place to wait out the red tape and paperwork. Of course I offered them to come and stay here. Who wouldn't want to? So, we've had house guests, in and out, for the past two weeks, and loved every minute of it. Even though the babies are teeny tiny, they filled our house to the brim with something special. And the family got the OK to take the babies out of state yesterday, so they headed off to their home. It was sad to see them leave, but what a happy occasion for them to finally be heading home.

The good news is, we still have a new baby in the near future. My daughter is expecting any time now. Well, theoretically she is due on March 17, so it could be a while, but she's showing signs of having that baby a little earlier than that, so who knows? And I've invited her and her husband (and of course the baby) to come and stay here for a week or so after the baby has been born, so we will have another wee one in the house. We don't know the gender of the baby yet, but we all have our own ideas about that. I'm thinking boy, but I was wrong with our first grand-baby, so I wouldn't take that to the bank. Bob thinks it's a girl. I'll just be happy to not be calling it an "it" anymore.

So, that there is why we're (okay, maybe just I am) nesting around here. I did this before Wyatt was born, and wondered if there really was such a thing as grandparent nesting. I'm here to tell you, there is definitely such a thing, and I've got it bad. Which isn't really bad, since I've got lots of rooms and closets and cupboards to organize.

That brings me to a whole different subject. I have had to swallow my pride and let all of my walls down as we've hosted my nephew's family here. Normally, when you have someone in your home for a night or so, you can hide the fact that you have closets and rooms that are in such an upheaval, people might get harmed by opening the doors. But, when you have people in your home for an extended period of time, they become part of the family, and there isn't much in the house that they don't see. So, darling nephew and family, please forgive my disarray. Forgive it and forget it. Seriously. I have been planning for months to tear into the den and get it all organized ... when Bob was planning on going out of town for training. Stacks of projects had accumulated on the counter tops and shelves. I kept the door closed anytime anyone would come into the house.


Problem is, his trip hadn't happened yet when my nephew's family came. So, they not only saw it, they had to be IN IT, as they had some computer needs. When they asked to use the computer, my initial response was to say, "Oh, we don't have a computer". But I'm pretty sure they wouldn't have bought that. Soooo, I directed them to the doors, asked if they were up to date on their tetanus shots, and let them enter completely at their own risk. Oh well. It is what it is, and there wasn't much I could do about it in that moment. At least I can report happily that they didn't receive any harm (that I know of).

I did lose a little sleep over it, I must say, and that became my first project when Bob went out of town.  So, nephew and wife... the room is no longer a danger, and is actually quite usable. Come back.


And just as a side-note, it's fun, but distracting to organize the den. The cupboards and drawers have all sorts of Bob's treasures in them, like his collection of Micro Machines he used to play with the kids with. I get a little distracted with the memories sometimes, and the work takes longer than it maybe should. In fact, I had to stop and take a photo and send it to my kids on Group Me, so we could have a "Memory Night"...


And that brings me to another subject -- something I've learned in the past couple of months -- that relationships and time with family are much more important things than the little details in life. I learned that with Valentine's Day, as that came and went without me being able to do some of the extraneous Valentine's things I had wanted to do for our family. I realized, as we had them all here for dinner just before Valentine's Day, that being together is much more important than "things" I might have made or bought for them. And it is. I love my family, and both Bob and I receive so much joy from being with them. That is truly as good as it gets. And if I have a disastrous den, or craft room, but I have time to sit up into the wee hours and visit and laugh with my family members (sorry to keep you up so late, nephew and wife), that, again, is the best thing that I could have done with my time.

Now, there is a balance, right? I mean, we have to have clean, orderly, functioning homes. Soooooo, I need to take advantage of some of this nesting time, get things organized, and just keep my house that way. Then, I won't have to take big chunks out of my life (and away from family time) to clean and re-organize. Simple as that. And now, off to clean the bathroom...

Thursday, January 23, 2014

Panama Canal Trip and then back to the routine!

We are back! And since I don't normally advertise over the internet when we are leaving, you wouldn't even have missed us, but we were gone for almost two weeks! We went on a Panama Canal cruise, which was something we've always wanted to see. It was A.M.A.Z.I.N.G.

This is the Panama Canal (Gatun Locks) as our big cruise ship is entering the locks. The little trains you see below, attach to the ship by lines, and keep the ship in the center of the canal where it belongs. There are four trains on each side of the ship.


And here are the Miraflores Locks, seen from the side. It's hard to believe those huge cruise ships can fit inside of that space, but they do!


Oh, and here's my travelling partner. I could look at this photo all the day long. In fact, think I will.


Leading up to the trip, Bob and I were at a point in our hectic lives where we were mostly just passing each other in the hallway (sometimes at a pretty good trot). We needed some time away together, and this trip was just the thing. We saw beautiful things, thawed out in the warm sun, lazed around on lounge chairs and went on hair-raising zip-lines in the jungles of Costa Rica...

Here we are before. Happy as clams.


And here is Bob, gliding along with the greatest of ease. He never really looked the slightest bit different than he would look when he's sitting in a lounge chair sipping a cool soda. His facial expressions never change. Of course, he is the consummate "calm and cool under any circumstances".


I, on the other hand, have varying levels of fear, puzzlement (as to how to get my body pointing straight instead of sideways, when coming in for a landing), and excitement.


And lest you are wondering why there should really be any fear involved, this photo may give it a little justice. Some of the zip lines are 150 feet above the jungle floor. Think of it. Doesn't it get your adrenaline going a little bit?


Near the end of the zip-lines, I did figure out how to come in straight and I may have even had a smile or two.


...We also went on walks, worked out together (remember, fatty, high-calorie cruise food -- we needed to keep some of that at bay), actually read books, and generally soaked each other up for 12 whole days. Heaven. We could have been anywhere on earth, and it wouldn't have mattered to either one of us, as long as we got to spend that uninterrupted time together. It will be just the thing to get us through the busy months ahead!

And now that we're back, I feel like I'm ready to conquer the world. Well, almost. I came back to this.


I had sworn to myself (and anyone else who would listen) that I refused to come home to any Christmas decorations that still needed to be put away. But, try as I might, I could not carve out the few hours it would take to put them all away where they go. So, it all sat on the floor of our basement just patiently waiting for me to get home. And the very morning after I got home, I rolled my sleeves up and got to work. It felt great to pack it all away, but I was reminded of my need to purge Christmas decorations, so I invited all of my kids to a Christmas garage sale next October. Done.

And with the basement all cleaned up and organized, I was in my "nesting" mode, so everywhere I've gone in my house in the past few days, I've lingered to organize. I still have oh, so much to do, but it feels so good to start seeing a little organization and order scattered here and there in our home.

In a couple of days, I'll be sharing my Trip Packing and Prep lists that help me remember to pack every last thing and also to do all that needs to be done around the house before we leave. It makes the preparation part of trips so much easier!


Friday, January 10, 2014

Cleaning Hard-Water Stains on Glass

Our shower has a clear glass wall, which I love, but it does require a little upkeep. We squeegee it dry after every shower. No big deal. It takes about a minute. But somehow the shower head must drip a couple of times afterwards, or the squeegee-ing isn't getting done as thorough down at the bottom of the glass wall, or some such thing, because we were getting cloudy glass. It was down on the lower portion of it, so I didn't really think about it too much, until one day. It finally got to me, and I decided I needed to do something about it. 


See how cloudy the bottom of the glass is? You can hardly see the drain.


And it seemed to have a stale odor along with the cloudiness on the glass. So, I looked in my cupboards for a solution. I know there are all kinds of concoctions out there, but I wanted something that was safe for my marble, and safe for me to breathe whilst doing the cleaning, AND something that wasn't going to take all day long.

And then I remembered Ducky. Ducky is what we use on the boat to clean 'er up after being out on the lake.


We happened to have a bottle out in the garage, so I decided it was worth a shot. I sprayed it on half of the water spot cloudiness, and took a clean cloth and rubbed. And after just a minute or two (literally), I was left with sparkling clean glass.

This photo below shows the glass with half cleaned and half not. I draped a towel behind so the photo would show the difference.


And before I knew it, I had cleaned the entire glass wall. It was so clean!


 Such a difference, and so little elbow grease. Just a little circular rubbing, and it was all taken care of.


Time to stock up on Ducky.


And since my bottle was from our old supply, I thought I'd share what a new bottle looks like. You can get Ducky products online and at marine supply stores.


Friday, October 18, 2013

The Real Deal: A happily imperfect life

Just in case you have found yourself reading blogs and thinking everyone in blogland is perfect, I've got some imperfection to throw at you today.

We have an organizing emergency around these parts. Just about every closet and drawer in my home need an organizing make-over in a big way. I'm looking for a good, solid whole-home organizing plan, and hope to come up with something that will work for me and my home. For all of our sake. My sweet, sweet husband never utters a word about how disheveled certain areas in our home are. He may be thinking a myriad of things as he opens a closet or drawer, but he is kind enough to just shut the door or drawer and move along. It could possibly have something to do with the fact that if he brings any of it out into the open, that will be "our" next, instantaneous project. No. It's better to keep one's thoughts to oneself in that case.

The odd thing is, I LOVE to organize. If I could have a day with nothing to do, I probably would choose to tear into my closet, or my food storage room, or anything else that needs some work. When I was a youngster, and my parents would go out on a date, I'd re-organize my mom's pantry, or move the furniture around in my room, or put all of my books in alphabetical order... the list goes neurotically on and on. Before I go too much further, my mom's pantry was never in need of reorganizing. She is a very organized gal herself. I just liked to stack and re-stack and put items in order of how a 12-year-old thinks pantry items should go in. Sorry mom. Truly I am sorry. Its a wonder you and Dad ever even wanted to leave the house.

Having said that, I think I put off organizing a room until I have the time to do it "right". I need to carve out a big chunk of time to go through everything and get things put where they belong. I also need to find a time when the piles of things won't be bothersome for a couple of days. So, it does take me a while to get to some of these larger organizing projects. But, I've dubbed 2014 as my year to get organized: "Get organized and clean in 2014" (or something along those lines).

This is my food storage/emergency supply room. (Please don't let there be any emergencies quite yet)


And my poor craft room. There is a circle of life in that room. I get it all spruced up and everything put away. And then a crazy week or month comes along, and I can't spare even a minute to put things away. It takes no time at all to turn it into a state of upheaval. So, another project awaits. Oh, but I need to get to it before the Christmas hurricane hits it.


So there you have it. I could show you many more photos of organizing catastrophes, but that just might make you feel out of sorts all day long.

I'll find a good solution, but in the meantime, I'll just shut a door or two and go along my merry way.

Friday, September 20, 2013

Fruit Fly Trap - Cheap, But Effective!

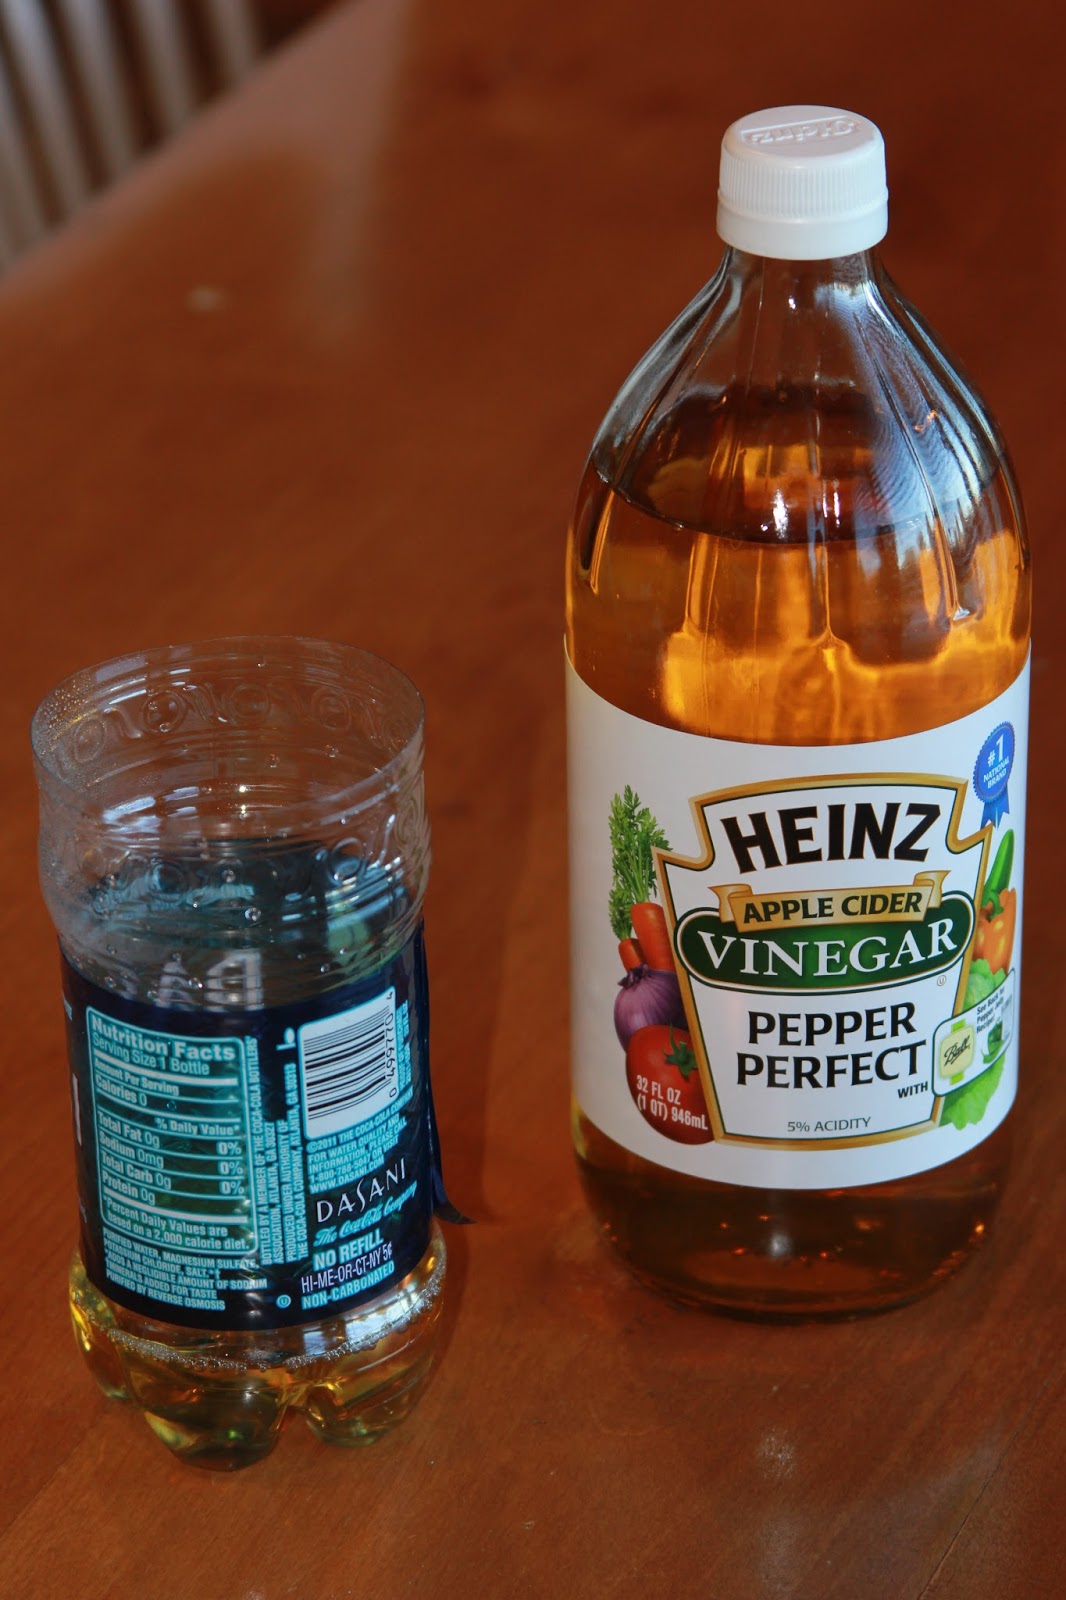
This is about the time of year that we get fruit flies invading our space. With 30+ fruit trees, that seems to be an ongoing issue, and one that we can't really avoid. Last year I started to experiment with fruit fly traps, and this is the one that seemed to work. I especially like it because it can be done with items that I already have at home, which means it doesn't cost me anything. Which is a good thing, because who wants to spend any money on those pesky fruit flies?

To make the fruit fly trap, you'll need an empty water bottle, apple cider vinegar, and a box cutter. Using the box cutter, cut the top of the water bottle off, just after the bottle's taper ends.


Pour about an inch of apple cider vinegar in the bottle. 


Invert the top of the bottle and place it into the opening you previously cut.


If the top slips down into the bottle, or has any small openings along the edge where it doesn't quite seal, then use clear packing tape along the top, cut edge to make sure there is a seal and to hold the inverted top into place.


Now, find a spot on your counter, and let the fruit flies come. It should attract the fruit flies no matter where you place it, though it needs to be in the open air and not in a cupboard or closet.

You could empty and reuse the same fruit fly trap, but it seems cleaner and easier to just toss that one when it needs freshening and start with another empty water bottle.

It's strangely fascinating to check the bottle every day and see how many more flies have been trapped. Fascinating and satisfying.

Monday, January 14, 2013

Grandma Nesting

Alrighty. I know I went through nesting as an expectant mommy back in the day, but would you believe I'm nesting as a grandma who is expecting her first grandbaby? Believe it... I am nesting. We're expecting our first grand baby any day now. He is due this Thursday, so when I say "any day", I couldn't be any more accurate. So, back to my nesting. I woke up on Saturday fully intending to work on two baby blankets that I need to finish for two new babies in our ward (I know, Bob... I'm using the word "new" very loosely here). To be absolutely honest, I not only need to finish them, but I need to start them, too. But, that morning, the first thing that popped into my head was a cleaning solution I had seen on Pinterest that boasted being able to clean stove tops, ovens, and just about everything else you can think of. Since that thought wasn't going anywhere, I decided I would give it a shot. I pulled all of the racks out of my oven, and put it on the Self-Cleaning mode. Then, I went to work on the racks. I made a paste out of baking soda and peroxide and applied it to the whole surface of each rack, let it sit for about 10 minutes, then scrubbed off the baked on gunk. Worked like a charm.

As I was working, I happened to glance at my stove top and thought that that, too, could benefit with this wondrous mixture. I have a stainless steel stove top that gets a brownish ring around the burners -- even when its clean. [Let me make one thing absolutely clear. I would not use this paste on a brushed stainless steel surface. I am pretty sure it would leave scratch marks, as it is an abrasive cleanser. The area around my stove burners has a different surface, and it doesn't show scratches, so I felt pretty sure it would take this treatment just fine. I wouldn't use it anywhere else on my stove top, where there is regular brushed stainless steel!]


The ring is a real pain to get off, so I usually leave it until someone like my son-in-law has had enough of it and starts scrubbing away. It really is hard to remove.

After finishing my oven racks, I applied the paste to the area around my stove burners, let it sit for several minutes, scrubbed a bit, and Voila! 


Looks pretty good, doesn't it!?  That is definitely a Pin that I would recommend trying. You probably have the ingredients already on hand, so its worth a try. Remember... baking soda, and enough peroxide to make a paste.

Sooooooo, back to my nesting. Have you ever heard of a grandma-to-be nesting? I mean, I know its real, because I'm doing it. I keep looking around for something to clean or organize, and my husband can attest that I can't sit still for two minutes without having something to occupy my time. I'm calling it nesting, but now that I think of it, it could very well be plain old anxiousness. Hmmmm.

Gotta go. I have two baby blankets to make... actually come to think of it, I think the microwave needs cleaning.