Showing posts with label home projects. Show all posts

Thursday, January 14, 2016

Painting Project: Prepping and My Favorite Painting Supplies

I think one of the reasons people dread painting so much, is that there is a lot of prep work. It's not my favorite part, but I just figure that into my work day, and it doesn't bother me too much. Especially because I know that if I take my time and prep well, the painting will look much better and go much smoother.

Before prepping, I set up a good work station. Now, unfortunately, I have set this up on my kitchen table, which means that we can't really use it until I'm done, but since I don't really have time to cook while painting, it all seems to work out in the end.

I start with a good thick towel or covering.


I've used a lot of different products to patch, but this is by far my favorite. It goes on easily, dried fast, and it has a primer built in to it, so it covers really well with even just the first coat of paint. Love it!  I don't have a picture of the spreader that I use along with it, but I use a metal one that is about 1-1/2" wide. Just remember to wash it after each use, before the spackling dries on it.


Sanding sponges are a must. They help smooth out the spackling, as well as any other imperfections along the way.


Blue tape with edge-lock. I go through a lot of this, but it's worth it. One thing about my main floor, is that we have stained wood trim. So, although that makes it so that I don't have to repaint my trim (yay!), I do have to tape it off really well. Blue tape works really well.


Good paintbrushes are a must! I love a 2" angled brush for cutting in around trim, and in the corners.


As far as roller pads go, invest in the good ones. If you go for the cheapies, they can leave fuzz on your walls. I've had that experience, and there isn't much you can do once the fuzz is on the walls. Ugh. These pro doo-z don't leave any thing at all, and after painting for a couple of weeks, I'm still using my first roller pad. When I'm done for the day, I wrap it all up in a plastic grocery bag, so that no air can get to it. The next time I paint, I pull the bag off, and the pad is wet and ready to go. I don't ever wash my roller pads. Too much of a pain, and it seems you never really get all the paint out. I buy a good supply, and change them out whenever I feel the need.


This Wooster Pelican is a something I just found this time around of painting. It has disposable liners, if you want to go that route, but the thing I like about it, is it's easy to carry around when I'm using the paintbrush. And when I'm done with the brush, it has a magnet on the side that keeps the brush up and out of the paint, but still able to drip into the container. Brilliant!


Of course there are other supplies you'll need: a roller pan with liners (I hate washing out roller pans), plenty of rags, baby wipes (another genius method of cleaning up spills as you go), screwdrivers (for removing electrical outlet covers, etc), paint stirrers, and anything else you think is necessary.

After you have all your supplies gathered, spend a day prepping. Tape everything carefully and thoroughly. It takes time, but once it's done, it's done. You'll notice the tape around the doorways, and the cabinets, as well as the rocks below...


More tape...


When you come to outlet and switch covers, REMOVE THEM! It is so easy to remove them, and it makes it so much easier to paint. I know that sounds like a no-brainer, but you'd be surprised how many people paint right over, or try to paint around. And once they're removed, it is nice to throw a piece of tape over the switches or outlets so that paint doesn't get on them. So easy!  I have a small container where I keep all the covers and screws so that as soon as the fresh paint is dry, I can easily take that container around with me and replace all the covers.


Once the taping is done, get painting! Make sure you have plenty of dropcloths. My favorite is the plastic lined canvas cloths. If you have a spill, the paint doesn't go through the plastic. 

Painting update: I've finished the family room, kitchen and family room upper stairway. Today I'll tape off the hall way, and hopefully get a coat of paint on it. Moving along...

Thursday, January 7, 2016

Big Project -- Painting the Main Floor, Part 1

I have been wanting to repaint most of our main floor for several months now, so I made a promise to myself that I'd start as soon as I could after the new year. It's a pretty big project, since there are several rooms that flow into each other. Which means that every one of those rooms needs to be painted if you paint any one of them. I started on one end (the family room), and will move to the kitchen, the stairway, the hallway, the living room, the dining room, and the entry. In that order, hopefully. 

We've had a straw yellow paint color for 17 years now, so I felt it was time for a fresh coat and a fresh look. I chose a light, warm gray. I actually painted my bedroom in that color a few years ago, and I have loved it, so I knew I would love it in these areas too. 

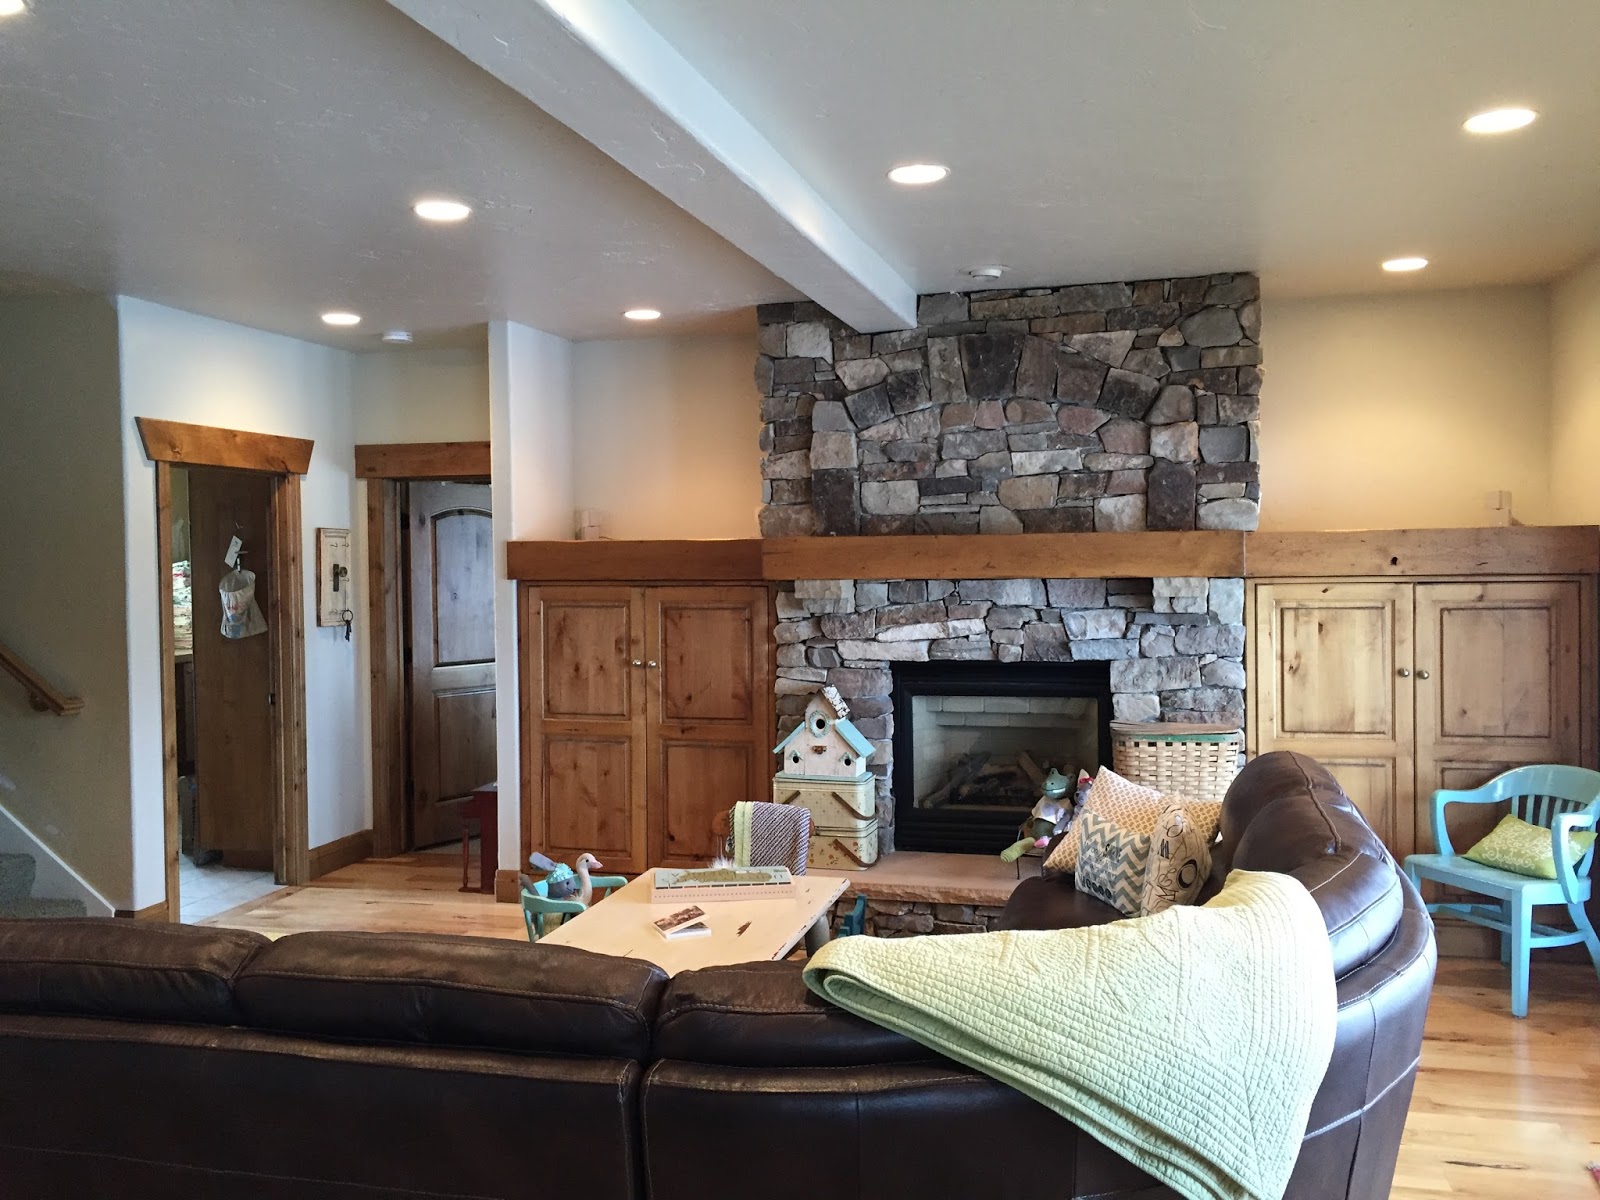
This is the family room after I've taped it off and prepped it for painting. Yellow walls that need freshening!


The first day of painting, I had so many things crammed into the day, that this is all I got done in the two hours that I was able to paint...


The next day (yesterday), I got to it and got a first coat on the whole room before my husband came home from work. We ran out to Taco Bell (this is how we eat when we're doing projects), came back and he helped me run a second coat over everything. Can I just tell you how much faster it is when one person is rolling and the other is cutting in? It goes lickety split.

So... we've got one room down. I haven't put anything back on the shelves yet, but you get the idea. I love this look. I really, really love the gray with the stone and the warm stained wood tones. It still looks yellowish in some places, because of the lighting, but it's a beautiful gray. 


I can't wait to get started in the kitchen. I'll be taping and prepping today. And maybe starting to paint, even. Yay!

When I get a minute, I'll share some of the tools and tricks I've learned along the way. There are some great products out there that help to make things go really smoothly.

Thursday, March 26, 2015

Rubber Mulch in Limberlost

We have an area all along the back of our lot that used to be the dog run. Now that we don't have dogs any more, we are in the process of making it a play area for the grands. We affectionately refer to it as Limberlost. When Bob was in grade school, he has wonderful memories of coming in after recess and listening as his teacher would read a chapter of A Girl of the Limberlost. Which, by the way, is also an old favorite of mine. So, when it came to naming our spot for the grands, it seemed like a natural -- full of sweet memories, and at the ready for a lot more to come!

Last year we had a cement pathway (all the way around it) poured, so that the kids could ride their bikes, skates, wagons, etc, around the perimeter. And then I proceeded to spend hours upon hours spraying the weeds that would pop up in the dirt area All. The. Time. We love the old orchard trees that run down the center of it, so we couldn't really put any kind of complete vegetation kill in there. 


This year we decided to solve that problem. Rubber mulch. Amazingly wonderful invention. The first thing we had to do to prepare the ground, was to remove dirt and even it all out. Bob made a screed board that leveled it off at about 3" from the edge of the concrete. This picture below is looking down Limberlost down the opposite way from the photo above.


We took the extra dirt and piled it in the crevasse that was between the cement path and the back fence. Fewer lost balls and toys. And okay, I'll say it... fewer places for snakes to lay in waiting.


And here's the screed board in action. Bob and I each took one end, and dragged it across the dirt several times until there was a good pile of dirt to be removed. Then we shoveled it into the wheel barrow and dumped that into the tractor, and then he drove that down the street to our daughter's house, where she'll be using it after we remove a little pond in her backyard. 


After the dirt was leveled off, we put down a landscape liner. We got that at Home Depot, along with the little staples that attach it to the dirt.


It was so nice to see the blossoms just starting to peek out from the apple-pear trees in Limberlost.


The preparation was really the hardest part of the whole project. 

We decided that before we put the rubber mulch in, we should put in a couple of things for the grands to play on. I found a great teeter-totter airplane from Lifetime that can fit up to 7 kids! We had a few of the kiddos here while we were assembling...


We put the airplane right onto the liner, so the mulch can go all around it.


... And it appears to be grandchild approved!

We also put together a Little Tykes play structure


There is a bigger slide that goes off the back side. It's pretty fun for the kids to play around on.

After we got the toys in place, we started dumping the bags of mulch. We had 3 pallets of rubber mulch delivered to the house -- 6000 pounds worth. It sounds like a ton (well... three tons), but it went pretty fast, and made such a beautiful difference! I love how it looks!


The rubber mulch is really great for a lot of reasons. It doesn't decompose like natural bark mulch does. We won't be replacing this every other year. It is made from old tires, which makes it feel like I'm doing something good for the environment. It is a soft landing for the kids coming off the slide, or if they happen to fall in it. It is heavier than bark mulch, so it stays in place better. And lastly, it is clean. The kids can sit in it and play with it, and they come out clean as a whistle. 


After we got that area done, we started on the area just in front of Limberlost. There are orchard trees all along that fence, too, and the garden beds were solid Mexican Primrose. I love the look of Mexican Primrose when it's blooming, but after that, it looks like a bunch of weeds, and let's just be honest here... it also was a great place for snakes to hide. I have seen many a snake back there in those Mexican Primrose beds. So, because of my relationship with snakes, the Primrose had to go.

The guys are clearing the beds below...


I don't know why, but boys and tractors....


And these are what the beds looked like after we pulled the old dead primrose growth out of them. Then, they removed dirt and put the liners in.


And voila! Beautiful beds with no primrose and no snakes. Woohoo!


We are really working towards less-maintenance in our yard. I will always like working in the flower beds, but there are some areas that had become a very unwieldy and took way too much time to keep up. Now that our grands are getting old enough to play out there, we want to spend time playing with them, instead of always having more work to do out there. Everyone is a winner now!

We'll continue to add and tweak in Limberlost in the coming years. It is definitely a work in progress.

Thursday, February 19, 2015

Map-Lined Den Doors

We have glass-paneled doors for our den. Originally, I thought I would love having the glass to look through into the den, but our painters did me wrong in that regard. When they were trying to get the painters tape off the glass, apparently they had very fresh blades in their Exacto knives, because they left scratches all along the sides of the glass. So much so that you can see them very clearly. And unfortunately we didn't notice for a while, and they were ... shall we say ... hard to track down, so we just had to live with it. For a while, I covered them with fabric from the inside, but I needed a fresh new look, and I wanted it to be more in the blue tones, to go with the rest of our entry way. 

And then the idea struck to use a map. A really big map. I tracked one down, and cut it to size. I have it tacked down on the inside of the doors. I didn't want it to be permanent, just in case down the line I wanted a change.  


It's a fun look that covers the windows well, and it was very reasonable. In fact, it would be cute to use old maps and do parts and pieces backing the windows. 


I love those quick, inexpensive projects that make a big statement. And on to the next...

Friday, January 23, 2015

Cutting a Window in the Playroom Wall

I know many of you may wince when you think of cutting holes in perfectly good walls. But this was one of those times when it was needed.

We've been working on our playroom, which is specifically for our grand babies (5 here, two more on the way!). It is a slow work in progress, but at least we keep progressing. Our most recent improvement was to make our window in the wall of the little closet. This room used to be our oldest son's room, and he had a regular clothes closet, but then also had a little closet that was framed in under the roof line. We used it for storage of all kinds of odds and ends through the years, and when it was emptied out, it felt like the perfect place for a little playhouse!

The rest of the playroom is mostly done, so we've been turning our sights on the playhouse now. We put in a wood floor, and have plans to make a little kitchen in there, too. It gets a little cavernous in there, so we decided a window would be just the ticket.

We had to decide on the perfect height for our little ones, and then drew the outline of our window on the wall.


There was some electrical going on in that space, and also a probable load-bearing wall, so we took all of that into consideration. And remember, when I say "we", I really mean  Bob, with me on the sidelines cheering. 

After he had both sides of the sheet rock removed, he was left with what was in the photo below.


He carefully cut the boards out, moved the electrical to below the window sill...


... and then framed in a header for support, and re-framed the window all the way around.


After that, it was my turn. I taped and patched the sheet rock to cover the screw holes and the areas that we had to add sheet rock to.


A new coat of paint, and no one's the wiser.


After painting, Bob put in the finishing MDF boards to frame the window.


And there is always patching to be done after that. So, I got our paintable caulk out, and went to work.


This is the same corner, after caulk.


A few coats of paint on the window frame, and then some curtains, and we can check that project off the list! 


I envision puppet shows happening from inside this window, in addition to hours and hours of playing house. Can't wait!

Saturday, September 27, 2014

Jelly Roll Jam Strip Quilts Label and Binding

A few weeks ago, I posted the fun easy way to make Jelly Roll Quilts. To see that post, click here.

After the jelly roll strip quilt has been quilted (either by hand or by machine), trim the edges all nice and even. At this point it would generally be time for binding, but I decided I wanted to put a label on my grandbabies' quilts, so they would always know who made it for them and when it was made. Furthermore, I decided I wanted to have the quilts be from both Bob and I since he provided the money in our bank account for the materials, and I provided the labor -- a perfect working team! 


To make the label, I just cut a square out of an off-white fabric. Then, I folded it in half and wrote on it with a Pigma Micron Pen. Just a note about Pigma Pens. I LOVE them. Does that sound over-dramatic? It may sound that way, but I have used them for years and years, and they are always my go to pen. They don't bleed on fabric, they have a nice, precise point, and they are permanent. Perfect, I tell you!

After pinning the piece of fabric in place, as in the above label, it is then time to bind the quilt. There are many different philosophies to binding. To me, there is no better finished look than hand binding. It is a beautiful way to finish the quilt, and all of the stitches are hidden. When I make a quilt that is a keepsake quilt, I hand-bind. Having said that, there is also a time and a place for machine binding, in my book. And these baby quilts are the time and place. I want these to be quilts that they use, and therefore they must be able to be thrown in the washing machine. So, machine binding it is. It will hold together well through wash after wash after wash... and also through little kiddos dragging the blanket around wherever they go. 

I could show you photo after photo of the binding process, but then I would probably be pretty much copying the directions from someone else's website, since that is what I looked at for these particular quilts. So, instead, I will refer you to Cluck Cluck Sew, a terrific website devoted to quilting and sewing. Click here to see their machine binding tutorial.


After binding the quilt, this is what the finished product will look like.


As a side note, when I got them machine-quilted, there were hundreds of designs to choose from. My grandson loves foxes, so I had his quilt quilted in a forest animals pattern. You can see an owl, and an acorn in the photo below. There is also a fox somewhere in there.


And for my granddaughter, the quilt had big loopy flowers, which are adorable.


I love how the quilts turned out. They were fast, simple projects, and very do-able. Especially considering the five more I need to make for the five additional grandbabies coming our way.