Thursday, August 28, 2014

Jelly Roll Jam Baby Quilts

Necessity is the mother of invention. Truer words were never spoken. When our first grand baby was born a year and a half ago, I decided I would make each of my grand babies a quilt sometime in their first year of life. I went to the quilt shop, found a pattern I liked for our grandson, bought the fabric, and then it sat in a nice stack in my quilting room. And since my craft room was in complete upheaval at the time, it sort of got shifted around along with several other stacks of things to do. Then came grand baby #2... a granddaughter this time. And I bought a pattern and fabric for her, too. Fast forward a year or so, to when I cleaned my craft room out and totally reorganized it. And suddenly my projects were all staring at me from my "project shelves". I knew I needed to get to these baby quilts. Then grand babies #3 & #4 were announced. Alrighty then. Plan B. Can I tell you how much I love Plan B? I had seen the online hullabaloo about the "Jelly Roll Jam" quilts, and I knew this was what I wanted to do for ALL of my grand baby quilts. I thought it would be so cute to have the same basic quilt pattern, but different fabrics for each grand baby.  And it didn't hurt that the quilts were a snap to put together. Some ladies put them together in 45 minutes. I'm not that fast yet, but it definitely takes under 2 hours, which is amazing!

To begin with, for my quilting projects, I always use a 1/4" quilting foot on my sewing machine. That way I can sew with my quilting foot along the edge of my fabric and know that I'm always sewing a 1/4" seam.

For this quilt project, you will need the following:

-40 strip jelly roll (see photo below), or enough different types of coordinating fabrics to cut 40  2-1/2" (by the width of the fabric: about 44") strips from.
-3/4 yard of fabric for inner border, cut into 6  2-1/2" strips by the width of the fabric (44")
-1 yard of fabric for outer border, cut into 7  3-1/2" strips by the width of the fabric (44")
-4 yards of fabric for the quilt back
-quilt batting (for the size of the finished quilt top)
-1 yard of fabric for the binding, cut into 2-1/2" strips by the width of the fabric (44"). Before buying this, read through this whole post. I generally have enough leftover fabric from my backing fabric for the binding strips.

Remember, I didn't have jelly rolls for the first two quilts. I had already bought the fabric for them, and still wanted to use that fabric. So, I made my own jelly rolls. Now, you may be wondering what a jelly roll is. It looks like the photo below, and is usually made up of 40 2-1/2" x 44" strips.


Very handy that it is already cut into the size I will be working with in my baby quilts to come. But for now, I had to cut my own, which wasn't really that big of a deal. I just laid my fabric out, and cut it into strips that were 2-1/2" wide by the total width of the fabric (44").


After I had 40 strips cut, this is what my piles looked like.


Next, I thought I would space them all out so that the fabrics were spread out. It turns out this doesn't make any difference, and may also end up having just the opposite effect of what I was hoping. In a jelly roll, the fabrics all come layered with the same colored of fabrics all together. When you open up a jelly roll to use for this quilt, keep the layers exactly as they came. Don't try to manipulate them like I did. It works much better to keep them as they are. I promise.


Below is a jelly roll that I opened and left in the order it came in. Leave it in the order it came in. 


The next step is to cut all of the selvage edges off. I've cut off half of them in the photo below.


And now, it's time to get started sewing. Before you even begin, load up 5 bobbins so that you won't have to stop and wind bobbins mid-way through your project. You'll be happy you did. Now take the first strip and cut 18" off of it. This way, your seems will end up being more varied throughout the quilt. Sew the first strip to the second strip (on the 2-1/2" ends), right sides together. Easy peasy.


Now, to save time and thread, don't break your thread when you come to the end of that first seam. Bring up the tail of the second strip up and lay it on your sewing machine, right side up. Lay the third strip on top of that, and sew together.


Continue on til all of your strips are sewn together.


Cut the threads between the strips. You will have one long strip in a big pile (about 1700" worth of a long strip!). Find the two ends.


Begin sewing the two ends together (be sure the right sides are together), along the whole length of that super long strip.


When you are getting towards the end of sewing that long seam, you will probably have something that looks like the photo below. No worries.


Just make a cut in the end of the strip, and the ends will fall together nicely for you to be able to finish sewing your strip.


You can trim it up evenly after you've finished sewing all the way to the end of the strip.

Now, you'll have a double wide strip that is half as long as the first one you made. Take the two ends of the double-wide strip and begin sewing them together (right sides together) along the long edge. As you sew over your seams, lay the seams towards the darker piece of fabric.


When you come to the end, you may have it work out perfectly, or you may have it twisted. It doesn't matter. You will clip the end either way before you sew all the way to the end.


Now continue on with your quadruple-wide strip. And follow the same instructions.


Continue until you've got your quilt at approximately 54" X 64". At that point, I added a couple of borders to frame it off. My inner border used strips that were 2-1/2" wide, and my outer border strips were 3-1/2" wide. I measured the length and width of the finished strip quilt, and then multiplied that number by two, and added 15". I cut the 2-1/2" strips that I would need, and then sewed them all together in one long border strip. I then sewed the border strip onto one side of the quilt, and trimmed it at the end of the quilt. Then I sewed the border to the other side doing the same thing. After the sides were complete, I sewed the strip along the entire top and bottom using the same method. To do the outer border, I followed the exact same steps as the inner border, but used the 3-1/2" wide strips.

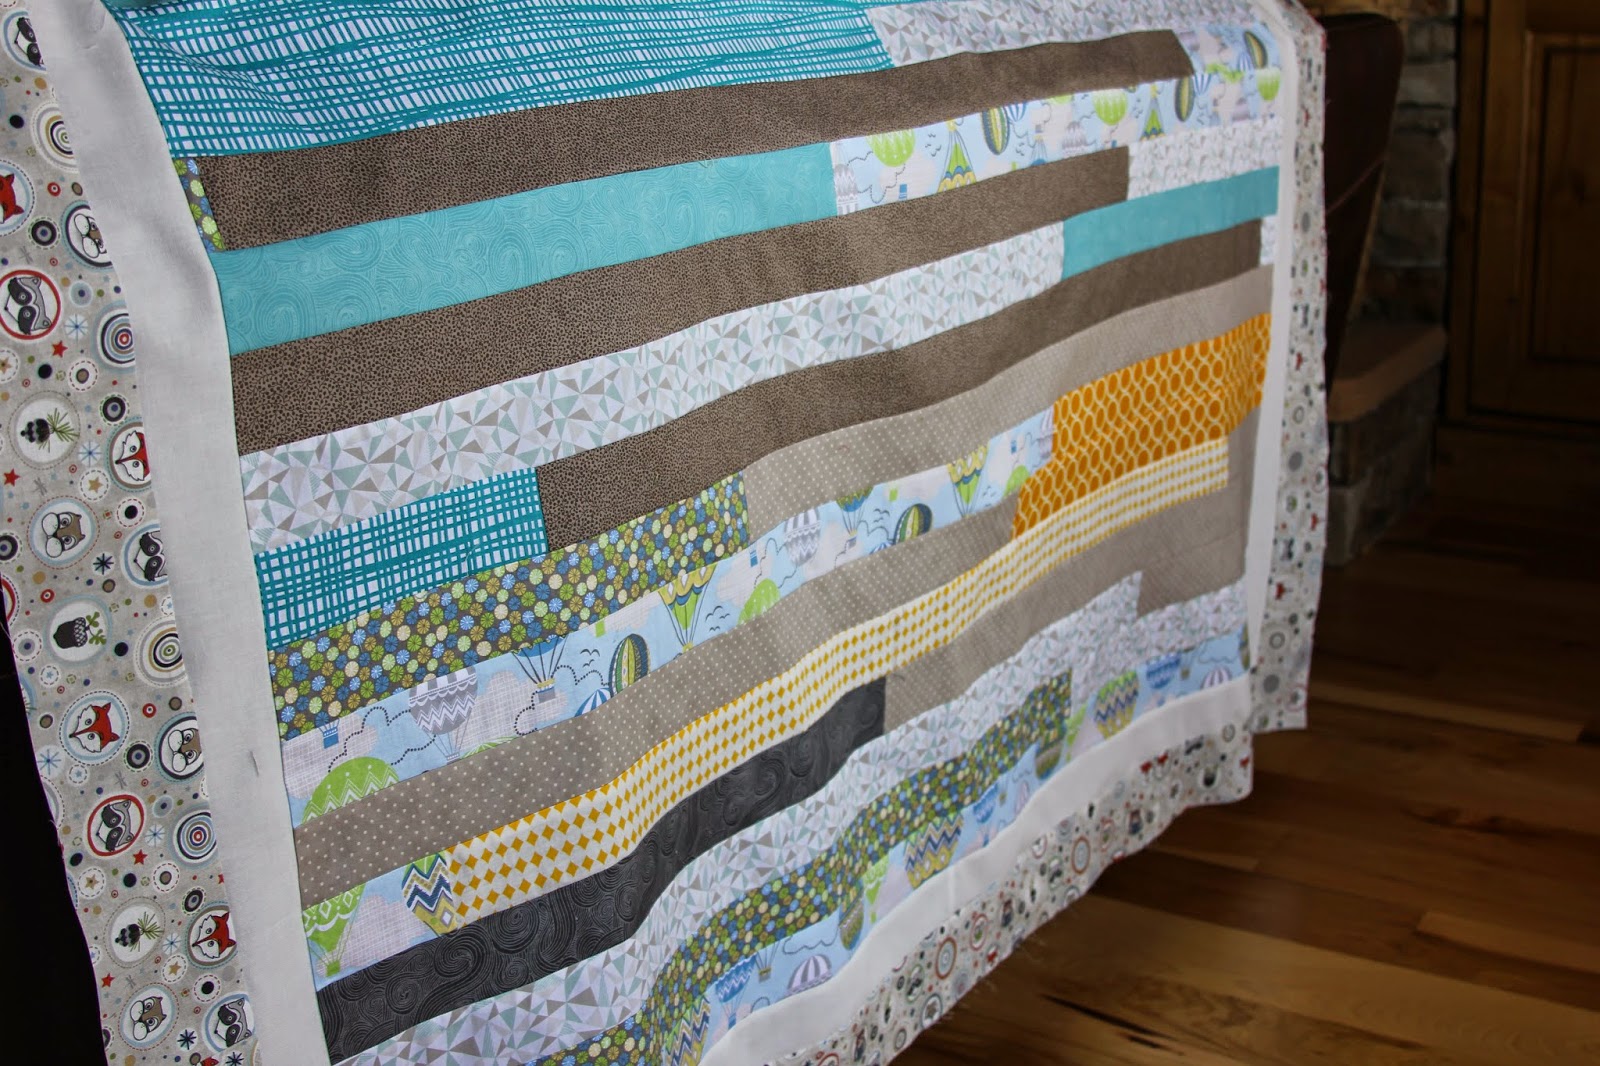
After the quilt top was finished, I ironed the back laying the seams down in preparation for quilting. (And yes... the fabric is different in this photo below. This is the quilt for my granddaughter)


These next two photos are the finished flimsies. This is before I took them to the quilter to have them quilted.


The strips will all be layered randomly in your finished quilt. You'll end up with some of the same together, and most not. The above quilt is the one I tried to manipulate by putting the strips in a certain order so that the colors would be all spread out. The bottom one is one I sewed together in the piles of strips as they were, without spreading the colors around evenly. They are a bit different from each other, but they both ended up being fine.


At this point, measure your finished quilt top. Then, find a backing that coordinates with the colors of your quilt top. You'll need about 4 yards of the fabric for the back. You can cut your four yards into two yard pieces, and then sew them together along the selvage. (Don't forget to iron down the seam on that backing piece) And now you will have a backing that is a bit oversized for your quilt top. I take it that way to the quilt shop to be machine quilted, and after they've quilted it, I cut the excess backing fabric off, and I have enough of that to cut the binding strips. The reason I like the machine quilt shop for these, is I want these to be machine washable for many years to come, and I also wanted them done quickly, sooooo the machine quilter was the ticket. And when I take it there, they use their own batting, so that eliminates me having to go and purchase batting. Yay! 

Next week, I'll post about the finishing the quilt... trimming, the quilt label and also information for the binding. (Click here for more information on the binding and quilt labels)

Tuesday, August 26, 2014

August Week 4: Canned or Bottled Fruits

This week's food storage items are: 

August Week 4: Canned or bottled fruits - mandarin oranges, pineapple, peaches, pears, etc.


This could be a fairly easy week or not, depending on how much canned fruit your family consumes in a year. If you bottle your own fruit, then obviously you will bottle this week's items whenever the fruit is ready to bottle. Either way, you will need to decide how much canned fruit your family consumes in a year's time. If you are buying the cans (as opposed to bottling your own), write those amounts and items on your grocery list, and in the next couple of days, go to the grocery store and pick up the items. When you bring them home, update your list and get the cans on your shelves. Done. Easy as that. It literally could take you a matter of a few minutes time to get this week's food storage items completed. Unless of course you are bottling your own, and then it definitely will not take a few minutes time.


If you would like the full info on the Week-By-Week Food Storage Plan, just click on the tab at the top of the page. You can then click on any single week and it will take you to the most up-to-date post that featured that week's items. It also has the information as to how you can get a copy of the weekly schedule as well as the complete inventory sheets.

Sunday, August 24, 2014

Family Reunions. You Gotta Love Them

We always have more than one family reunion to go to every year. There is the annual reunion of my grandpa and grandma's descendants. We love going to this reunion, as it is held in beautiful Logan Canyon at a tiny little cabin that my grandparents built a million years ago. My grandparents have been gone for a long time now, and only half of their daughters are still living (including my sweet mom), but the tradition lives on, and we all love to gather and remember the wonderful couple who started this family. We usually get a few of my kids and their spouses tagging along, which we love. It is always a truly lovely day.

And then there is another annual reunion that is even closer to home in more ways than one. It is the reunion of my parents and all of their descendants. Since they had 6 daughters and 33 grandchildren, and oodles of great-grands, this is a good-sized reunion, and always lots of fun. Most of us live within an hour of each other, so we do see each other throughout the year at different times, but there is still something special about getting together specifically for a reunion. We haven't had this one yet this year... it is coming up on Monday, and I'm sure a great time will be had by all!

And (drumroll, please) this year was the first (of many) reunions for Bob and I and our descendants. It seems strange to have a reunion with our names at the head of it! There are only 12 of us at the moment, with 2 more on the way, but we knew we needed to start sometime and this seemed as good a time as any. We wanted the grand-babies to grow up knowing we've held the reunions since they were born. Now, some may wonder why we would need a reunion, because we all live within 30 minutes (some as close as just down the street) from each other, and all of the menfolk in the family work for Bob, and see each other many times a day. But as I said above, there is something special about getting together for a reunion and celebrating being a family. We played together, and talked and laughed and ate together. It was a sweet moment in time for Bob and I.

We love this family! Number 1 and 2 grandbabies didn't want
to hold their own signs, but you get the point...
We started the day out with a grand kids treasure hunt. Since only one of our grand kids is actually walking, we had him put a treasure in his bag, and then one in his cousin's bag. It was darling, and fun to think about the future years when we will have lots of grand kids running around our trails.


And is a reunion really a reunion without the "guess how many candies in the jar" game? I think not.


While the kabobs were cooking, we lazed around on the deck. There were coloring pages of each member of the family strewn across the tables with crayons, for kiddos and anyone else who felt like coloring. We had some real masterpieces that I wish I had taken photos of! I also put one of each of the coloring pages into a "coloring book" for each of the grand kids to take home and color later on (or when they are old enough to actually know what a crayon does).


We also had my niece come up and take some real photos of our family. Can't wait to see how they turned out!

That night we played a family quiz game to get to know all of the members of the family a little better. It was enlightening and lots of fun. And for answering correctly, you got to have a ticket in the raffle with your name on it, which is all good, since it upped your chances of winning something at the end of the night. Each couple ended up winning at least one thing at the raffle. Yay! 

Our first ever reunion wasn't fancy or elaborate, but it was exactly what I had hoped. And it gave us a great jumping off point for many, many years to come!

Yep... it is ALWAYS worth the time and effort to go to family reunions. You definitely have to love them! 

Wednesday, August 20, 2014

Watching the Clouds

I saw this great quote from the Country Living Magazine. It makes "looking at the clouds" all the more important on my summer to-do list...


Tuesday, August 19, 2014

August Week 3: Tomato Products

This week's food storage items are:

August Week 3: Tomatoes - salsa, sauce, whole, diced, paste, pizza, spaghetti sauce

It's amazing how often I use some sort of canned or bottled tomato product. We love Mexican food and also some Italian food, so it's important for me to always have some on hand. 

For the most part, these are the items (from the list) that I keep in my food storage:


As with most of the other weekly items, I try to estimate what I might use of each of the items in a year's time. And then I pad my numbers. At the end of the year, I want to still have a few on my shelves that I can rotate through. I really try to plan it so that I never truly run all the way out.

After deciding how many of each of the tomato items I will use this year, I update the totals on my inventory sheet, then check that against how many I actually have on my shelves. The difference is what I will go shopping for.

Now, case lot sales are a good place to pick up many of these items. Whenever our grocery store has a case lot sale, I check my shelves to see what items I might need a whole case of, and then buy the case and keep it in the rotation. You can decide which you would like to do -- wait for a sale, or buy the items you need now and move on. The problem with putting too many items on the "waiting for a sale" list, is that that list can get pretty long, and your shelves can stay empty for a while.

After I pick up my items for my food storage, I'll update my inventory list with the new totals, and I will be done for the week.


Remember, this is a rotating food storage plan, which means you will actually be using many of your food storage items so that there is very little wasted, expired food. I used to keep cases of cans on the shelves, never rotating through and using them, and every time I would clean out my shelves, I would end up throwing a lot of old food away. This plan should resolve that problem.

I've had a few people email me with questions this week, and I thought I'd share the questions and answers here so that maybe some of your questions will be answered also.

Q: I would be curious to know how much you budget for each week, how much are you spending to create this supply?

A: Since each week will be varied as to how much you will spend, I would recommend implementing a budget in which you set aside a certain amount from each paycheck for all food storage and emergency supplies. Then, when you go to purchase items, you can take from the money you have budgeted for it. As you get established, you’ll notice that some weeks you literally won’t have to spend anything, while other weeks will still require purchasing items. The money you set aside will also depend on how many you have in your family. Look at the monthly lists and estimate what a month might require as far as budgeting, and begin setting that aside. You may have to adjust that as time goes on.

Q: I have a couple of follow-up questions, if you don't mind. I recognize that this plan is to build a food storage and emergency supply. I have never really had the time or extra money to do such a thing and have always shopped week to week for the things we need right then. That being said, my first question is for each week's list do you intend to purchase enough of that item(s) to last until the following year's shopping? My second question is, how often do you shop for fresh items? Thanks again!

A: To answer your first question, when I first started out, I was not able to purchase an entire year's supply of every item. Sometimes (depending on the item) I would purchase only 3 or 6 months worth. After a while, I was able to get my storage to a year's worth of the items, so now I do try to purchase an entire year's worth of what I might use of each item; and, for your second question, I'll answer it two ways, since I'm not entirely sure what you mean by "fresh items". If you mean fresh produce, I usually pick those items up twice a week, or whenever I need them. I don't include any fresh produce in my food supply. If you mean items to refresh my food storage shelves, I am generally successful in only having to shop for them once a year, whenever they come up on my list.

If you would like the full info on the Week-By-Week Food Storage Plan, just click on the tab at the top of the page. You can then click on any single week and it will take you to the most up-to-date post that featured that week's items. It also has the information as to how you can get a copy of the weekly schedule as well as the complete inventory sheets.

Saturday, August 16, 2014

Pumpkin Growing 101

I have learned a few things about pumpkins this year. I grew pumpkins last year, but my harvest was a bit measly. Okay. A lot measly. Anyway, this year things are improving a bit. I did a few things differently, and it seems to have made a difference:

-I bought my pumpkin starts from a different source.
-I planted them in a different spot
-I planted a variety of types of pumpkin
-I planted them in and around my flower garden
-They seem to be getting more sun in this new area
-I've given them some extra "food" to help them grow (Osmocote)
-I've become a little more educated about pumpkin growing

When my plants started taking off, there were plenty of blossoms that seemed to not be doing anything but falling off after a few days. After reading up on the process, I realized that these blossoms were "male" blossoms, like in the photo below. Apparently, the reason the plants begin with male blossoms, is that it attracts bees, which then begins a pattern for the bees to return over and over again.


The photo below shows a female blossom. Notice the tiny pumpkin start at the base of the blossom. These blossoms are open for one day (at the most). The bee must first visit a male blossom, then visit a female blossom to transfer the pollen to the female blossom. If not, the female blossom will fall off and die, and that little premature pumpkin will wither and die on the vine. How amazing is that? 


And once those female blossoms have been fertilized with the pollen from the male blossom, the pumpkin will begin to grow and mature.


This one below is my prize pumpkin. It is hard to tell from the photo, but it is much larger than a basketball now. It just keeps on going.


After the vine starts to dye off, the pumpkin will be ready for harvest. Where the vine attaches to the stem is still green and apparently feeding this pumpkin below, so it should be okay to be out there for a while yet. I certainly hope so, as I don't know what I'd do with a pumpkin in August. They say that if you can easily indent the pumpkin skin using your fingernail, the fruit is still too immature to harvest. The shell has to be hardened, or it will likely shrivel and spoil within just a few days.


I also love that I planted my mom's harvested zinnia seeds right in the middle of my pumpkin patch. How sweet is it to see those zinnias poking their heads up through the pumpkins. And somehow I think I've got some of every color of zinnia in the few that I planted.


I mentioned that I planted my pumpkins in and around my existing flower beds. I had a few spaces open with our new patio, so I plopped those plants wherever I saw decent sunny ground. This guy below has grown about 20 feet from it's original plant base. Love, love, love it!


Incidently... this is the same angle a day later. Can you believe how fast it grows? 


And just to the rear of these flower beds, you can see my pumpkin vines doing their thing and going pretty much wherever they want to go. There is something about a vine like that, that I love.


Mixing in and around the kale. So pretty!


Thursday, August 14, 2014

Those Idyllic Summer Days

It's been a fast and busy summer, hasn't it?! I still wonder what ever happened to the long, lazy summers of youth. We would go out to play after lunch (and to my Dad's horror, in our bare feet), and we'd reappear sometime around dinner time. And then, we'd head back out for a healthy dose of night games. The days seemed to stretch on and on. We did all those cliche things, like laying on the grass and looking up at the clouds to find animals and shapes, making whistles out of grass shoots, rubbing yellow dandelion flowers on our chins to "see if you liked mustard", held our own carnivals and theatrical productions (complete with hand-written fliers going out to houses, and posters being put up at the end of the street), roller skated, rode bikes, and walked down to the drug store to spend our allowance on real penny candy. Do they even have real penny candy any more? I think not. Anyway. Those were the days. The summers were perfect. Our mom made sure to take us on trips to the beach, "turtle" hunting (which was really rock hunting mixed with creek walking), berry picking, and as school neared, shopping for school clothes. Ah. The memories make my shoulders relax a little, and my blood pressure start it's journey downward. Sweet, sweet times.

I've got a couple of weeks left of summer. Maybe I can get a cloud-gazing day in yet. I'm going to give it my all.

On a completely different subject, I've arrived at a do-able way for me to get my chores done. I was getting way behind, and kept putting off different chores until it was obviously a "chore emergency", and then I would have to spend time then and there and get 'er done. I decided something needed to change to get me back on track. So, I'm back at designating Monday for my cleaning day. I have two different lists that I rotate through every other Monday, and that seems to be the ticket. I can't clean my house from top to bottom every week. Time-wise that is not ever going to happen. So, I do half of the cleaning every other week. And you surely know by now that I love lists. So, I've put my cleaning to-do's on a list inside of a plastic sleeve so that I can mark it off as I go with a dry-erase marker. Perfect! And then, if I get interrupted by something important (like a grand baby making a visit), then I leave that list out for the next day or two til I get everything done. So far it has worked like a charm. I have even gotten to chores that I have put off for a very long time. Oh, and I also have added things to the list like "cleaning the fireplace glass" which only has to be done about once a year, but I want to be sure I do it, and have a date by it, so I'll know next year when to get to it again. I know, I know. Maybe a little OCD, but it really does work for me. (Finding a good house cleaner would work for me, too, but alas...)

And getting back to the subject of summer-time relaxing, Bob and I got away to the cabin for a little overnight last Friday night. It was critical (that sounds dramatic, but it is oh, so accurate) that we find some time to unwind, and that was just the ticket. Once we got there, we went out for a ride in the evening, and were treated to some amazing sights...


We saw a few different sets of mama and baby moose.


And then we rounded the corner and saw these two bull moose just chomping away at some sort of greenery. We turned the Mule off and sat and watched. Simply magnificent.


And then they decided to cross the road.


This guy stopped and looked at us as if deciding whether it was worth his time and energy to stomp or maybe even gore us.


Luckily, it was not worth his time. Or energy.