Friday, May 31, 2013

Comfort Food: Shepherd's Pie

Sometimes I need to throw all caution to the wind and make something for dinner that is purely a comfort food. This recipe is not going to win any awards for being "low in points, calories, fat or carbs". Its just yummy and easy to love. Its also one of my son's favorite meals. This is the son in particular that has just come home from his two year mission. I can't help but still make his favorites (especially when they're mine, too!)

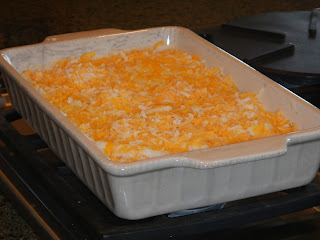
So.... the other night I made shepherd's pie. This is a basic, no-frills recipe, and there is a really great chance that you have all the ingredients already in your pantry.

Shepherd's Pie
Folks, its obvious I'm not a food photographer
or food blogger.

Shepherd's Pie

1 lb. ground beef
onion powder
10-3/4 oz can of cream of potato soup
1/3 c. milk
1 can green beans
3 c. mashed potatoes
1 c. shredded Cheddar cheese

Brown ground beef in a large skillet, and season with onion powder. Drain off fat and juices and return to heat. Add soup, milk, and green beans to skillet. Mix well. Spoon ground beef mixture into a lightly greased 9X13 casserole dish, and spread out evenly. Spread potatoes on top of beef mixture and sprinkle with cheese. Bake at 350 degrees for 25 minutes, or until cheese is melted. Serves 6.

Tuesday, May 28, 2013

May Week 4: Portable toilet and supplies, diapers, feminine products

This week's food storage/emergency prep items are:

May Week 4: Portable toilet and supplies, cloth or disposable diapers and/or Depends undergarments (if needed), feminine products


I love the idea of this little portable toilet. It is basically a five gallon bucket, but the lid, (as you can see in the photo) is a little toilet seat with a lid. It all snaps right into place and would provide the perfect little emergency toilet.


You can also buy these little toilet waste bags, which are brilliant. You fit them right around the bucket and under the seat, which makes it easy to dispose of the waste. Love it! The bags have a waste bio-gel in them, which makes the whole clean-up process easier and neater.

The toilets come with emergency hygiene items (toilet paper, wipes, toothbrushes and paste, soap, etc) stored right inside of them, so there is a compete kit that is easily carried out when needed. I bought my toilet and supplies from Emergency Essentials, but they are surely available through other stores.

This is also the week to buy some extra diapers and/or adult disposable undergarments. For whatever reason, I thought it a good idea to have a package of adult disposable undergarments on our emergency shelves. It seems like a good thing to have in case of illness during an emergency situation.

And lastly, store whatever feminine hygiene items your family might need for the year.

The great thing about this week's items is that from year to year, I shouldn't really have to re-stock (unless there is an emergency and we have used some of the items).

If you are not in a position to spring for one of these little toilets, I would get a 5 gallon bucket, find some bags that will fit over the edge of it, and store the bags and some toilet paper in the bucket. Also include some sort of hand sanitizer or soap. That would definitely work for an emergency!

If you would like the full info on the Week-By-Week Food Storage Plan, just click on the tab at the top of the page. It also has the information as to how you can get a copy of the weekly schedule as well as the complete inventory sheets.

Friday, May 24, 2013

Activity Days Chalkboard Letters

We had a fun Activity Days Mom and Me activity a couple of weeks ago. We had some fun activities, including having the moms and daughters come dressed alike. It was so great to see the lengths they went to to be just alike, including making sure their hair was the same, and they had the same hair clips. It was the best!

We also had the moms and girls work on a super easy craft together. I started out thinking we would have Bob cut out their last name initial in wood, and then the moms and girls would paint their letter in chalkboard paint, let it dry, and then decorate it in chalk.

When we found that Home Depot has wood with the chalkboard paint already painted on, we knew that was a better route. Then we wouldn't have the mess of paint on their cute clothes, and everywhere else within reach.

So, Bob cut out a letter for each of the sets of moms and daughters. If you don't happen to have a magic laser machine, then you could also cut letters out with a scroll saw. I've done many a project on a scroll saw in my time...


They first cleaned off the letter with rubbing alcohol, as the laser machine sometimes can leave a burn mark that easily washes off. Then, they rubbed chalk (using the long side of the piece of chalk) all over their letter, and then erased it, giving it more of a chalkboard look. This also helps so that any chalk writing and drawing can easily be erased instead of leaving a mark. One suggestion is to use a good, high quality chalk. I like this Prang brand. It doesn't scratch the chalkboard surface, like some of the cheaper brands can.

After they "tempered" the chalkboard letters, they went to town decorating them together -- drawing and erasing and drawing and erasing until they had the perfect designs.


They can display them in their home and change the chalk design whenever they want to. It would be cute to draw hearts for Valentines, shamrocks for St. Patrick's, holly for Christmas, etc. They turned out darling, and the girls seemed to be pretty excited about them.

Of course I had to have one for my own house....


Tuesday, May 21, 2013

May Week 3: Jello and Pudding Mixes

This week's food storage items are:

May Week 3: Jello and pudding mixes


Now, if you don't eat or cook with any jello and/or pudding mixes at all, then you have a week off! I have a few recipes that we use that use jello or pudding mixes in one way or another. So, I will decide how many times I think I'll make my salads and desserts that involve using a jello or pudding. Then, I'll check my inventory and see what I already have on my shelves, and add whatever I still need to my shopping list. Next time I'm at the grocery store, I can pick up a few boxes of jello and pudding, then update my inventory, and get the boxes on the shelves where they belong.

There you have it. Another week's food storage items are easily inventoried and added to the shelves. It truly should only take 10 or 15 minutes to decide how much and what you need. So, so easy, and so, so do-able!

If you would like the full info on the Week-By-Week Food Storage Plan, just click on the tab at the top of the page. It also has the information as to how you can get a copy of the weekly schedule as well as the complete inventory sheets.

Sunday, May 19, 2013

A bird in the hand...

The other day, when Wilson and I were walking into the house, he noticed a little "peep" from inside the metal pail on the deck. Sure enough, there was a tiny bird just chirping its little lungs out for his momma. Above the pail is a lantern where we have house finches that build nests every year. Apparently this year one of the babies slipped out of the lantern. I'm surprised it doesn't happen more often... the lanterns are completely open on the bottom. It takes a pretty skilled bird to even get a nest started in the lanterns, let alone keeping eggs and then baby birds in it!


As always, Bob came to the rescue. He put work gloves on and then carefully took everything out of the pail.


Sorry about the blurry photo below, but you get the idea. The little fella didn't have any feathers yet, and was desperately in need of the warmth of the nest, and something to eat.


We took the lid off of the lantern, and deposited the little baby right next to his sibling. Its hard to see in the photo below, but they are snuggled in at the bottom of the lantern, where its nice and dark and full of the makings of a warm nest.


I wondered whether the mom and dad birds would continue taking care of the birds or not, but sure enough... they have both been busy flying to and from the lantern keeping those tiny birds fed.

Don't you love those little miraculous successes? I also love that Bob didn't just shrug it off and say it was just survival of the fittest, or something like that. It was important to me to at least try to give the little guy a chance at life.

I think there are times in life when all of us need a boost from others to get back where we're meant to be.

Friday, May 17, 2013

"New" Aluminum-Leaf Mirror

When I re-did Wilson's room in preparation for him coming home, I tried to re-use whatever I could from his previous room's decor.


One of the items in his room, that I kept, is the mirror in the above photo, to the right. It is one that we bought when a local JCPenney was going out of business several years ago. It is H.E.A.V.Y. and a good, solid mirror.

The only problem was that it had a bronze-colored metal all around the edges. I know that shouldn't be a big deal, but with the color scheme that I was going with, it seemed to really stand out.


I thought about painting it, but that seemed troublesome with how heavy it is, and then trying to figure out a paint that would actually work and be easily applied.

And then I remembered this gem...


I bought that roll of aluminum foil tape a few years ago for a craft, and have used it time and again. It is about 2" wide and has an adhesive backing. It was the perfect thing to help transform my mirror.

First, I cleaned the edges of the mirror.


Then, I took the adhesive tape and cut a piece slightly longer than the first edge I wanted to cover. I laid it over the edge, leaving enough on the front to cover the little bit of frame that showed on the front of the mirror. After carefully applying it all the way down, I smoothed it down on the top edge, and then the front and back edge.


It almost gives it the look of "silver leafing". I love the way it turned out, and I love that it was a project I could complete using things I had on hand!


Next time you're in Home Depot, you may want to pick up a roll of this tape. I've used it in several different crafts, and the roll never seems to get any smaller!

Wednesday, May 15, 2013

Our missionary son returns!

The big day finally came yesterday! Our boy returned after serving an LDS mission for two years in the California Roseville Mission. I can't tell you how great it was to see him coming down that escalator at the airport.


Oh, what a sweet moment for a mom. I didn't want to let go of him!


Another big hug from Bob.


Wyatt was so excited to meet his uncle for the first time. And vice versa.


After the airport, we walked around Temple Square and had lunch. I love this photo of our two boys catching up.


Lunchtime. No one told me that I had cried (happy tears) all my make up off my eyes. Hmmmm. Oh well. He looks great, though, doesn't he?


Yellow ribbons adorn our house on just about any surface we could find to tie one on!


My soul is happy.

Tuesday, May 14, 2013

May Week 2: Dry soups, ramen, canned soups / Boxes of crackers: saltines, grahams, etc.

This week's food items are:

May Week 2: Dry soups, ramen, canned soups / Boxes of crackers: saltines, grahams, etc.

Pretty cut and dried. If you use dry soup in any way (as soup or in other recipes), decide how much you use in a year. Does your family eat ramen noodles? If so, add a year's supply of those to your list. Canned soups include all canned soups you eat, which also means any cream of chicken, cream of potato, cream of mushroom, etc. Estimate what you will use as far as all of those items go, and add the items to your grocery list.


As far as crackers go, I don't really keep crackers on my food storage shelf, because their expiration dates just seem to come to quickly. But, I do use this week as a time to go through my crackers -- saltines, grahams, Wheat Thins, etc. I toss out the old half-eaten boxes and add to my grocery list whatever it is that I need to replenish so that we have some on the shelves. There is nothing worse than making a pot of soup and not having the right crackers to go along with it. I also make sure I have enough grahams to get us through several s'more nights during the summer.

Next time you go to the grocery store, buy the items you have just put on your shopping list, and then get them on your shelves. Update your inventory sheets, and sit back until next week! Yippee! Another week completed!

If you would like the full info on the Week-By-Week Food Storage Plan, just click on the tab at the top of the page. It also has the information as to how you can get a copy of the weekly schedule as well as the complete inventory sheets.

Monday, May 13, 2013

Wilson's new room

This is a thing of beauty. Every space filled with a sticker. Tomorrow is the big day, and there is definitely an air of excitement around here!


I finished Wilson's room. At least I think its finished. I'll probably add a few things here and there, but I'm pretty sure he would consider it finished. I lightened it up so much -- it feels bright and larger. I hope he likes it, and I hope it's still masculine enough. 


This is the "before" picture of that same corner shown above. I was just getting it ready to paint, and realized I hadn't taken a "before" with his old furniture in it. It wasn't too impressive, lets just say.


Another before photo. It looks like a cave, actually.


Much brighter.


He gets home tomorrow. T.O.M.O.R.R.O.W. We are so excited around here. Its been two long (but wonderful and blessed) years, and we're ready to have him back in the proverbial nest.

The frames above his bed are framed maps from the areas he served in on his mission in the California Roseville Mission. And in the center is a framed piece of glass that is burlap backed and can be written on with dry-erase markers. Not that he'll write on it, but I sure will! :)


The great thing about the frames, is that I used some of the ones we had used for Lindsay's wedding reception.


Pink and cream weren't going to do for Wilson's room, so I grabbed some cans of spray paint and went to work. By the way, one of the best ways to keep your frames from sticking to the drop cloth while you paint is to put push pins on the underside of the frame. It gives the frame some "feet" and lets it dry really nicely.


And these are the finished frames in their new silver, gray and green colors.


I then just enlarged and copied the different areas he has served in, and put them into the frames and voila. A very cheap but fun reminder of his mission days. Plus, since I love the look of maps, it can stay up long after he leaves the house (ummmm... I can't go there right now).

Sunday, May 12, 2013

Happy Mother's Day!

Mother's Day. Some love it and some do not. I love it. I love that I get to reflect on all the blessings of motherhood -- of both having a wonderful, amazing mother,

Me and my mom

and of being a mother to four beautiful kids (okay, so they're not kids anymore, but...)

Our four kids
1993
I love that (sortof like New Year's) I resolve to try to be a better mom in the coming year. But, I don't get "down" about the things I fall short in. Its just part of life to be imperfect and to strive to be better.

I love what Our Best Bites wrote about motherhood this past week:

"If you spend any amount of time browsing the internet, you know what it takes to be an ideal wife and mother. If you read enough blogs or spend enough time browsing Pinterest, you’ll know that you need to…

*Prepare 3 healthy, homemade, preferably organic meals a day.

*You’ll need an elaborately simple system for folding and organizing your laundry.

*Due to a system of charts, your house will never be more than 10 minutes away from being company ready.

*You’ll properly display your family with their coordinating heights and ages in a vinyl decal on your minivan.

*You’ll send your daughters to school every day with a different hairdo, most of which involve mastering curling their hair with a flat iron and twisting elaborate shapes into her hair, fastened with giant bows and flowers that you have on a color-coded hair-bow organizer that you made yourself.

*You’ll never buy eggs from the store—if you’re a good mom, you’ll build your own chicken coop in the backyard and paint it a popular Benjamin Moore shade where your free-range chickens can happily lay their organic eggs.

*You’ll have professional portraits taken on a very regular basis. They should always be taken outdoors, either on abandoned rail-road tracks, in front of an abandoned burnt-down graffitied building that’s clearly unsafe for children, out in nature, but with items that don’t naturally occur in nature, like the big velvet couch that mysteriously appeared in the middle of a wheat field. Bonus points if you get at least one shot with your family holding hands while walking away from the camera.

*You’ll reupholster all your old furniture in funky, hard-to-find fabrics.

*Your kids clothes will be made from your husband’s old work shirts.

*At some point, you’ll consider redecorating your whole house with owls.

*You’ll definitely make all your own baby food because it’s just as easy as buying it at the store, and everyone knows that your babies will grow up with above-average intelligence and be better-looking in adulthood. Because of your homemade baby food.

*And finally, if you don’t simultaneously bargain shop AND shop at Anthropologie, you might as well not shop at all.

We might be guilty of a few of those things, but it’s easy to see how when we start looking around at what everyone else appears to be doing, we can start feeling a little inadequate."


We moms can't waste time feeling inadequate and wishing for something different. We are strong and determined and can accomplish just about anything we need to. So, we roll our sleeves up and continue working and progressing and striving and loving -- and enjoying every bit of it all along the way.

I'm so very blessed in being surrounded by a sweet, patient, loving family -- my husband, my four kids, my two son-in-laws (who are really like my sons), and my darling grandson -- how can I be anything but happy?


I always wanted to be a mother. When I was in various school classes and had to answer the question of what I wanted to be when I grew up, I always wrote "mother". My teachers were frustrated with that answer and would always try to get me to write something besides "mother", but I never could think of anything else. I love being a mom.


I love that on Tuesday my son comes home from his LDS church mission (two years since I saw him last!). I'll have all my little chicks back in the figurative nest. Or should I say swans...

Wilson, get in there where you belong!

I love that I have always had beautiful women around me that are exquisite examples of motherhood. I have to look no further than my family -- my mom, daughters, sisters, aunts, grandmothers, cousins and nieces -- to see lovely mothering to both their children, and other children around them.


And truly, whenever I've been "stuck" in a situation, and not really known what to do, I have and do and will call my mom!


Happy Mother's Day!

From our recent trip to the United Kingdom

Saturday, May 11, 2013

Recipe: Seared Chicken with Avocado

Bob and I are trying to eat healthier. I try to find recipes that are light or low-fat and adapt them to our tastes (which usually involves removing the onions and peppers).

I found this great recipe that I made the other night at its one that I'll definitely make again. It was fresh and tangy and satisfying. I paired it with roasted potatoes and green beans.


Seared Chicken with Avocado
(Recipe adapted from the Weight Watchers Five Ingredient 15 Minute Cookbook)


4 skinless, boneless chicken breast halves
seasoning salt
seasoned pepper
1 t. olive oil
1 diced, peeled avocado
2 T. chopped fresh cilantro
2 T. fresh lime juice (about one lime)
1 lime, cut into fourths

Sprinkle seasoning salt and pepper on both sides of chicken. Heat oil in a large nonstick frying pan over high heat. Add chicken. Cook 1 minute on each side, or until it is seared. Reduce heat to medium; cook 5 minutes on each side with lid covering to keep moisture in. If chicken needs more time to cook, turn the heat down to low, keep the lid on, and let it continue cooking.

Combine avocado, cilantro and lime juice. Squeeze lime over chicken before serving. Top with avocado mixture. (My husband doesn't like cilantro, so I added my cilantro to the avocado after I had taken his serving out)

Makes 4 servings

Thursday, May 9, 2013

Wisteria and "Be Still and Know" wooden sign

Every year, when we trim and try to tame our wisteria, we start to grumble a little about how wild they are, and how they need to be cut back (or else they could quite possibly take over the house).

And every year, around this time, I'm reminded of exactly why I LOVE wisteria. It is gorgeous, fragrant, and the blossoms literally hang off the branches in a profusion of purple lovliness.


Our front yard wisteria is in all its glory right now. The backyard wisteria patiently waits until the front vine has given its all, then it proudly goes into bloom (thus enabling us to enjoy wisteria for a prolonged period of time).


Don't you just want to reach up and scoop a handful and breathe in that delicious fragrance?


I can hardly stand it. When I walk through our entry area, I gaze out the windows and find myself slowing my step to take in the rich blooms. What a lovely, romantic plant!

Although I have been staring out the window quite a bit for the past week or so, I have managed to get a few projects done. I wanted to make a wooden sign for a friend of mine whose husband has been called to be a mission president in Florida. They will be there for three years, so its a huge sacrifice sacrifice in every way. She has been a trooper, and has said to me more than once that she needs to remember to: "Be still and know that I am God".  This scripture is found in the Bible (Psalms 46:10) and the Doctrine and Covenants (101:16). So, I got to thinking that that might be the perfect thing to put on a sign. (To see how I have made previous wooden signs, click here or here). You can't really tell in the photos, but the paint color is a soft, sweet blue.


I like to cover the back so that it is somewhat decorative, and when I saw my old road map Alamanac sitting on the counter, I knew that was just the thing! I pulled out the map of Florida, cut it up in a few pieces, and pieced it together in a patchwork style on the back.


My husband and I will write a short note to them on the back, sign and date it, and it'll be done! I'm thinking I may make another batch of these for some gifts. If you're one of my five sisters, forget that you ever saw this post.