Showing posts with label 72-hour kits. Show all posts

Tuesday, October 6, 2015

October Week 1: 72 Hour Kits. Start them or update them.

This week's emergency preparation item is:

October Week 1: 72 hour kits. Start them or update them.

72-hour kits in back packs

72 hour kits
(includes the rolling cart under the backpacks)

So...... if you have a 72 hour kit, this is relatively easy. Just get your kit(s) out and go through them. Throw out the old, expired food, batteries, etc, that may need replacing. Then, write the items on a list and get to the grocery store in the next couple of days to purchase what you need. When you have the items back in your kit, and your kit back where it belongs, then check it off the list, and relax until next week.

I like to keep my 72 hour kits on the main floor, in a closet that is readily accessible. It's the closet on the way out to the garage, so it's pretty convenient. Everyone knows where the kits are, so we should be able to grab the kits and go quickly. If I kept the 72 hour kits in the basement with the rest of my emergency supply, they would take longer to grab (which may not be possible in the case of a house fire or earthquake), or they might get ruined in the case of a flood, etc.

Now, if you don't have a 72 hour kit yet, then you've got your work cut out for you. BUT, this is the time to get started. I have a couple of different lists... one for the kids' 72 hour kits, which are contained in separate backpacks for them. The other list is a comprehensive list that includes everything my husband and I would need, along with some items that the entire family will use. This is the week I check on all of my items, and try to get them completed and updated.

On my lists for my 72 hour kits, there is a place to write when items expire so that I can just look at the list (without even pulling my kits out) and purchase the items that have or will soon expire. Once I have bought them, I can just switch the items in the kit out and update the list.

We worked on 72 hour kits last year on this blog, so we've gone through it step-by-step. To see the different posts on collecting the items, click on the 72 hour kit tab above.

Now that we have all of our kids married off, and on their own, we don't keep an emergency kit here at the house for each of them. In fact, I've passed on to them their 72-hour kits in their backpacks. They can keep them, update them, build off of them, or whatever they want. I will continue to encourage them to build their own kits for their own little families. In my opinion, the 72-hour kits should be for whoever is living in your home at the current time. Any others should keep their own kits at their own homes. Because that can get way out of hand to keep kits for older kids, grandkids, parents, etc.

If you would like the full info on the Week-By-Week Food Storage Plan, just click on the tab at the top of the page. You can then click on any single week and it will take you to the most up-to-date post that featured that week's items. It also has the information as to how you can get a copy of the weekly schedule as well as the complete inventory sheets.

Thursday, May 14, 2015

72-Hour Kits: Task 10 - Miscellaneous B

With today's post, the 72-hour kits will be wrapped up! This is such a huge accomplishment. We hear over and over again to get our 72-hour kits ready, and there are always natural disasters happening all around the world. It's time to "get 'er done". No more excuses. No more procrastinating. This is the day to finally get your 72-hour kits done and on the shelves. If you haven't been following along, click the 72-hour Kit tab above, and start at the beginning -- step by step.

Today we'll finish up the Miscellaneous List for the Main 72-hour Kits:

2 whistles
2 flares
compass (may not be needed, but it's so small, it's easy to tuck in a corner)
magnifying glass
small sewing kit w/ upholstery thread
crayons, notebook
pencils & hand sharpener
puzzles, games (for small children)
scriptures 
newspaper (40 sheets)
contact information - family and friends
updated family photo
cash
extra house key

Look at that list and decide which items you want or need in your own 72-hour kit. Remember, these lists are guidelines, and you should adjust to whatever your own needs are.

A few things to think about...
-you may wonder why you need an updated family photo. This helps in finding other members of your family, if it comes to that.
-contact information may seem unneeded too, with the technology we have today. If cell phones can't be used, would you know all of your family and friend's phone numbers by heart? I know I wouldn't. I'd be up a creek for sure.
-cash. Stash just a bit of cash in your 72-hour kits. $20 - $100. Somewhere in that area. Just for incidentals. Hopefully you'll have all of the items you'll need already, but just in case you need to purchase something, it's good to have some cash.
-newspaper. This is purely for using as liners, insulators, and whatever else you might come up with.

Now, if you're also working on your Children's Backpack Lists, the following list will wrap those up, too:

rope
whistle
8 quarters
family photo
scriptures/book (mini)
notebook, pencil
contact information (family and friends)
game/activity
list on outside of backpack of what else to grab (sleeping bag, winter wear, big first-aid kit, etc)

The list on outside of their backpacks is handy, if you have different kiddos in charge of different things. You could have someone in charge of bringing the portable toilet along with their backpack. Or the list could say that if it's winter, grab a parka.

Aaaaaaannnd, we're done! Now, you can place your 72-hour kits in a closet or space that is very easily accessible, and forget about it until the fall, when we pull out the main list (which you should keep on a clipboard with your 72-hour kit). At that point, you'll just take that list to the store and buy only the things that have or will expire that year. Then, when you have those items, you'll take out only the items that are expiring, and replace them with the newly purchased items. This way, you don't have to empty your whole kit and look at everything to see what has expired. And as you replace the old with the new, you'll note the new expiration dates on the clipboard. Then, close up your 72-hour kits, and forget about them for a whole year. Sooooooo easy!

Wednesday, April 8, 2015

72-Hour Kits: Task 8 - Food Prep, Etc.

You should have a really great start on your 72-Hour Kits by now. We just have a few more tasks to complete them. Task 8 will be to gather the remaining items for food preparation.

The list is as follows:

Main Kit:
propane stove
propane
mess kit
paper plates
cups
scouring pads
dish soap and/or powdered dish soap
rubber gloves
3 ea. baggies (lg and small)
disinfectant

Kids' Backpacks (if applicable):
set of eating utensils

As with all of the other lists, decide what you will want and need in your own 72-hour kits. The propane stove I have in our kit is just a small one-burner stove that I would be able to use to heat up a can of chili or soup. And it's really important to have a small canister of propane in your kits. The mess kit has a pan included in it that I can heat food up in. 

All of the other things on the list are pretty self-explanatory. I keep most of the items on the above list (for the main kit) in my rolling cooler. The disinfectant is kept upright so that it doesn't leak everywhere.

Start gathering what you'll need of the above items, and get them stored in your 72-hour kit. We'll get going on the next task in a couple of weeks.

To see the other Tasks that we've covered so far, or to get a copy of my complete 72-Hour Kit List click on the 72-Hour Kit tab above.

Thursday, March 5, 2015

72 Hour Kits: Task 7 - Hygiene

Task 7 is quite comprehensive and has quite a list that goes with it.  As always, you will need to decide what is appropriate for your own needs and wants in your family's 72-hour kit. Remember, for my family, we have a main, larger kit that covers Bob and I and many general family items. We also have smaller, backpack kits for each of the kids so that they can grab and go, and have their basic needs met in their own packs.

For the main kit, the items for Task 7 are as follows:

2 - mirrors
2 - hand towels
bar soap
body wash
2 - shampoo (trial size)
2 - lotion (small size)
2 - deodorant (trial size)
baby powder
comb
2 pkgs. handi-wipes
2 - hand sanitizers
Scope mouthwash
toothbrush
1 - toothpaste 
2 - toilet paper
feminine hygiene products
tissues
2 - vaseline
2 - chapstick
insect repellent
sun screen
2 - nail clippers (finger and toe)

Many of the above items don't expire, so those won't ever have to be replaced, but the items that do expire have a date by them on my 72-hour kit list, and I'll replace them when their expiration date comes up. I check my 72-hour kits every fall, and to do it quickly and easily, I just scan my list for the items that have or will soon expire, and then I write those items on a shopping list and grab them next time I'm at the store. When I have all of the new items purchased, I open my kit, take out the old and replace with the new. Very easy. I don't have to go through the entire kit and look at every item. In fact, I don't even have to open my kit up until I have the new items to go in to it.

For my kit, all of the above items go in to my rolling cooler, with the exception of the toilet paper. Those are in the duffel bag.

In the backpack kits for the kids, the list for Task 7 is as follows:

toilet paper
tissue
toothbrush
toothpaste
bar soap
body and face wash
sanitizing wipe pkts - 4
hand sanitizer
towel
comb
deoderant (trial size)
shampoo (trial size)
lotion (trial size)
chapstick
mirror

Again, decide what you want in your kids' packs, and adjust the list accordingly. Since this list is quite long, we'll take the month of March to collect all of the items. At the beginning of April, we'll start Task 8.

To see the other Tasks that we've covered so far, or to get a copy of my complete 72-Hour Kit List click on the 72-Hour Kit tab above.

Thursday, February 26, 2015

72-Hour Kit Reminder

Don't forget to get your 72-Hour Kits up to where we are on the schedule. To see what we've done so far, click on the 72-Hour Kit tab above.

We'll be moving on to the next task next week on March 5!

Thursday, February 5, 2015

72 Hour Kits: Task 6 - Shelter/Clothing

Alrighty. It's high-time we move on to the next step in the 72-hour kits. Today's task is all about shelter and clothing.

My list goes as follows:

2 person tent
tarp
survival blankets
rain ponchos
hand warmers
warm gloves
extra shirts
underwear
sweatshirt/jacket
wool socks
ski hat

And when we had our kids here at home, and they had their own 72-hour kit backpacks, I packed the following in their packs:

2 large garbage bags (for shelter, extra layers, etc)
survival blanket
rain poncho
hand warmers
warm gloves
complete change of clothes
sweatshirt/jacket

Your list will likely be a little different, depending on where you live, and the weather. Obviously, we never know when this 72-hour kit will come into play, so plan on the coldest weather you might receive.

Remember that a 72-hour kit generally doesn't provide you with all of the niceties of life. Think about being away from your home and having only what is in your kit. What will you need? What are the bare necessities?

Some of the items on the lists will just come from your drawers or closet. The others may take some time to gather. We'll work on this Task for the month of February, and then we'll move on. Good luck!

To see each of the other tasks in the 72-hour kit project, just click on the 72-hour kit tab above.

Thursday, January 29, 2015

72-Hour Kit Reminder

Quick reminder to work on those 72-hour kits! We'll be working on the next task next week, so click the 72-hour kit tab above, and see what we've done thus far.

Saturday, January 17, 2015

72 Hour Kits: Task 5 - Water Systems, etc

To check out the previous 4 tasks, click on the 72-Hour Kit tab above.

Today's task is the water-related items. We've already stowed water (in Task 4), so we won't talk about water today, but there are a few more items that we need to cover:

1.  water purification tablets. These are easy to store, so it always makes sense to me to have a supply of them somewhere in your emergency supply. You can find these at a variety of stores and online shops. I like the Katadyn Micropur Purification Tablets, found here. By the way, these have an expiration date. So, on your 72-hour kit checklist, be sure to note the expiration date. Remember that after the 72-hour kit is complete, you'll just be looking at your list once a year, and removing the items that expire that year, and replacing them with new.

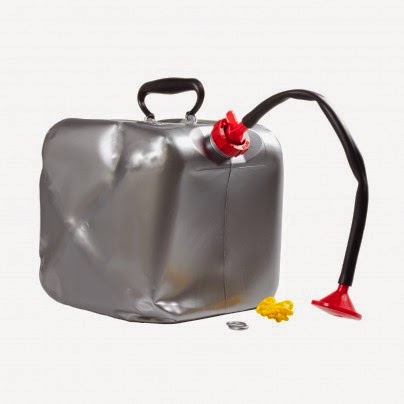
2. collapsible water bag. These come in all shapes and sizes and types. There are even some that have a filter as part of the spigot, which would be so handy. Think emergency. 72-hour kit kind of emergency. If you had to find water from another source other than your home emergency supply, you might need a convenient carrier, and these store in a very small amount of space.

3. water filtration system. Again, there are a bazillion of these on the market, and they just keep on coming out with better (and smaller) systems. Shop around, but be sure to get something that you can filter water through.

4. solar shower. This isn't completely necessary. Or is it? The one I have is compact, fits in my kit, and I believe it would feel like it was heaven-sent after 24 or 48 or 72 hours of not having a shower. And this little beauty is under $15.00. It is perfect for a emergency shower. 

Image from Beprepared.com

These items all fit nicely into my rolling cooler. I have mentioned before that I have three different types of bags/buckets/carriers that my 72-hour kit fits into. Each carrier has a different purpose, and can be used in an emergency. You will come up with something that works best for you, which may be completely different than what works for me. Just find your method, and get cracking.

Start working on today's Task 5 as soon as you can. We'll give you til the end of the month, and then we'll start with Task 6. Some may think that this is far too drawn-out for a 72-hour kit plan, but it seems much more do-able in small chunks. And it's much better than doing nothing at all. So, keep moving along. In no time at all, you'll have that 72-hour kit that has been on your To Do list forever. Yay!

Thursday, January 8, 2015

Grout cleaning, Christmas organizing, and 72-hour kits

First of all, a big reminder that we'll be working on the next task for our 72-hour kits next week. Click the 72-hour kit tab above, and get caught up, and on the 15th, we'll move on.

Second of all, last night I achieved something great. All of the Christmas decor is gone from our main floor, and that same main floor is vacuumed and dusted. Ahhhhhh. I mentioned how it makes me feel like I can breathe deeply, and indeed I now can. That isn't to say that the basement makes me feel like I can breathe deeply. All of the decor that was on the main floor is sitting in piles, waiting to be gone through, and then awaiting it's new place in my cleaned-out spacious holiday closet. Since my holiday closet isn't spaciously cleaned out yet, I can't put everything back in it, so it sits and waits. This has been the weirdest year as far as getting things back into place. I'm VERY motivated to get it done the right way: to purge the old decor that I don't use, and donate it (either to my kids or to the thrift store). My "grandmother nesting" is in full swing, which helps the cause. BUT, more important things seem to keep coming up. Things like holding our new baby granddaugther, playing "McDonalds" with her sweet two-year-old brother, visiting our twin grandbabies in NICU as often as we possible can (because they are changing before our very eyes), catching up with a friend who has been serving with her husband in Florida but is home for her father's funeral (how do you say, "Darn. Don't have time to talk. I've got old Christmas decor to purge.") Christmas decor can wait. As luck would have it, we don't have a function that we need our basement for until Easter. ;)

And thirdly, I have made a miraculous, astounding, spring-in-my-step discovery. It began before Christmas as I was readying guest rooms and bathrooms for our kids to come and stay. In the bathroom that used to be our girls' bathroom as they were growing up, I was going for the vintage look and wanted white tiles with white grout.  Really? What in the world was I thinking? What happened to my rule of always using the grout that was already the color of dirt so that it would never look dingy? I think I thought that in this one little space, I'd be able to maintain control. But sadly that wasn't the case.

Sorry for the yellow-ish photos. That bathroom has no natural light, so photos are rough. But, yellow-ish or not, the ugly groutlines still show up loud and clear.


Ick.


And recently I have tried every single grout bleaching and brightening technique known to the Pinterest world. And every single time, it ended up looking the very same. How can bleach be so selective as to ruin articles of clothing, but won't make a dent in tiny dirty grout lines. Go figure.

One day as I was wandering through Home Depot, I thought I'd check once again for some sort of product that I hadn't already tried. And voila. I happened upon the answer.


The Miracle Grout Pen. I figured it couldn't hurt. I bought two pens (so that I for sure wouldn't run out), and took them home and went to town.


Can I tell you how much I love this product? Even if I have to do it once a year, I will love it til the day I die. It transformed an embarrassing countertop into one where the grout is the last thing you notice. I love it, I tell ya.

I used about a pen and a half on a two-sink countertop and back splash. I love the results and I'll let you know if it starts fading with cleaning. So far, so good.

Saturday, December 6, 2014

Reminder For 72-Hour Kit: Task 4

Just a quick reminder... We're working on Task 4 for the 72-hour kits. I decided we'd take a little longer to gather these items since it's right smack-dab in the middle of the Christmas rush. So.... keep the list of what you need to pick up, and if you're in a store that happens to carry any of the items, buy them. They will likely be on sale this month, so it would be good to pick them up if you can. If you're too busy to think about it, do it in the beginning of January. We'll wrap up Task 4 in the middle of January, so be ready for the next step.

If you'd like to be reminded of Task 4's items, click on the 72-Hour Kit tab above, and click on Task 4.

Thursday, November 20, 2014

72 Hour Kits: Task 4 - Tools & Fix-Its

If you haven't had a chance to check out the previous three Tasks, click on the 72-Hour Kit tab above, and you can find all of the information you need. On to Task 4....

Since these are very comprehensive 72-hour kits that we're working on, we have broken them down into "do-able" segments. At the end of the time, you'll have a complete 72-hour kit, and you'll just need to check it once a year (we check ours in the fall) to update it.

The items for Task 4 are Tools and "Fix-Its". All of these items are kept in the duffel bag portion of our kit. Again... organize in the way that makes most sense to you. Our way may not be your way. You can always change the list around to accommodate your own needs.

The items for Task 4 are:

-survival knife and/or utility knife (depending on the knife... you may only need one)
-hammer, screwdriver, wrench
-pliers, wire cutters
-400 feet of bailing wire
-nails and screws
-small shovel
-small ax
-100+ feet heavy duty nylon cord
-4 large eye hooks (to make clothesline with cord)
-100 clothespins
-work gloves
-electrical tape
-duct tape
-super glue
-rubber bands

These items can be found at Home Depot, Walmart, or your own garage. Gather what you can from what you already have around the house, and then go from there. We'll give you a month to gather these things, since there are quite a few things on the list. Just keep a list in your purse or on your phone, and whenever you have the time, purchase or gather the items. When you have them gathered, place them in the duffel bag.

Keep in mind that my 72-hour kit list has been compiled from many lists I have come across for the past several years. I have fine-tuned it to what will meet my family's needs, and you will likely fine-tune my list to your needs.

Also, all of these items will fit into the "non-expiring" group, so you won't have to ever replace them. Yay! Once they're in your kit, they stay there, and shouldn't have to be moved or changed.

To read each of the posts about the 72-hour kits, or to find instructions on how to receive an email with the complete 72-hour kit lists, click on the tab above.

Friday, November 7, 2014

72 Hour Kits: Task 3 - Completing The 5-gallon Bucket

With Task 1, we gathered our 72-hour kit containers and Task 2 we bought the food for our 5-gallon buckets, as well as for our kids' backpacks. For Task 3, we'll finish filling the 5-gallon bucket. There are some utensil-type items that will fit in your buckets, and fill them to the top.

The Task 3 list is short and simple, and very do-able. So, if you haven't quite finished Task 2, you'll be able to work on both at the same time for the next couple of weeks.

To finish off the items in the 5-gallon bucket:
-eating utensils
-napkins
-can opener

To complete the items in your bucket, you'll need eating utensils. You can do this in one of two ways -- a real knife, fork and spoon for each member of your family, which can be used and washed for every meal they are needed; or, you can buy a box of plastic utensils, enough for each family member to have a set for every meal they would be needed. For my 72-hour kit, I have a combination of the two. I have one real set (just in case we need beefier utensils for cooking, serving, etc. I also have a box of plastic utensils for us, enough to use for each meal, if needed. Of course we can also wash plastic utensils, but if water is an issue, we may not want to use much for washing things. It is personal preference, and you should include in your 72-hour kit what makes the most sense to you and will fill the needs of your family.

You will also include a stack of napkins -- whatever you can fit in the bucket.

And most importantly, a manual can-opener. What a bummer it would be to have all this canned food to eat, but no can opener. Don't forget the can-opener.

Since the utensils, napkins and can-opener are obviously non-expiring items, place them in the bottom of your bucket, and then the food that expires towards the top of the bucket. That way, when it comes time to check your bucket once a year, you will easily find the food items that need to be replaced.

Once you've got your utensils, napkins and can-opener in your bucket, close the lid tightly, and put it on the shelf. You will not need to open that bucket again until next year, when the time comes to rotate some of the food out.

Don't you feel like you're making great progress? You've finished one portion of your family 72-hour kits. In a couple of weeks, we'll move on to one of the other containers. Until then, gather all of your items for your 5-gallon bucket and get it put in place on a shelf or in a closet that is easily accessible for everyone in your family.

To read each of the posts about the 72-hour kits, or to find instructions on how to receive an email with the complete 72-hour kit lists, click on the tab above. 


Thursday, October 23, 2014

72 Hour Kits: Task 2 - Food

Now that you've found some containers for your 72-hour kits, we're going to start filling them... ever so slowly. If you were to look at my 4 page list of items, any sane person would be overwhelmed by it. It is a lot of stuff. But, if you and your family were living on your roof (if there was a flood) or camping in a parking lot down the street (you never know... ), you would probably need a lot of stuff. Hence the comprehensive 72-hour kit. Mind you, I'm not a crazy "the sky is falling, the world is ending" type of person. I'm pretty much the opposite of that. In fact, maybe it's in part because I have a pretty good storage of emergency items, that I don't think of those kind of dire emergencies, or world-ending catastrophes at all.

We are going to break this down into do-able tasks. And now that you have finished Task 1, you're ready to roll on to the next task. My 72-hour kit is made up of three separate containers: a five gallon bucket with a lid, a good-sized rolling cooler, and a small-ish duffel bag. When we had kids in the home, their items were kept in their own large school backpack. You can read more about containers (Task 1) here.

Task 2 will involve the food for your 72-hour kit. Now, I basically have two different 72-hour kit lists. One is for each of the kids' items, which are kept in their own backpacks. And the second list is for Bob and I. Even when we had kids in the home, Bob and I kept our food items combined with the main 72-hour kit (instead of us also having to carry backpacks for ourselves). I hope that makes sense. For those of you without kids in the home, you won't have to worry about a list for your kids' items. For those of you who have others living in your home, you'll want to keep up on both lists.

On to Task 2. I keep all of Bob's and my food items in the 5 gallon bucket. Again... when we had kids in the home, their own food items were kept in their own backpacks.

For the parent(s), the food items that are kept in the 5 gallon bucket are as follows:
-hard candy (1 package of something like Jolly Ranchers or Lifesavers)
-water bottles (4)
-chunky soup (4 cans)
-chili (2 cans)
-tuna (4 cans)
-granola/cereal bars (12 bars)
-honey
-peanut butter
-fruit leather (12)
-roasted, salted almonds (1 pkg)
-crackers (2 pkgs)
-beef jerky (2 pkgs)
-salt and pepper

For the kids' backpacks, the food items are as follows:
-hard candy (1 package of something like Jolly Ranchers or Lifesavers)
-water bottles (2)
-chunky soup (2 cans)
-chili (2 cans)
-tuna (1 can)
-granola/cereal bars (6)
-fruit leather (6)
-roasted, salted almonds (1 pkg)
-cracker/cookies (2 pkgs)
-beef jerky (1 pkg)

There will be some nay-sayers out there who think that this is too much or too little, or who think that we should be using dehydrated food so that it lasts longer and is lighter to carry. You can and should adjust this list for what you think your family might need. I try to keep in mind that we don't have to eat like kings for the 72 hours. We all will just need to survive, which I think we can do with this list. I don't like the idea of dehydrated food for my kits, because I don't want to have to rely on a stove to cook the food. All of the food in my kits can be eaten out of the can without warming it up, if needed. It may not be our first choice of how to eat it, but we could do it in a pinch. Part of our 72-hour kit is a little propane stove (which we'll get to later on), so we definitely could warm our food, but we wouldn't have to.

So, adjust this list to what you think you'll need for your family. And when you have a good list, start working on accumulating the items. It may take a couple of weeks to gather it. You could take from the stocks you have on your shelves, but be sure that the expiration date is at least a year away, so that you can rotate through the food when you check it next year. Put the items you need on a grocery list, and when you are at the store in the next couple of weeks, pick up the items. Once you have them, divvy them out to either your 5-gallon bucket, or your kids' packs, wherever they belong.

This is also a good time to figure out where you will keep your 72-hour kits. It should be in a place that is easily accessible for an emergency grab. A coat closet or pantry or some such place works nicely. We have ours in a closet right by the door leading out to our garage. We all know where it is, and it would be easy to grab during an emergency. Be sure to clear the space now and keep your containers there as we fill them.

Start working on Task 2. We'll give you a good couple of weeks to complete this task, and then we'll move on to Task 3.

To read each of the posts about the 72-hour kits, or to find instructions on how to receive an email with the complete 72-hour kit lists, click on the tab above.