Showing posts with label house decorating. Show all posts

Thursday, January 7, 2016

Big Project -- Painting the Main Floor, Part 1

I have been wanting to repaint most of our main floor for several months now, so I made a promise to myself that I'd start as soon as I could after the new year. It's a pretty big project, since there are several rooms that flow into each other. Which means that every one of those rooms needs to be painted if you paint any one of them. I started on one end (the family room), and will move to the kitchen, the stairway, the hallway, the living room, the dining room, and the entry. In that order, hopefully. 

We've had a straw yellow paint color for 17 years now, so I felt it was time for a fresh coat and a fresh look. I chose a light, warm gray. I actually painted my bedroom in that color a few years ago, and I have loved it, so I knew I would love it in these areas too. 

This is the family room after I've taped it off and prepped it for painting. Yellow walls that need freshening!


The first day of painting, I had so many things crammed into the day, that this is all I got done in the two hours that I was able to paint...


The next day (yesterday), I got to it and got a first coat on the whole room before my husband came home from work. We ran out to Taco Bell (this is how we eat when we're doing projects), came back and he helped me run a second coat over everything. Can I just tell you how much faster it is when one person is rolling and the other is cutting in? It goes lickety split.

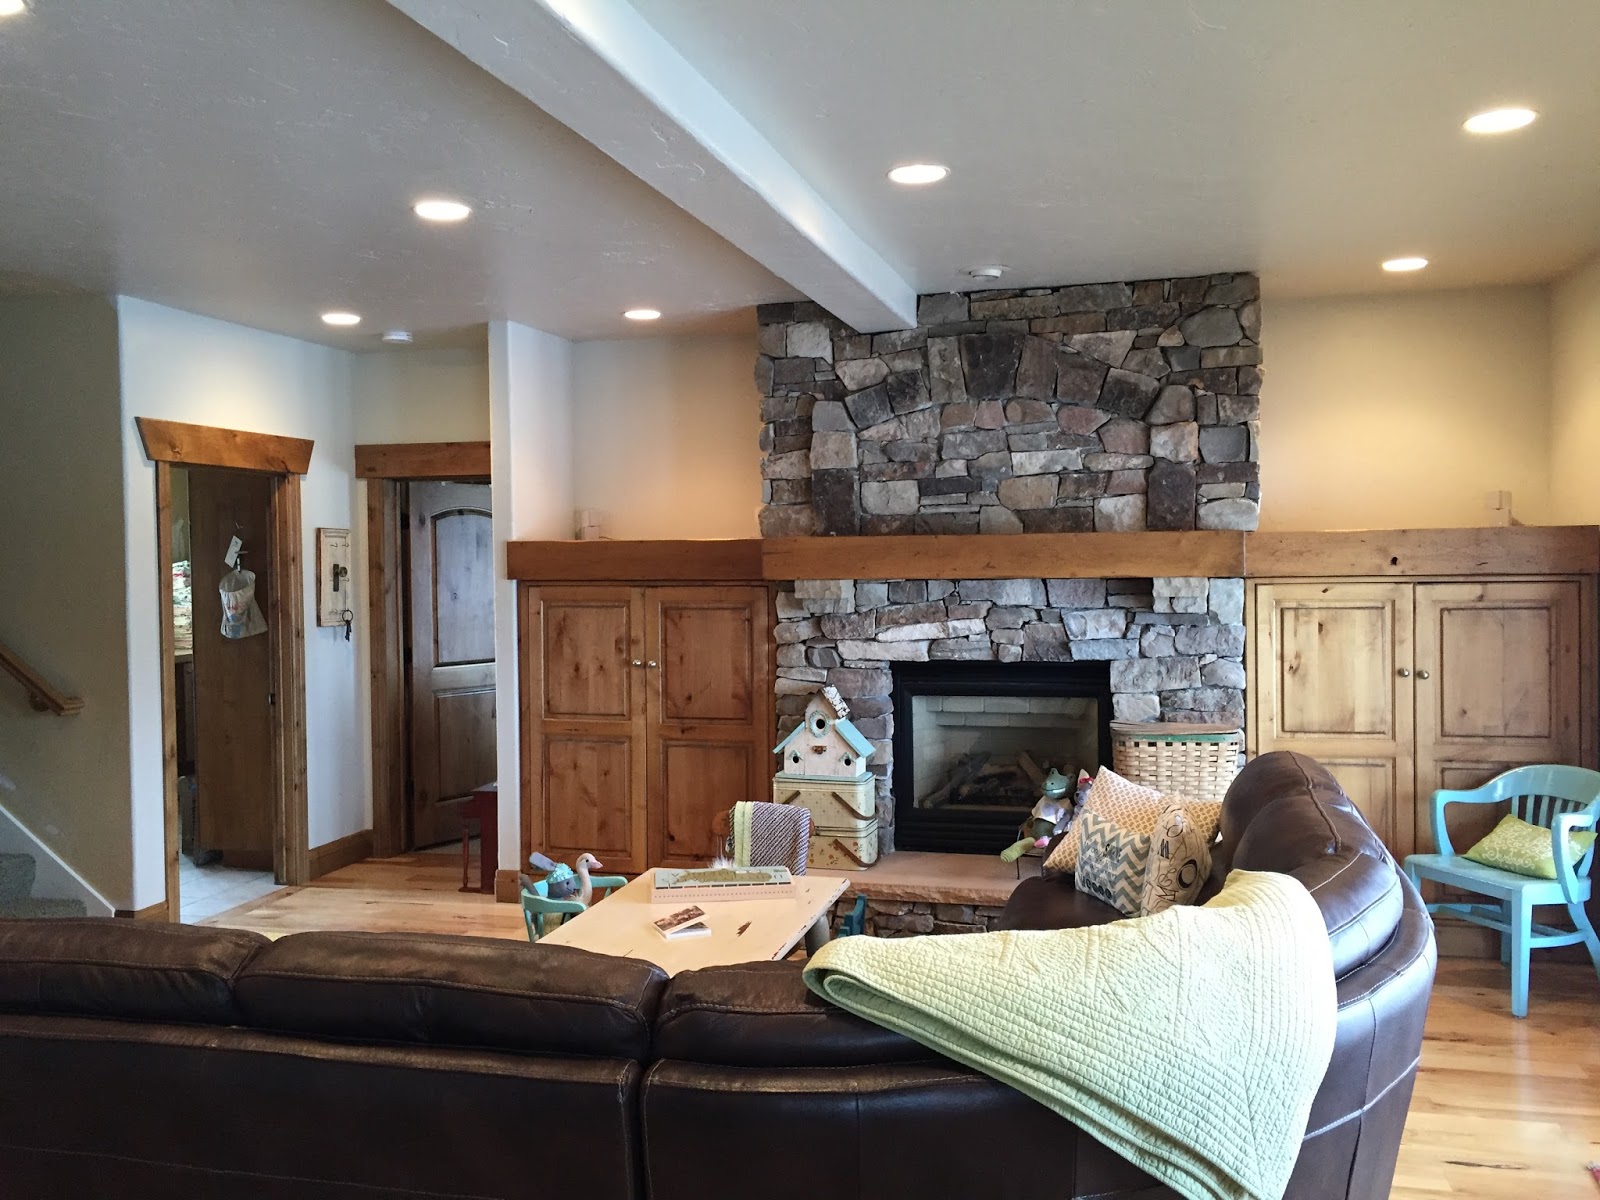
So... we've got one room down. I haven't put anything back on the shelves yet, but you get the idea. I love this look. I really, really love the gray with the stone and the warm stained wood tones. It still looks yellowish in some places, because of the lighting, but it's a beautiful gray. 


I can't wait to get started in the kitchen. I'll be taping and prepping today. And maybe starting to paint, even. Yay!

When I get a minute, I'll share some of the tools and tricks I've learned along the way. There are some great products out there that help to make things go really smoothly.

Thursday, October 29, 2015

Halloween Decorating, Easy Style

Halloween is coming and going in just a flash. Can't believe how quickly this month has flown by! It may have something to do with being gone for 9 days smack dab in the middle of it, but more on that in another post.

I did my usual quick and simple Halloween decorating this year, keeping in mind that we have seven grandchildren, 2 years and under, so whatever I have within reach needs to be touchable and even playable. Notice all of the things in the picture below, that are at child-level. They can play with the ghosts, car, pumpkin and scarecrow to their heart's delight.


We went up to the cabin and cut some gorgeous maple branches to begin with. I don't care a bit that the leaves curl up and shrivel a little. I am so in love with the color that I don't even notice it. I wonder if people who come to my house try to figure out why I have branches of dead leaves strewn all about. Oh well. Maybe it adds to the spooky effect?


After I placed the leaves around, I just took out one box (Yay!) of Halloween decor, and placed items here and there around the house.


I don't love the creepy or gory side of this holiday. I don't even really like dressing up. (My costume usually involves an orange jack-o-lantern t-shirt, or some such thing.) But I do love how much the kiddos love it, and I love to see their costumes and how excited they get. I love fall and the smells and colors of it. So.... that's pretty much how my decorating goes. Oh, and some Fisher Price Halloween toys to go along with it all. After all, I'm a grandma, and the littles need to have lots of fun at our house!


The best thing about fall decorating with branches as the base, is that the day after Halloween, I just take out the Halloween-specific items, and throw in a few Thanksgiving ones, and voila! Another holiday decorated for! Fall decorations seriously can last for more than two months. I sure wish Christmas decorations could be up that long, because they take the most work.

How much do you love this old Alfred Hitchcock book? It's the perfect Halloween decoration!


Another good thing about gathering branches and leaves as your base for decorating? You don't have to store them. You just toss them in the garbage when Thanksgiving is over! Doesn't get any easier than that!

And last night we had a trunk-or-treat in the church parking lot. I'm generally not a fan of the old trunk-or-treating in our neighborhood, simply because the kids that show up to trunk-or-treat are the the exact same kids who show up at our house only a few days later for round #2. Does that sound Humbug-ish? Maybe. But I've always thought trunk-or-treating was great for areas that might be iffy to trick-or-treat in, or if your church group was spread out over a large area, but wanted an opportunity to trunk-or-treat together. That makes so much sense. But going to the same car trunks as the houses they will trick-or-treat to a couple of days later seems a little much. Having said that, we whole-heartedly got into the spirit of things, because I certainly know the kiddies love getting twice as much candy, and I also know that if I was one of those kids, I would have loved the heck out of it.


We decided to decorate the tractor and use that as our "trunk", since Bob is known for his tractoring around these parts. I had a little bug the day I was planning on decorating it, so I literally opened a closet or two, pulled out some things, cut a few vines off of an errant (understatement of the year) trumpet vine, and draped them all over the bucket of the tractor. Done.

Thursday, February 19, 2015

Map-Lined Den Doors

We have glass-paneled doors for our den. Originally, I thought I would love having the glass to look through into the den, but our painters did me wrong in that regard. When they were trying to get the painters tape off the glass, apparently they had very fresh blades in their Exacto knives, because they left scratches all along the sides of the glass. So much so that you can see them very clearly. And unfortunately we didn't notice for a while, and they were ... shall we say ... hard to track down, so we just had to live with it. For a while, I covered them with fabric from the inside, but I needed a fresh new look, and I wanted it to be more in the blue tones, to go with the rest of our entry way. 

And then the idea struck to use a map. A really big map. I tracked one down, and cut it to size. I have it tacked down on the inside of the doors. I didn't want it to be permanent, just in case down the line I wanted a change.  


It's a fun look that covers the windows well, and it was very reasonable. In fact, it would be cute to use old maps and do parts and pieces backing the windows. 


I love those quick, inexpensive projects that make a big statement. And on to the next...

Thursday, February 6, 2014

Sweet Pea Baby Shower

The baby shower turned out great! My daughter Whitney planned out all of the decorations while I was with my husband floating in the ocean somewhere around Panama. She is amazing, and it makes me think I'll need to plan another trip right before the next event I have at my home.

The theme was "Sweet Pea". We couldn't do a boy or girl themed shower, since we don't know the gender of the baby yet. 

I had my niece Joanna design the invitations. She is so very talented at everything graphic arts.


I wish I had taken photos of the food table all laid out with the scrumptious food. But, that was right when the festivities were starting, and I was otherwise occupied. Suffice it to say, it was all delicious. My friend Kristen made the frosted sugar cookies. Divine. In fact, before things even started, my husband was on his way out to a meeting, and wondered aloud whether I had stashed some away for us to have later. Indeed I had. Probably more than we need, but I've definitely got us covered for a while. We also had a fruit plate and a delicious cheese ball with crackers, and personal vegie cups.

Of course we couldn't just serve plain old water bottles. I bought a brand with a plastic label, which made it really easy to remove. And then I just tied a small piece of green tulle around each bottle. So easy, and it doesn't matter if the tulle gets wet or cold, or whatever. It looks great no matter what.


And at the end of the buffet was where the guests could cast their ballot as to which gender they think the baby is.


And I'm pleased to announce, the "he's" have it. If the ladies have anything to do about it, the baby is a boy!

Here are some of Whitney's darling decorations...


She made the darling felt raindrops and hung them from "clouds" to hang over the gift area... a baby "shower". So cute!


We had the guests put the gifts in our old bassinet. My mom had her own babies sleep in this very same bassinet, and I had mine sleep in it too. It originally cost my mom $18.00. I'd say we got (and are still getting) our use out of that! I love it!


Garlands made by Whitney.


Dishes of candies and gum, all looking a lot like peas.


More pea decorations...


Whitney helped me put these favors together for the guests as they left the shower...


Sunday, December 8, 2013

JOY Christmas Sign


I remember seeing a sign similar to this floating around the internet last year. I ran out of time to make one last year, so I grabbed a big scrap of plywood from my husband's scraps, and put the board in my holiday storage closet so that this year I could actually make myself that sign. When I pulled out my holiday decorations, I noticed the board and was excited to get working on the project. It was EASY. So easy. And absolutely no cost. I used scrap wood and paint I already had. Yay!

I left the plywood the size it was when I found it, but it could be made in any size that works for your home. I painted the wood a creamy white. It only took a couple of coats of paint, and dried quickly.


I didn't want it to be perfect, like it would be if I had made templates with my Silhouette, so I just decided how tall I wanted my letters, and drew block letters on craft paper. I made sure the letters were all the same height and that the thickness was pretty close to the same for each letter.

I cut the craft paper letters out and laid them on the board until I liked their positioning. I taped them in place so they wouldn't shift around while tracing them. I just used a regular pencil and traced the letters onto the board.


After tracing, I followed the pencil line with a paintbrush, using red paint. You can see here that I basically outlined the letter first, and then filled it in afterwards.


The letters took just a couple coats of red paint. I wasn't really concerned with them being perfect. I just did my best with my paintbrush, and that was plenty good enough for this project!


After the paint dried, I took my electric sander to it to give it some age. And then I used a little bit of glaze and rubbed it on all over the sign, rubbing it off with a cloth almost simultaneously with rubbing it on.


Then, I coated the whole thing with three coats of exterior varnish, and that's it! It was super simple, and didn't require me to go out and buy anything at all. (Oh, how I love that kind of project!)


Monday, November 11, 2013

From Halloween to Thanksgiving Decorations

I LOVE this time of year. I love the warm colors of fall decorating. Everything feels so cozy and pleasant!


I make the transition from Halloween to Thanksgiving decorating really easily. This year I made a sign that has a Halloween side and a Thanksgiving side.

I started with it on the Halloween side...


And as soon as Halloween was over, I turned it around to the other side...


I still have the same stack of books, old window, and dried fall leaves as a backdrop for the decor.


I've just taken out the Halloween decorations and replaced them with a few Thanksgiving things. Really, on my mantel, the only things that I have up there that are specifically Thanksgiving, are books and the sign.


And because I collect old postcards, I always bring a few out to set in my card holder.


The dining room is pretty simple, too. I had just a few things in it that were truly Halloween, so I put them away, and left the table and sideboard with just fall and Thanksgiving things.


I was roaming through the aisles of the grocery store and saw these rolls of twine for $1.29. I picked two of them up and stuck a couple of candlesticks in them. So easy, inexpensive, and I'll be able to use the twine afterwards for other things. Love it!


And on the back of the chairs, I tied a little sprig of fruit and leaves with a sheer gold ribbon. The sprig was on sale at Joann for 40% off, so they were pretty darn cheap!


I have more Thanksgiving things (pilgrims, turkeys, cornucopias, etc) in my storage room, but I'm liking things just like they are. And besides, I do have one set of pilgrims and Indians out. When you're a grandma, you unabashedly add things like this to your decor.


The grand baby loves it, and I love that there is something within his reach that he can play with to his heart's content!

I think I'll call it "done" for this year. Simplify, Dayna, Simplify.