This is one of those weeks that is a "catch-up" week. My weekly plan consists of four weeks per month, but there ends up being four times during the year with an extra week. So, I use these weeks to go through and organize my food storage room and shelves. If I fell behind just a bit in the past weeks, then I can make up the time this week, also.
If you are totally organized and up-to-date, and don't need to work on getting things spiffed up, then you just have a week off, plain and simple. Yay! Doesn't a week off sound pretty darn good? And then you'll be so ready for next week, when we dive right back into our plan.
Now, I received an email this past week, and I want to address that while also reiterating it here: If you didn't start this plan back at the beginning of the year, it doesn't matter one bit. This plan is designed so that you can start it at any time of the year. There is no beginning and no end to it. You just start wherever we are in the calendar year, and a year from that time you will have gone through all of the weeks of preparation, and then you'll continue on through the weeks and rotate and re-aquire when needed. I don't want anyone to think to themselves that they are behind four months, or that they should just wait til next January to start. That isn't how this baby works. Start today! (and if you really ARE starting this week, and notice there is nothing to do this week, just work on getting your food storage space or area ready for next week)

Tuesday, April 29, 2014
Sunday, April 27, 2014
Backyard Paver Project and Splash Pad
Where in the heck have I been? Just about everywhere, but in front of the computer.
We've had a lot of pans in the fire these days. And since I'm not the best multi-tasker, it has made me a little bananas. Okay, maybe a lot bananas. Anyway, we're still plugging away at them, and the backyard project is nearing the end. We had our pond removed after 14 years. We LOVED having it and loved the fish, and the beautiful sound of trickling water, but when our first grand baby was born over a year ago, we made the decision that the pond would go in the spring after he turned one. We didn't need the worry of having a pond that would be a danger to the little ones. So, we started thinking about what we wanted instead, and came up with the idea to extend our patio out over where the pond was, and to move the fire pit down to that area, too.
So, these next several photos are what we began with. Keep in mind that these pictures where taken on April 5. I hadn't had the time to clean the yard up from the winter kill, so it's all looking a little drab. The lawn was still pretty grayish from the winter, too.
This photo is looking from our cement patio out towards our pond. You can't see the pond here, but it's just after that horizontal row of rocks along the grass.

And here's a photo of the boulders that lined the stream, which emptied into the pond.

More boulder-lined stream bed...

And this is the opposite end from the pond. We have a driveway in the backyard that goes to a garage outbuilding. So, this section of grass sloped up in a sort of ramp to the driveway.

And this is a closer look at the pond.... looking a little green and full of leaves.

These stairs and brick pathway were laid by my husband. He did a great job with that project!

A photo from the pond end of the area, looking towards the other end.

So you see, we had our work cut out for us.
We had a couple of companies come and give us bids on removing the pond and rocks, and installing a paver patio. We found one that said he could finish in time for our annual extended family Easter egg hunt, so we gave him the green light and sat back and crossed our fingers. And that was 2-1/2 weeks before Easter. They swore up and down that they would be done, and we didn't have to give them any money beforehand, so I figured they must really know they could hit the deadline.
We needed loads and loads of rocks hauled away before they could even begin removing the pond. After having them all hauled in 14 years ago, it was a little hard to see them all hauled away. That is, until I heard that the workers found a bunch of snakes (their words: a BUNCH) all in the rocks. After I heard that, I had a smile on the whole time they were hauling rocks away. See ya, wouldn't want to be ya.
So, they hauled all the rocks away. It took them several loads in their trailer, and lots of hard work.

Finally, on April 9, they came and started hauling rocks away and moving dirt. This is a photo of the same area as above, the morning after they hauled a bunch of rocks away.

Looking towards what used to be the pond.

The tractor that plucked the rocks out and dropped them into the trailer


The old pond area.

This is about the time that my mom and sister happened to drop by. We weren't home, so they went around back to see the progress on our big project. Needless to say, I think they were dubious about the job being done in time for our Easter egg hunt and barbecue. My mom sent me an email later that night asking if I wanted her to try to do it at her place, bless her heart. I told her, "Oh no. The guys will for sure be done. No problem." All the while, I was hoping that those words wouldn't come back to bite me.
Then, on April 15, we started seeing marked improvement. Four days left til the Easter Egg Hunt. Could they do it?


The spot for the new splash pad!

And on the 18th, the day before our big family Easter gathering, the guys were working til about 10:30 that night...
These are the new stairs and walkway where our old stairs had been.

This is a set of stairs that is right where our waterfall used to be, which dropped right into the pond. The stairs lead to a pathway that follows along where the stream used to be.

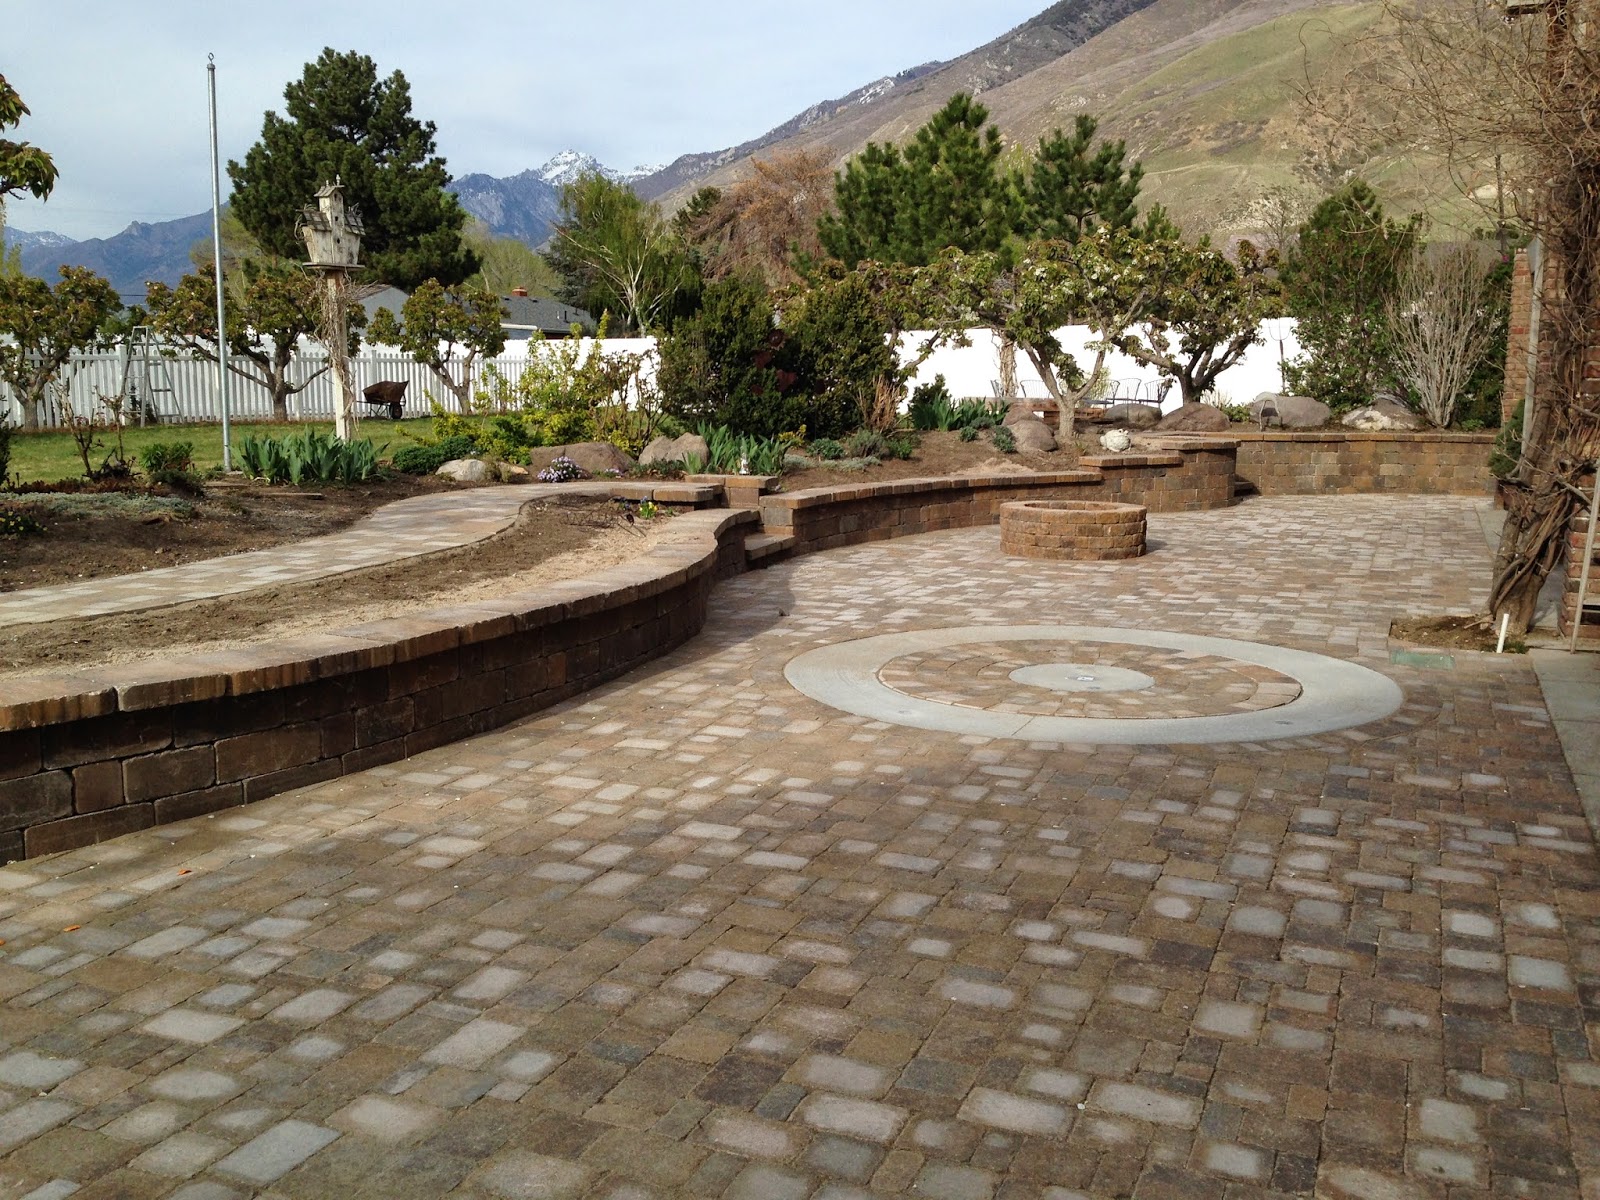
Nice beautiful paver wall where the stones used to be. And it's low enough so that you can sit on it, which provides lots of seating.

Since I didn't want a pool in our yard, we decided a splash pad would be safer and easier to maintain. And we're sure the grand kids will love it! The splash pad is in the circular cement area. The outer ring has the splash nozzles, and the inner cement area has a couple more nozzles and a drain.
And there is the sweetest man in the world, picking up something or another that was leftover from the big Easter festivities. The stairs behind him lead up to that driveway that is in our backyard.

Obviously I didn't have time to get plants in before our gathering, but that will come in good time. The yard was all usable, and beautiful, and mostly finished. The splash pad wasn't completely hooked up at the time, but we weren't planning on using it then, anyway.
So, my doubts have been put to rest, and I have a renewed faith in mankind. I was pleased and actually surprised that it was mostly done and usable. The kiddos had fun hunting Easter eggs, and we all had fun eating and visiting on that incredibly lovely, warm day!


We've had a lot of pans in the fire these days. And since I'm not the best multi-tasker, it has made me a little bananas. Okay, maybe a lot bananas. Anyway, we're still plugging away at them, and the backyard project is nearing the end. We had our pond removed after 14 years. We LOVED having it and loved the fish, and the beautiful sound of trickling water, but when our first grand baby was born over a year ago, we made the decision that the pond would go in the spring after he turned one. We didn't need the worry of having a pond that would be a danger to the little ones. So, we started thinking about what we wanted instead, and came up with the idea to extend our patio out over where the pond was, and to move the fire pit down to that area, too.
So, these next several photos are what we began with. Keep in mind that these pictures where taken on April 5. I hadn't had the time to clean the yard up from the winter kill, so it's all looking a little drab. The lawn was still pretty grayish from the winter, too.
This photo is looking from our cement patio out towards our pond. You can't see the pond here, but it's just after that horizontal row of rocks along the grass.
And here's a photo of the boulders that lined the stream, which emptied into the pond.
More boulder-lined stream bed...
And this is the opposite end from the pond. We have a driveway in the backyard that goes to a garage outbuilding. So, this section of grass sloped up in a sort of ramp to the driveway.
And this is a closer look at the pond.... looking a little green and full of leaves.
These stairs and brick pathway were laid by my husband. He did a great job with that project!
So you see, we had our work cut out for us.
We had a couple of companies come and give us bids on removing the pond and rocks, and installing a paver patio. We found one that said he could finish in time for our annual extended family Easter egg hunt, so we gave him the green light and sat back and crossed our fingers. And that was 2-1/2 weeks before Easter. They swore up and down that they would be done, and we didn't have to give them any money beforehand, so I figured they must really know they could hit the deadline.
We needed loads and loads of rocks hauled away before they could even begin removing the pond. After having them all hauled in 14 years ago, it was a little hard to see them all hauled away. That is, until I heard that the workers found a bunch of snakes (their words: a BUNCH) all in the rocks. After I heard that, I had a smile on the whole time they were hauling rocks away. See ya, wouldn't want to be ya.
So, they hauled all the rocks away. It took them several loads in their trailer, and lots of hard work.
This photo is from April 8. Still no change in the yard, and I was starting to feel panicky, but trying to stay optimistic.
Finally, on April 9, they came and started hauling rocks away and moving dirt. This is a photo of the same area as above, the morning after they hauled a bunch of rocks away.
Looking towards what used to be the pond.
The tractor that plucked the rocks out and dropped them into the trailer
The old pond area.
Then, on April 15, we started seeing marked improvement. Four days left til the Easter Egg Hunt. Could they do it?
The spot for the new splash pad!
And on the 18th, the day before our big family Easter gathering, the guys were working til about 10:30 that night...
These are the new stairs and walkway where our old stairs had been.
This is a set of stairs that is right where our waterfall used to be, which dropped right into the pond. The stairs lead to a pathway that follows along where the stream used to be.
Nice beautiful paver wall where the stones used to be. And it's low enough so that you can sit on it, which provides lots of seating.
Since I didn't want a pool in our yard, we decided a splash pad would be safer and easier to maintain. And we're sure the grand kids will love it! The splash pad is in the circular cement area. The outer ring has the splash nozzles, and the inner cement area has a couple more nozzles and a drain.
And there is the sweetest man in the world, picking up something or another that was leftover from the big Easter festivities. The stairs behind him lead up to that driveway that is in our backyard.
Obviously I didn't have time to get plants in before our gathering, but that will come in good time. The yard was all usable, and beautiful, and mostly finished. The splash pad wasn't completely hooked up at the time, but we weren't planning on using it then, anyway.
So, my doubts have been put to rest, and I have a renewed faith in mankind. I was pleased and actually surprised that it was mostly done and usable. The kiddos had fun hunting Easter eggs, and we all had fun eating and visiting on that incredibly lovely, warm day!
And now that that is pretty much buttoned up, I can do the landscaping and we can work on our grandchildren's play area, Limberlost. Fun projects ahead!
 |
| Splash pad -- up and running! |
By the way... the water pressure on the splash pad can be adjusted to any height. When they first turned it on, it shot up higher than our house, which is pretty high, considering the splash pad is on the basement level, and our house is two more stories above ground! We have it adjusted down to a nice easy-going height so it will be just right for the little ones.
Tuesday, April 22, 2014
April Week 4: Ready dinners
This week's items for the Week-by-Week Food Storage Plan is:
April Week 4: Ready dinners -- boxed, frozen, MRE's
As with other weeks, decide exactly what your family uses in a year's time. When our kids were younger, and I was running them around in the afternoon hours, we ate "ready dinners" more often than we do these days. If you have a boxed dinner that you like to throw in your meal schedule, then decide how many times you may use that in a year's time, and add that to your shopping list.
I do like to have a frozen stir-fry meal on hand to use once in a while. We probably realistically use them only 4-6 times a year, so I'll put that on my shopping list and stow them away in the freezer for a rainy day.
If you like to store MRE's (stands for Meal: Ready to Eat) in your food supply for long-term storage, this would be the week to be sure you have what you need of those items. There are many great companies out there that have a wide variety of MRE's, and it might be a good time to research and find a company that sells the products that fit your family's needs. Emergency Supply (one of many, many on-line emergency supply resources) happens to have a sale right now on MRE's for one week. Click here to find out more about that.
You may not want to purchase MRE's for your family's needs, and you may not use any other boxed or frozen ready dinners. In that case, you have a "week off", and you can work on organizing your food storage space.
Add any items to your shopping list that you want to store under this week's category. Next time you're at the grocery store, pick up the items and get them on your shelves. Check. Done for the week!
If you would like the full info on the Week-By-Week Food Storage Plan, just click on the tab at the top of the page. You can then click on any single week and it will take you to the most up-to-date post that featured that week's items. It also has the information as to how you can get a copy of the weekly schedule as well as the complete inventory sheets.
Sunday, April 20, 2014

Friday, April 18, 2014
Playroom Project #1: Wood Floor in the Playhouse
We've got the first project in our play room done, and it was a biggie! The playroom is taking over a room that was previously our older son's room. He is married and living with his darling wife, so the room is our blank canvas now. The first order of business was to get all of his (and our other son's) stuff out. Still working on that a bit, but we're making progress. I still have a couple of pieces of furniture to move out, too.
In addition to a regular clothes closet, he had a closet that was a bit shorter, and tucked in under the roof line. We thought that would make a perfect place for a playhouse for the grand kids. Once we got all of the old boxes and storage items out of the closet, we realized we had a roof leak, and a mold problem. We had the roof fixed, and then tackled the mold project. To read about how we got rid of the mold, click here. Once that was all taken care of, we had a bare floor to start over on.

We decided that a laminate wood floor would be perfect for a playhouse. Easy to sweep or wipe clean!
We bought all of the supplies for the wood floor at Home Depot. Once we bought the wood, we laid the stacks out in our home for a couple of days to acclimate them to the temperature and air in our home.


It's fairly easy to lay. It has a piece of adhesive tape along the back that overlaps so that each of the pieces butt up next to each other, and are held together with that long strip of tape.

Once the backing was in, the floor went in right on top of that. The floor is a snap and lock type, so there is no need for nails or glue. It floats on the surface. Oh.... hello there, cutie!

It went together very quickly. The only places that needed a chop saw were along the one edge.

And here is the floor completed. The blue tape is a rough plan for where the little cabinets will be going. You can see the white quarter-round base moulding along the back in the photo below. It isn't attached yet. We're waiting til we put the cabinets in, and then we'll do the moulding.

The finishing touch was to put the little threshold that transitions the carpet to the wood floor. It looks awesome! Bob did such a nice job laying the floor. And our little grand son has already traipsed around inside of the future playhouse. I think they will enjoy that for many years to come.

Now on to the next project!
Tuesday, April 15, 2014
April Week 3: Emergency Sewing Kit
For this week, the Week-by-Week Food Storage items are:
April Week 3: Emergency Sewing Kit: thread (upholstery thread), pins, needles, buttons, tape measure, scissors, etc.

The nice thing about this week's items are that once you have them on your shelves, they should stay there and you shouldn't have to replenish every year (in theory, that is!).
I keep my sewing kit and threads in a bin that also has some medicines and first-aid items. Store the items you think you'll need in a sewing kit. I keep both regular thread and upholstery thread. Upholstery thread is quite a bit stronger than regular thread.
You can find a little sewing kit with some of the basics at Joann's (or other craft stores), or you can put one together on your own. Gather a few of the necessary items, and put them on your shelves, and voila!... you're done for the week! I do check them every year as the week comes up... just in case someone has found my scissors or thread and "borrowed" it from my bin.
Remember... this is a plan that can be started any time during the year. You don't have to wait until the first of the year, or even the first of the month. Start this week, and move along from week to week. It is a continuous plan, so there really is no end to it, anyway. You will check on your food supply and replenish (if needed) once a week from here on in. It shouldn't be an overwhelming thing to think about, though, because it literally only takes a few minutes a week and can easily be integrated into your normal grocery shopping.
If you would like the full info on the Week-By-Week Food Storage Plan, just click on the tab at the top of the page. You can then click on any single week and it will take you to the most up-to-date post that featured that week's items. It also has the information as to how you can get a copy of the weekly schedule as well as the complete inventory sheets.
Thursday, April 10, 2014
Spring Is Everywhere!
Now that it is April, spring has come on every where I look. A few morning ago, I was trying to sleep, and early in the morning I could hear the most beautiful songbirds chirping and singing so happily. I couldn't be annoyed by it... it was just to sweet of a sound. A little later on, I was out on the deck, and this is what I found right outside of my bedroom. I mean right outside. Like 5 feet from where our bed is.


If you look closely enough, you can see mamma's tail feathers towards the right. She's been sitting on those eggs so faithfully.
Funny thing is, I cleaned all of those lanterns out last year, which included cleaning old nests out of them. I guess the house finches won't let something like that stop them from rebuilding.
The yard is really waking up, and starting to show some lovely colors.
The ground is still pretty barren, and some of the perennials are just starting to do their thing, but its always such an amazing time of year in the garden. Almost daily, you can find things that have appeared that weren't there the day before.
And my front yard wisteria is going to have another good year.
Those fuzzy little nubs will become luscious gorgeous wisteria blossoms. Can't wait!
I've got loads to do out in that dirt this year. Hopefully this weekend the weather will cooperate, and I can get some things crossed off my list. We've got big things and big changes happening in our yard this year. Hopefully it all works out the way we're hoping and planning!
Tuesday, April 8, 2014
April Week 2: milk, etc.
This week's Week-by-Week Food Storage items are:
April Week 2: Dry milk, evaporated milk, sweetened condensed milk, chocolate milk, hot cocoa mix

Again, think of these items in two ways: long-term storage and also shorter term. For long-term storage, I store powdered milk, hot cocoa mix, and Morning Moo's milk chocolate drink. I don't ever open those in the course of a normal year, so those will sit on the shelves for quite a while.
For shorter-term storage, I stock up on evaporated milk and sweetened condensed milk. I figure out what I will go through in a normal year, add a few to that number, and get them all on the shelves. I also am careful to use these items so that they are rotated through and don't have a chance of expiring.
One of the great things about this system is that I almost always have everything I need on my shelves for any given recipe (except of course fresh items). I never completely run out of anything, so I'm never in a panic to run to the store to get an item I'm in desperate need of. Its an easy system to start and an even easier one to maintain throughout the coming years.
If you would like the full info on the Week-By-Week Food Storage Plan, just click on the tab at the top of the page. You can then click on any single week and it will take you to the most up-to-date post that featured that week's items. It also has the information as to how you can get a copy of the weekly schedule as well as the complete inventory sheets.
Friday, April 4, 2014
Recipe: Fruit Salad
The other night, I was asked to bring a salad to an event, and brought this gem. Its a recipe that I've had for years and years, and never fails to please. Its easy, and best of all it is a fruit salad that can be made just about any time of the year. The main fruit in it is apples, so it is a wonderful winter fruit salad as well as any other season! The sauce is thick and yummy!

The recipe is as follows:
Fruit Salad
sauce:
1 small package dry vanilla pudding (cook-type)
1 small package dry tapioca pudding (cook-type)
2 c. orange juice
1 c. pineapple juice
fruit:
any fresh fruit except melons
can use apples, pineapple, grapes, bananas, strawberries, raspberries, etc.)
for a large salad, feeding 12 people, I used
-5 Fuji apples, diced
-2 cups fresh pineapple, cut into small pieces
-2 cups grapes
-3 large bananas, sliced
-1 pint strawberries, sliced
Combine the dry pudding mixes and the orange juice and pineapple juice in a saucepan. Stir over medium heat until the mixture thickens and comes to a boil. Remove from heat and let cool.
Combine all of the fruit in a large bowl. Pour cooled sauce over all the fruit and fold in, to cover all of the fruit. I like to mix my salad up in a large bowl and then pour salad it into a pretty bowl for serving. Enjoy!
Tuesday, April 1, 2014
April Week 1: Pasta
We are in a new month! Accordingly, our color for this month is yellow, and you will find all of this month's items highlighted in yellow on the inventory sheets. Just trying to make this whole process as easy as can be!
This week's food storage items are:
April Week 1: Pasta - all types, including mac and cheese and packaged pasta dinners

This week's list will be short or long, depending on the pasta that your family consumes in a year. For my family, we are finding that we like the whole wheat pasta quite a bit, so we are trying to replace the regular pasta with that whenever we can.
Think about the recipes that you make that call for pasta: casseroles, spaghetti, lasagna, salads, etc. Write down the types of pasta that are used in the recipes and decide how many times in a year you'll be likely to make those dishes. You'll end up with a good list of the pastas you will need in your storage. Remember that this system is specifically designed to help you rotate through and use your food storage, so whenever you make any food using pasta in the coming year, take from your food storage. If you acquire a nice supply of foods, but don't rotate through them, you'll end up throwing a lot of old food away, and that is a huge waste of time and money.
My husband and I don't eat much mac and cheese (okay, we don't eat ANY mac and cheese, and since my macaroni-loving son is now married, we won't need to store any for him). I'll store just a few boxes of mac and cheese since I've got grandbabies that are just now entering the mac and cheese world.
Are there any other pre-packaged pasta dinners that your family eats? If so, be sure to include them on the master list.
I told you last week about the Family Home Storage Center. (To read last week's post detailing the Family Home Storage Center, click here) Believe it or not, they also have pasta, and I have canned both macaroni and spaghetti. They are good for 30 years, so those are definitely long-term items that I don't open up unless I truly need to.
You should have a good list of items to add to your grocery list. Next time you get to the grocery store, pick up these items and get them on your shelves at home. You can now rest for the week, knowing you have something your family actually will eat, on your food storage shelves. Yay!
If you would like the full info on the Week-By-Week Food Storage Plan, just click on the tab at the top of the page. You can then click on any single week and it will take you to the most up-to-date post that featured that week's items. It also has the information as to how you can get a copy of the weekly schedule as well as the complete inventory sheets.
Subscribe to:
Posts (Atom)